
Ruby on Rails
This tutorial will show you how to use the Lokalise Ruby SDK to create webhooks, listen to webhook events in third-party apps, and handle incoming notifications.
In this tutorial you'll learn how to...
- Work with Lokalise API tokens
- Create webhooks with the Lokalise API
- Listen to webhooks events
- Handle incoming notifications
You canfind the source code on GitHub.
Prerequisites
This guide assumes that you have already created a Lokalise project (if not, learn how to create a new project in this guide). Also, you'll need a read/write Lokalise API token; you can learn how to get one in the corresponding article. Alternatively, you can implement an OAuth 2 flow as explained the corresponding article and act on the user's behalf.
If you want to follow this guide locally on your computer, you need to have the following software installed:
- Ruby 2.7 or above
- Rails 6 or above
- Your favorite code editor
- Heroku CLI
Finally, please note that in order to listen and respond to webhook events, your app must be publicly accessible. In this tutorial, we'll deploy our app to Heroku (see below).
What we are going to build
We are going to create a simple application that will allow users to register webhooks in their Lokalise projects. The app will also listen to incoming notifications generated by these webhooks and react to them by sending API requests.
Preparing a new Rails app
Create a new Rails app by running the following command:
rails new LokaliseWebhooksDemoThis is going to create an application skeleton for you.
Open your Gemfile and modify it in the following way:
group :development do
  gem 'sqlite3', '~> 1.4'
end

group :production do
  gem 'pg', '~> 1.0'
end

gem 'ruby-lokalise-api', '~> 6.0'
cd into your project's directory and run:
bundleNext, create a Procfile with the following contents:
web: bundle exec puma -C config/puma.rbThis file will be used on Heroku cloud hosting. If you are using a different hosting provider, you might need to take additional steps.
Finally, initialize a new Git repo and create a new Heroku app:
git init
git add .
git commit -m "Initial"
heroku create YOUR_APP_NAME
Your app must be publicly accessibleIf you run your Rails app locally (
rails s) and providelocalhost:3000/notifyas a notification URL, it won't be possible to register a Lokalise webhook. That's because Lokalise sends a special "ping" request to the provided URL and expects to receive a 2xx status code. If the URL is not accessible, the webhook won't be created.
Registering webhooks
Now let's create a new controller inside the controllers/webhooks_controller.rb file:
require 'ruby_lokalise_api'

class WebhooksController < ApplicationController
  def new; end

  private

  def api_client
    @client ||= RubyLokaliseApi.client ENV['LOKALISE_API_TOKEN']
  end
end
This controller will be used to register new webhooks, thus we are creating a Lokalise SDK client here as well.
Next, we are going to create a new form inside the views/webhooks/new.html.erb file:
<h1>Register a new webhook</h1>

<%= form_with url: webhooks_path do |f| %>
  <%= f.label :project_id %>
  <%= f.text_field :project_id %>
  <%= f.submit "Register!" %>
<% end %>
Add the necessary routes to the config/routes.rb:
resources :webhooks, only: %i[new create]

root 'webhooks#new'
Next we'll add a create action to our WebhooksController, which should register a new webhook via the Lokalise API:
  def create
    api_client.create_webhook params[:project_id],
                              url: 'https://lokalise-webhooks-rails.herokuapp.com/webhooks/notify',
                              events: %w[project.key.added]

    redirect_to root_path
  end
Responding to notifications
Next up, let's add a new notify action to listen to all incoming events:
  skip_before_action :verify_authenticity_token, only: [:notify]

  # ...

  def notify
    if params[:event] == 'project.key.added'
      project_id = params[:project][:id]
      key_id = params[:key][:id]

      api_client.create_comments project_id, key_id, [
        { comment: '@Bob could you please double check this key to make sure it complies with our requirements?' }
      ]

      api_client.update_key project_id, key_id, is_hidden: true
    end

    head :ok
  end
So, if the event is project.key.added, we add a new comment for this key and hide it for all non-admins. Please note that your event handlers must respond to POST requests and return 2xx status codes. Otherwise, Lokalise will consider the webhook notification to be unsuccessful and will try to re-send failed notifications multiple times.
Please note that we are also skipping verification of the authenticity token for this action, which is mandatory. You can introduce an additional level of security by checking the request headers in the before_action. Specifically, each reqest with contain a special "secret" (that you can customize when creating a webhook) as well as the Lokalise project ID and the webhook ID. Please find more information in the corresponding document.
Add a new route to the config/routes.rb:
  resources :webhooks, only: %i[new create] do
    collection do
      post 'notify'
    end
  end
A notice on notification handlersPlease note that your notification handler routes must respond to HTTP POST and return 2xx status codes. Otherwise, Lokalise will try to re-send notifications multiple times before giving up.
Testing it out
Now everything is ready! Let's publish our app to Heroku and add an environment variable with the Lokalise API token:
git add .
git commit -m "Finalized webhooks"
git push heroku master
heroku config:add LOKALISE_API_TOKEN=123abc
heroku open
Enter your Lokalise project ID in the text input and press "Register!".
Now open Lokalise, proceed to your project, and click "Apps" in the top menu. Find the "Webhooks" app, click on it, and then press "Manage". You'll see that a new webhook was registered for you:

Note the "X-Secret header" hidden value. You can use this value inside your app and compare it with the one sent to the notify action for extra protection (thus filtering out malicious requests).
Return to the Lokalise project editor and create a new translation key. Reload the page and make sure the key was hidden:

Click on the "Comments" button (the first button on the screen above) and make sure the comment is displayed properly:

This is it, great job!
Webhooks and bulk actions
Webhooks support Lokalise bulk actions as well as the find/replace operation. You can find more info the Webhooks article but let's see how to listen to such events.
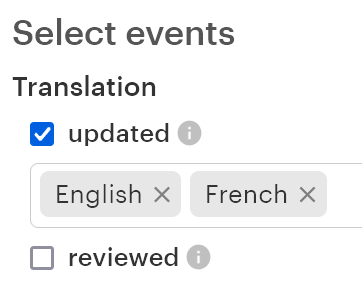
First of all, it's important to enable the proper events in the webhooks configuration. For instance, if you'd like to monitor find/replace operation as well as applying pseudolocalization using bulk actions, you should tick the translation updated event:
Please keep in mind that as long as the bulk actions may involve multiple keys, the event payload will contain data from 1 and up to 300 keys. If more than 300 keys were involved in the operation, you'll receive multiple events.
Also note that in case of bulk actions, the event name will be pluralized: project.translations.updated, not project.translation.updated. For example, if you would like to display information about all the updated translations as well as project and user name, you can use the following code snippet:
def notify
  if params[:event] == 'project.translations.updated'
    puts "Project name: #{params[:project][:name]}"
    puts "User name: #{params[:user][:full_name]}"

    params[:translations].each do |translation|
      puts "Translation ID: #{translation[:id]}"
      puts "Translation value: #{translation[:value]}"
      puts "Language: #{translation[:language][:name]}"
      puts "Key: #{translation[:key][:name]}"
    end
  end

  head :ok
end
So, :translations contain an array with all the translations data, including the language and key details.