Android SDK v1
Over-the-air localization SDK for Android devices. No more unnecessary app updates.
A new way to measure and manage updates over the air (OTA)We have improved how OTA usage is measured. We measure usage from gigabytes per month (GB/month) instead of monthly active users (MAU). In other words, based on how much data you use, not on how many active users your app has. So you’re free to add as many app users as you like. The three factors that impact data usage are users, bundle size, and number of bundle releases.
Introduction
OTA best practicesMake sure to check out our blog post covering some over-the-air best practices and recommendations to optimize and reduce the bundle size.
This guide assumes that you have already prepared your Android app for localization as SDK is designed to work with Android resources.
Lokalise Android SDK is available as an .aar library (it can be downloaded by visiting the following link) or as a Maven dependency (please refer to Step 3 in the Getting Started section) and can be easily included in your projects. Once the translations are finalized in the Lokalise editor, you generate a bundle using the Lokalise Download page. When the end user opens your app on their device, the SDK requests the latest version of the bundle from our servers and, if found, it downloads this and stores it locally.
Compatibility
AppCompat 1.2 is not supported by our Android SDK 1.3. You can either downgrade AppCompat to 1.1 to continue using SDK 1.3, or switch to Android SDK 2.0.
Limitations and special notes
Views and XML
Some views are not supported when inflating from XML (Action bar, Menu items, Android preferences and possibly others), but you can still get the latest translations via getString(), getText(), getQuantityString() and other system methods, as well as setting the content of these views programmatically.
For example, the following code can be used for your menu items:
@Override
public boolean onCreateOptionsMenu(Menu menu) {
    getMenuInflater().inflate(R.menu.main, menu);

    menu.findItem(R.id.action_settings).setTitle(R.string.my_settings_title);
    // ... any other menu items

    return true;
}
Retry mechanism
If the Android SDK was unable to download the OTA bundle, it will perform up to 4 retries with increased timeouts. Please note that this behavior might be revised in the future.
Getting started
Step 1: Set up your project in Lokalise
If you have not yet done so, add a new project in Lokalise, upload any source language files you may have (or just add keys directly in Lokalise's editor if you are building a new app). Take note of the project ID, which can be found in project settings and usually looks like this: 3281927757690217f560f6.71199070.
Step 2: Generate the bundle
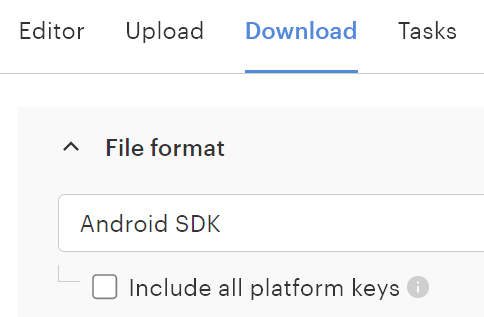
Go to the Downloads page in Lokalise, select Lokalise Android SDK as the format and click the Build only button to generate the bundle. You will be automatically taken to the bundle versions management page in project settings. Leave the switches as they are for now. See details the in Managing bundles section.
Make sure to always include the latest strings in your project when releasing the app.
Step 3: Include Lokalise SDK in your project
First you need to add https://maven.lokalise.com to your repository list and include your library as well as google GSON library in your .gradle file:
repositories {
    ...
    maven {
        url "https://maven.lokalise.com"
    }
}
...
dependencies {
    ...
    implementation 'com.lokalise.android:ota-sdk:1.+'
    implementation 'com.google.code.gson:gson:2.8.0'
}
If you are using ProGuard, add the following rules:
-keep class co.lokalise.** { *; }
-dontwarn co.lokalise.*
Also, if you are using DexGuard, you will need to specify these additional rules:
-keepresources string/**
-keepresources string-array/**
-keepresources plurals/**
Step 4: Initialise the SDK
For this step you will need your SDK token (generate a token in project settings > General tab) and the Project ID of the desired project (obtained in the project settings). In your main Application class include the following code:
public class MyApplication extends Application {
    ...
    @Override
    public void onCreate() {
        super.onCreate();
        // Initialise Lokalise SDK with projects SDK token and project id
        // It is important to call this right after the "super.onCreate()"
        // If you are using AppCompatDelegate.setCompatVectorFromResourcesEnabled(true)
        // make sure it is called before LokaliseSDK.init()
        LokaliseSDK.init("<sdk token>", "<project id>", this);

        // Add this only if you want to use pre-release bundles
        LokaliseSDK.setPreRelease(true);

        // Fetch the latest translations from Lokalise (can be called anywhere)
        LokaliseSDK.updateTranslations();
    }
    ...
}
We will need to inject the Lokalise SDK into the Activity context as well. To do so, we recommend you create a base Activity class and extend all your activities from it. Add the following code into your activity:
public class MainActivity extends AppCompatActivity {
    ...
    @Override
    protected void attachBaseContext(Context newBase) {
        // Inject the Lokalise SDK into the activity context
        super.attachBaseContext(LokaliseContextWrapper.wrap(newBase));
    }
    ...
}
If you are using Calligraphy library for Android, attaching to context should look like this:
super.attachBaseContext(LokaliseContextWrapper.wrap(
    CalligraphyContextWrapper.wrap(newBase)
));
That's it! You are ready to go!
Usage
Updating translations
There is no need to update your code, refer to the keys as usual:
<TextView
    android:id="@+id/test"
    android:text="@string/hello_world"
    ... />
Or from code:
TextView test = (TextView) findViewById(R.id.test);
test.setText(R.string.hello_world);
If you want your Action bar to have the latest translations, set its title programmatically:
@Override
protected void onResume() {
    super.onResume();
    setTitle(R.string.hello_world);
}
Changing application locale
To change the locale of your application, use the LokaliseSDK.setLocale(<Language ISO e.g. "en">, <Region ISO e.g. "GB">) method.
There is no need for custom locale changing code or context wrappers, simply call this method and restart the Activity.
Dynamically adding keys
Sometimes you need to add new strings without recompiling the application.
After adding a new key via the Lokalise interface and creating a new Android SDK bundle, you can refer to the new key by name using the following code:
LokaliseResources resources = new LokaliseResources(context);
String newKey = resources.getString("new_key_name");
if(newKey != null) {
    // do something with the new value
}
Please note that there is no guarantee that the key will exist when you request it, since you can pass any key name to the method, so make sure to check whether the returned value is null.
Callbacks (available in version 1.3.0)
If you need to know when Lokalise is done downloading a new translation bundle, there are several options.
Lokalise callback
The simplest way is to use the LokaliseCallback interface:
LokaliseCallback myCallback = new LokaliseCallback() {
    @Override
    public void onTranslationsUpdated(long oldBundleVersion, long newBundleVersion) {
        // Do something
    }
};
LokaliseSDK.addCallback(myCallback);
If you need to remove a callback, simply use LokaliseSDK.removeCallback(myCallback);.
Broadcast receiver
You can also receive notifications about bundle updates via Broadcast receiver:
IntentFilter myIntentFilter = new IntentFilter(LokaliseDefines.INTENT_TRANSLATIONS_UPDATED);
BroadcastReceiver myReceiver = new BroadcastReceiver() {
    @Override
    public void onReceive(Context context, Intent intent) {
        long previous_version = intent.getLongExtra(LokaliseDefines.EXTRA_BUNDLE_VERSION_OLD, 0);
        long current_version = intent.getLongExtra(LokaliseDefines.EXTRA_BUNDLE_VERSION_NEW, 0);
        // Do something
    }
};
@Override
protected void onResume() {
    super.onResume();
    registerReceiver(myReceiver, myIntentFilter);
}
@Override
protected void onPause() {
    super.onPause();
    unregisterReceiver(myReceiver);
}
Managing bundles
Publishing changes
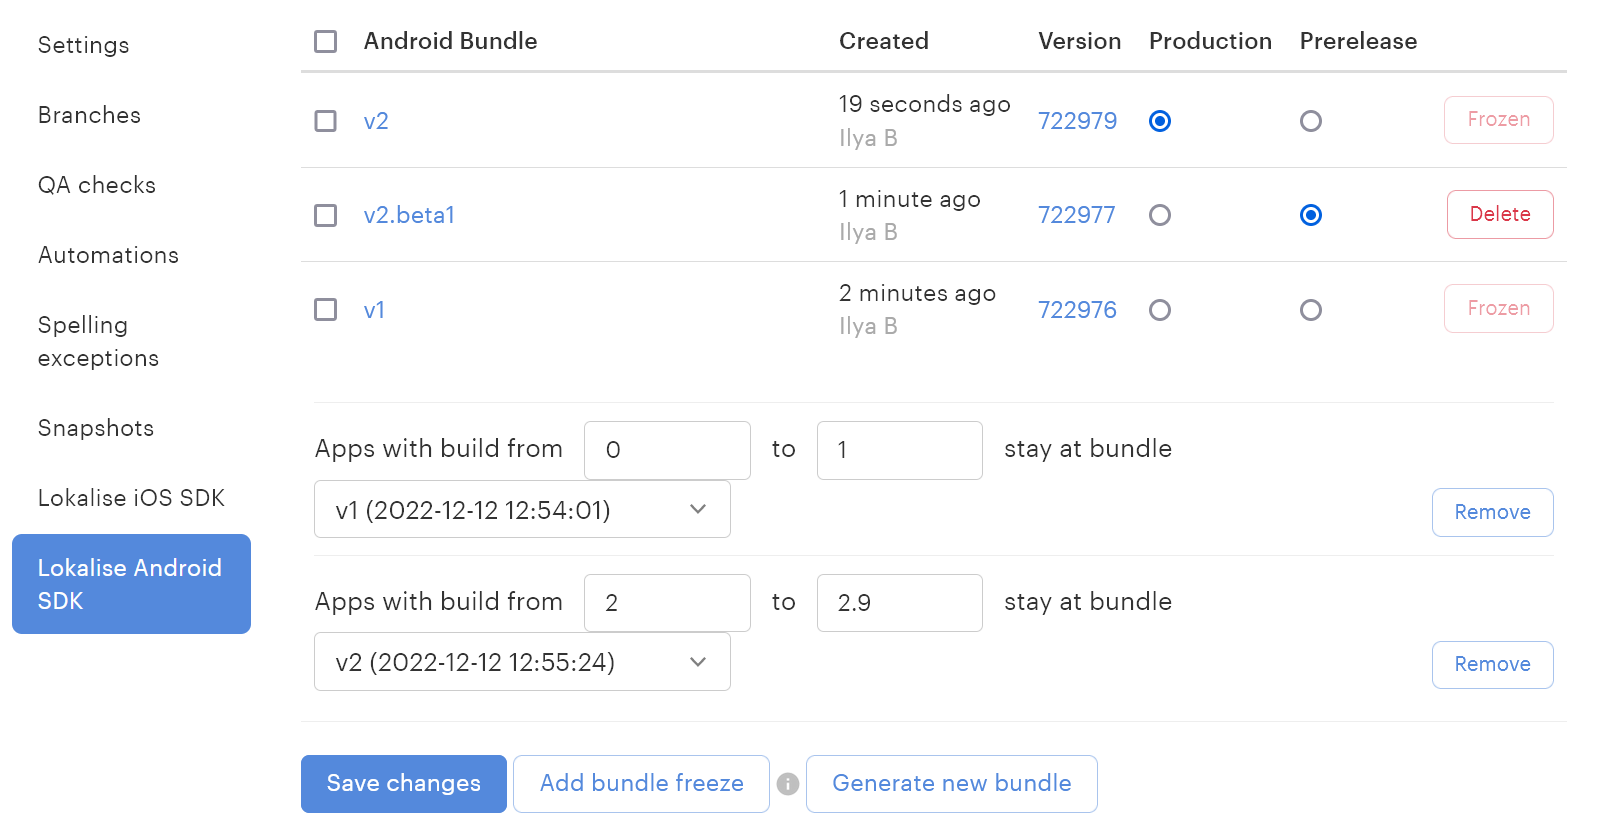
Lokalise supports production and prerelease versions of the bundle and lets you keep different versions of each bundle.

When the bundle is generated, it will take you to the project settings / Lokalise Android SDK section. Turn on the relevant switch before the bundle to publish it to production or prerelease.

Hit Save changes to apply.
Bundle freeze
Lokalise offers the option to freeze a particular bundle on a particular app version. As you can see in the screenshot below the "Test_01" bundle is assigned to the apps with a build from 0 to 6 and the newest bundle is assigned to the apps with a build from 7 to 12. This feature is supported in the Lokalise Android SDK 1.3 and up.
Adding languages
Although if you add a new language to the bundle, it will be available in the application, we advise releasing a fresh build with natively included resources for the new language since this could cause inconsistent translation of the interface otherwise. For example, the Action bar or application name will not be translated.
From version 1.3.2 and above, you can get a list of locales that are currently present in the downloaded OTA bundle on the device by calling the LokaliseSDK.getAvailableLocales() method.
Mobile SDK insights
We provide comprehensive usage stats on the project's Statistics page. To access Mobile SDK insights, open your project dashboard and click More > Statistics.
Then, under the Report range section, switch to the Mobile SDK insights tab.
The available reports include:
- Daily unique users (range)
- Daily requests (range)
- Monthly active users
Updated 6 months ago