Python and Flask
This tutorial will show you how to use the Lokalise Python SDK to manage translation files and how to implement an OAuth 2 flow.
In this tutorial you'll learn how to...
- Work with Lokalise API tokens
- Upload translation files with the Lokalise API
- Download translation files with the Lokalise API
- Implement an OAuth 2 flow
- List customer projects
- Act on the customer's behalf and upload/download translation files
You can find thesource code at GitHub.
To learn more about libraries forPython translate, please refer to our dedicated blog post.
Prerequisites
This guide assumes that you have a Lokalise project (if not, learn how to create your Lokalise project here). In this tutorial, we are going to upload English translations. Therefore, make sure that your project has the English language added with the “en” ISO code.
If you want to follow this guide locally on your computer, you need to have the following software installed:
- Python (version 3.7 or above)
- Code editor
What we are going to build
In the first part of this tutorial, we are going to use regular tokens to upload an English translation file to your Lokalise project and download it back.
In the second part, we'll implement an OAuth 2 flow and act on the user's behalf to upload and download translation files to or from their project.
Setting up an app
In this tutorial we will use a minimalist Flask framework, but you can utilize any other solution you see fit.
First, create and activate a new virtual environment in your project's directory:
cd MY_PROJECT_NAME && python -m venv venv
. venv/bin/activate
If you are on Windows, the latter command should look like venv\Scripts\activate.
Now install Flask, the Lokalise Python SDK, and dotenv to store environment variables:
pip install Flask python-dotenv python-lokalise-api requestsCreate a new file called app.py with the following contents:
import os
import base64
from dotenv import load_dotenv
load_dotenv()

import zipfile
import io
import requests
import lokalise

from flask import Flask, render_template, request, redirect, url_for, session

app = Flask(__name__)
Finally, create a templates folder and an i18n folder with an en.json file. Paste the following contents inside the en.json file:
{
   "app.name": "Demo app",
   "app.description": "Demo app description"
}
Working with API tokens
Getting an API token to use the Lokalise API
Create an .env file in the root of the project and add your Lokalise API token. Make sure to add an API token with read and write access to your Lokalise projects. Learn how to get a Lokalise API token.
LOKALISE_API_KEY=123secret456
Never publicly expose your API key!Specifically, don’t forget to add the
.envfile to.gitignore.
Initializing the client
Let's create a method to initialize the Lokalise Python SDK client:
def __client():
    return lokalise.Client(os.getenv('LOKALISE_API_KEY'))
Getting your Lokalise project ID
Now add a new environment variable inside your .env file with your Lokalise project ID. Learn how to get the Lokalise project ID.
LOKALISE_PROJECT_ID=123.abcUploading translation files to your Lokalise project
To get started with file uploading, we need to add the corresponding template, so create a new upload.html file inside the templates directory:
<!doctype html>
<html lang="en">
<head>
	<title>Upload translation file</title>
</head>
<body>
	<h1>Upload translation file</h1>

	<form method="POST" action="/upload">
		 <input type="submit" value="Upload!">
	</form>
</body>
</html>
Now let's perform the actual upload. Add the upload method to app.py:
@app.route('/upload', methods=['GET', 'POST'])
def upload():
    if request.method == 'POST':
        filename = os.path.join(os.path.dirname(__file__), 'i18n/en.json')

        with open(filename) as f:
            content = f.read()

            __client().upload_file(os.getenv('LOKALISE_PROJECT_ID'), {
                "data": base64.b64encode(content.encode()).decode(),
                "filename": 'en.json',
                "lang_iso": 'en'
            })

        return redirect(url_for('upload'))
    else:
        return render_template('upload.html')
We read our JSON file and encode its contents in Base64. Then simply use the upload_file method to perform the upload.
Now you can boot your server by running:
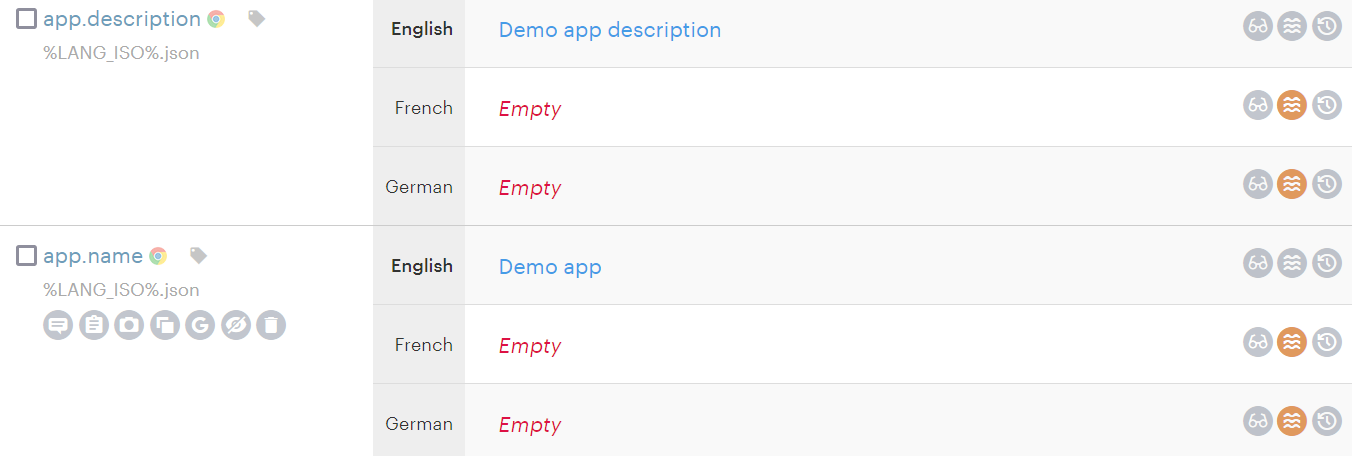
flask runProceed to http://127.0.0.1:5000/upload and click "Upload!". Then return to your Lokalise project and make sure the translations were properly uploaded:

Great job!
Downloading translation files from the Lokalise project
Start by creating a simple template inside the templates/download.html file:
<!doctype html>
<html lang="en">
<head>
	<title>Download translation file</title>
</head>
<body>
	<h1>Download translation file</h1>

	<form method="POST" action="/download">
		 <input type="submit" value="Download!">
	</form>
</body>
</html>
Next, add a new download method:
@app.route('/download', methods=['GET', 'POST'])
def download():
    if request.method == 'POST':
        response = __client().download_files(os.getenv('LOKALISE_PROJECT_ID'), {
            "format": "json",
            "filter_langs": ["en"],
            "original_filenames": True,
            "directory_prefix": ""
        })

        data = io.BytesIO(requests.get(response['bundle_url']).content)

        with zipfile.ZipFile(data) as archive:
            archive.extract("en.json", path="i18n/")

        return redirect(url_for('download'))
    else:
        return render_template('download.html')
In this case, we are downloading only the English translations in JSON format, getting the download bundle, reading the archive, and extracting the required file to the i18n folder.
Your existing translations will be overwritten!Please remember that the current implementation overwrites any translations inside the
en.jsonfile with the new ones. If you don't want this to happen, save your new translations to a file with another name.
Now you can edit existing translations in your Lokalise project, reload the server, proceed to http://127.0.0.1:5000/download, and click "Download!". Make sure that your translations are replaced with the new ones.
Awesome!
Working with an OAuth 2 flow
Registering an OAuth 2 app
To get started, please reach out to our tech support and ask them to register an OAuth 2 app for you (if you don't have one registered already). You will be presented with the Lokalise client ID and client secret that we will be using in the next steps.
You can store these keys in the .env file:
OAUTH2_CLIENT_ID=your_id
OAUTH2_CLIENT_SECRET=your_secret
Never publicly expose your OAuth 2 client secret!Specifically, don’t forget to add the
.envfile to.gitignore.
Implementing an OAuth 2 flow
To implement an OAuth 2 flow, we'll need two new routes: one to display the actual link, and another to read response from Lokalise and request an OAuth 2 token.
Let's start with the login method:
@app.route('/login')
def login():
    login_url = __auth_client().auth(
        ["read_projects", "read_files", "write_files"], "http://localhost:5000/callback", "random state"
    )
    return render_template('login.html', login_url=login_url)

# ...

def __auth_client():
    return lokalise.Auth(os.getenv('OAUTH2_CLIENT_ID'), os.getenv('OAUTH2_CLIENT_SECRET'))
login_url will contain the actual link that the user will need to visit and log in to Lokalise. Note that we are requesting permissions to view the user's projects and read/write translation files. The callback points to the /callback route that we'll implement in a moment.
Next, add the callback method:
@app.route('/callback')
def callback():
    code = request.args.get('code', '')
    response = __auth_client().token(code)
    session['token'] = response['access_token']
    return redirect(url_for('login'))
code is a secret alphanumeric string generated by Lokalise. We use it to obtain the user's OAuth 2 token. This token will then be utilized to send API requests; therefore, store it in session.
Also make sure to add a secret key to protect the session (it should not be exposed):
app = Flask(__name__)
app.secret_key = b'_5#y2L"F4Q8z\n\xec]/' # <=== add this line
Now add the templates/login.html file:
<!doctype html>
<html lang="en">
<head>
	<title>Login to Lokalise</title>
</head>
<body>
	<h1>Lokalise OAuth 2 login</h1>

	{% if session['token'] %}
		<p>
			Your OAuth 2 token: {{ session['token'] }}<br>
			{% if session['project_id'] %}
				Your project ID: {{ session['project_id'] }}<br>
			{% endif %}

			<a href="/projects">Choose a project to work with</a><br>
			<a href="/upload">Upload translation file</a><br>
			<a href="/download">Download translation file</a>
		</p>

		<form action="/logout" method="POST">
			<input type="submit" value="Logout">
		</form>
	{% else %}
		<a href="{{ login_url }}">Login!</a>
	{% endif %}
</body>
</html>
Choosing a project to work with
The next is step is to allow our user to choose a project that s/he wants to work with. Thus, create yet another route:
@app.route('/projects', methods=['GET', 'POST'])
def projects():
    if request.method == 'POST':
        session['project_id'] = request.form['project_id']
        return redirect(url_for('login'))
    else:
        projects = __oauth_client().projects().items
        return render_template('projects.html', projects=projects)
This route either displays a list of projects obtained via the Lokalise API, or stores the chosen project ID in session.
Add a new method to prepare the OAuth 2 client:
def __oauth_client():
    return lokalise.OAuthClient(session['token'])
Let's add a new template under templates/projects.html as well:
<!doctype html>
<html lang="en">
<head>
	<title>Your Lokalise projects</title>
</head>
<body>
	<h1>Choose a Lokalise project to work with</h1>

	{% for project in projects %}
		<p>
			{{ project.name }}
			{% if session['project_id'] == project.project_id %}
				(currently chosen)
			{% endif %}
		</p>
		<form action="/projects" method="POST">
			<input type="hidden" value="{{ project.project_id }}" name="project_id">
			<input type="submit" value="Choose">
		</form>

		<hr>
	{% endfor %}
</body>
</html>
Uploading translation files on the user's behalf
So, once the user has chosen a project to work with, we can upload files to that project. Therefore, modify the upload method in the following way:
@app.route('/upload', methods=['GET', 'POST'])
def upload():
    if request.method == 'POST':
        filename = os.path.join(os.path.dirname(__file__), 'i18n/en.json')
        with open(filename) as f:
            content = f.read()

            __oauth_client().upload_file(session['project_id'], {
                "data": base64.b64encode(content.encode()).decode(),
                "filename": 'en.json',
                "lang_iso": 'en'
            })
        return redirect(url_for('upload'))
    else:
        return render_template('upload.html')
Now we are using the __oauth_client() method and read the chosen project ID from the session store.
Downloading translation files on the user's behalf
The next stop is the download() method that we are going to modify in the following way:
@app.route('/download', methods=['GET', 'POST'])
def download():
    if request.method == 'POST':
        response = __oauth_client().download_files(session['project_id'], {
            "format": "json",
            "filter_langs": ["en"],
            "original_filenames": True,
            "directory_prefix": ""
        })

        data = io.BytesIO(requests.get(response['bundle_url']).content)

        with zipfile.ZipFile(data) as archive:
            archive.extract("en.json", path="i18n/")

        return redirect(url_for('download'))
    else:
        return render_template('download.html')
Once again, we are using an OAuth 2 client and the project ID stored in session.
Logging out and a template
Finally let's add the ability to log out, which simply means clearing the session store:
@app.route('/logout', methods=['POST'])
def logout():
    session.pop('token', None)
    session.pop('project_id', None)
    return redirect(url_for('login'))
The last thing to do is code the login.html template which should provide all the necessary links and buttons:
<!doctype html>
<html lang="en">
<head>
	<title>Login to Lokalise</title>
</head>
<body>
	<h1>Lokalise OAuth 2 login</h1>

	{% if session['token'] %}
		<p>
			Your OAuth 2 token: {{ session['token'] }}<br>
			{% if session['project_id'] %}
				Your project ID: {{ session['project_id'] }}<br>
			{% endif %}

			<a href="/projects">Choose a project to work with</a><br>
			<a href="/upload">Upload translation file</a><br>
			<a href="/download">Download translation file</a>
		</p>

		<form action="/logout" method="POST">
			<input type="submit" value="Logout">
		</form>
	{% else %}
		<a href="{{ login_url }}">Login!</a>
	{% endif %}
</body>
</html>
Testing it out
That's it! Now you can boot your server by running:
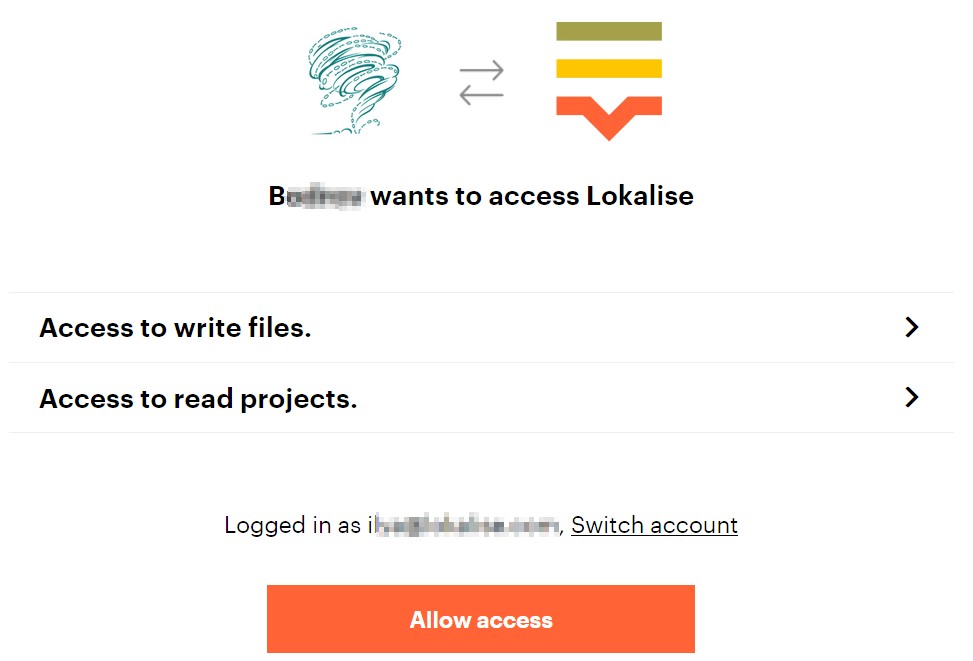
flask runNavigate to http://localhost:5000/login and click "Login!". You'll see the following page:

Click "Allow access". You'll be navigated back to your app.
Next, click "Choose a project to work with", and select one of the projects.
Finally, click either "Upload file" or "Download file", and perform the uploading/downloading process as before. Make sure that your translations are updated accordingly.
That's it, great job!
Updated 6 months ago