
iOS SDK
Over-the-air localization SDK for iOS. Lightweight and easy to integrate.
A new way to measure and manage updates over the air (OTA)We have improved how OTA usage is measured. We measure usage from gigabytes per month (GB/month) instead of monthly active users (MAU). In other words, based on how much data you use, not on how many active users your app has. So you’re free to add as many app users as you like. The three factors that impact data usage are users, bundle size, and number of bundle releases.
Prerequisites
OTA best practicesMake sure to check out our blog post covering some over-the-air best practices and recommendations to optimize and reduce the bundle size.
This guide assumes that you have already prepared your iOS app for localization. Need help with this? Read our Getting started with iOS localization tutorial. If you are experienced in iOS localization we recommend having a quick read in any case, just so we’re all on the same page.
Introduction
Lokalise iOS SDK comes as a CocoaPod library and can be easily integrated into your Objective-C or Swift project. Once the translations are finalized in the Lokalise editor, you generate a bundle using the Lokalise Download page (or use an API request to generate it). When the end-user opens your app on their device, the SDK requests the latest version of the bundle from our servers and, if found, it downloads this and stores it locally.
Features
- Over-the-air (OTA) localization
- Instant UI language switching
- Test localizations (using prerelease bundles)
- NSBundle swizzling for transparent integration
- XIB and storyboard localization
Limitations and special notes
System localization
Some of the system interface objects might not get translated (the search bar for example) when changing the application language during runtime.
UI localization
If you choose not to use swizzling, storyboards and nibs will not be localized using our SDK.
InfoPlist localization
InfoPlist.strings content can't be overridden by our SDK, so don't forget to include the latest translations in your next release.
Retry mechanism
There's no built-in retry mechanism in the iOS SDK. We assume that the checkForUpdates is called by the developer on the app start and app resuming which, in a sense, is a retry mechanism. Of course, you're free to add additional retry logic.
Getting started
Step 1: Set up your project in Lokalise
If you have not yet done so, add a new project in Lokalise, upload any source language files you may have (or just add keys directly in Lokalise's editor if you are building a new app). Take note of the project ID, which can be found in project settings and usually looks like this: 3281927757690217f560f6.71199070.
You also need an SDK API token. You can generate this in project settings > General tab.
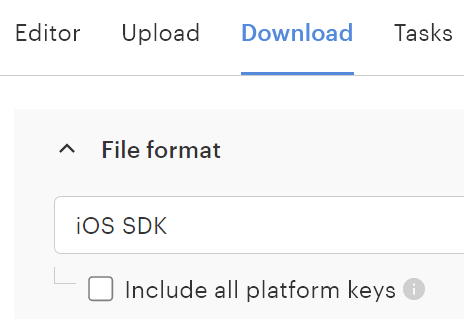
Step 2: Generate the bundle
Go to the Download page in Lokalise, select Lokalise iOS SDK as the format and click the Build only button to generate the bundle. You will be automatically taken to the bundle versions management page in project settings. Leave the switches as they are for now. See details in the Managing bundles section.
Make sure to always include fresh Localizable.strings in your project when releasing the app. There are various ways to automate this process, please refer to Part III - Integrating, in your project in the Getting started with iOS localization tutorial.
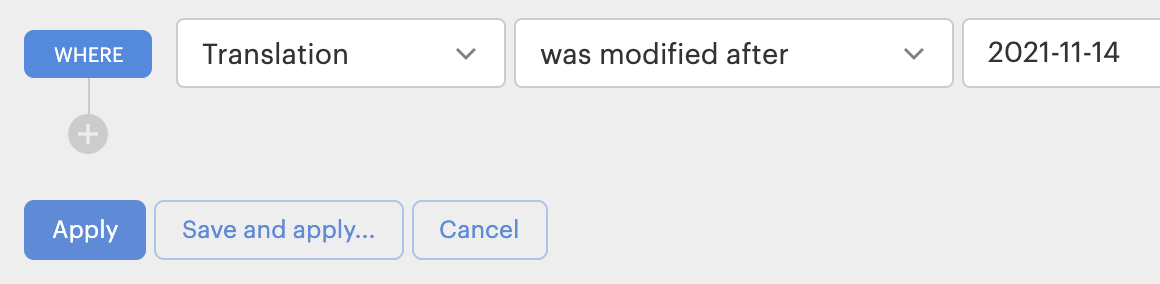
Once you update some translations in Lokalise, generate a new SDK bundle that includes only recently updated keys. We can narrow down such keys in Lokalise editor by using Filter > Translations > Was modified after, then just specify a date:
Select all keys and tag them:

In the UI on the Download page, you can use the Include tags option where you specify that tag and Lokalise will include only keys with the tag assigned:

On export via API, use that tag to export just those recently updated keys by specifying it as a value for the include_tags attribute. You can also check API reference for the File Download endpoint.
You will need to repeat those steps each time you release a new version, since it's a good practice to keep local Localizable.strings files updated regularly as well. So you should have a smaller bundle that's faster to download compared to all the project keys and languages in a bundle.
Step 3: Install Lokalise SDK
CocoaPods
To install using CocoaPods simply add these lines to your Podfile:
use_frameworks!
pod 'Lokalise', '~> 0.10.0'
Dependencies will be installed automatically.
Carthage
To install using Carthage simply add this line to you Cartfile:
binary "<https://raw.githubusercontent.com/lokalise/lokalise-ios-framework/master/LokaliseCarthage.json>" ~> 0.10.0Link c++ (libc++.tbd) and z (libz.tbd) libraries to your targets.
Swift Package Manager
To install using Swift Package Manager:
- Add through File > Swift Packages > Add Package Dependency... action in Xcode. Use https://github.com/lokalise/lokalise-ios-framework.git repository URL and the Version: Up to Next Minor starting with 0.10.2 option.
- Add this line to dependencies section of your
Package.swift:
.package(name: "Lokalise", url: "https://github.com/lokalise/lokalise-ios-framework.git", .upToNextMinor(from: "0.10.2"))Manual
If you would like to install manually, download Lokalise.framework and add it to your project (embed and link).
Link c++ (libc++.tbd) and z (libz.tbd) libraries.
Add Run Script to your Builds Phases.
bash "${BUILT_PRODUCTS_DIR}/${FRAMEWORKS_FOLDER_PATH}/Lokalise.framework/strip-frameworks.sh"Usage
Configuring the SDK
We recommend configuring Lokalise iOS SDK within the - (BOOL)application:(UIApplication _)application didFinishLaunchingWithOptions:(NSDictionary _)launchOptions app delegate method.
// Provide SDK Token and Project ID and enable Swizzling

\[[Lokalise sharedObject] setProjectID:@"Project ID" token:@"SDK Token"];
\[[Lokalise sharedObject] swizzleMainBundle];

Lokalise.shared.setProjectID("Project ID", token:"SDK Token")
Lokalise.shared.swizzleMainBundle()
Checking for updates
To get new translations you need to call the checkForUpdateWithCompletion: method. A good place for this is in the applicationDidBecomeActive: method of your app delegate. It will be called every time application is launched or restored from the background.
- (void)applicationDidBecomeActive:(UIApplication *)application {
    [[Lokalise sharedObject] checkForUpdatesWithCompletion:^(BOOL updated, NSError * _Nullable error) {
        NSLog(@"Updated %d\nError: %@", updated, error);
    }];
}

func applicationDidBecomeActive(_ application: UIApplication) {
    Lokalise.shared.checkForUpdates { (updated, errorOrNil) in
        print("Updated: \(updated)\nError: \(errorOrNil)")
    }
}
Updating UI
Lokalise posts the LokaliseDidUpdateLocalizationNotification when the localization or localizationType is updated. Subscribe to it in any view controller or model in order to react and update your UI.
- (void)viewDidLoad {
    [super viewDidLoad];
    [NSNotificationCenter.defaultCenter
        addObserver:self
        selector:@selector(updateUserInterface)
        name:LokaliseDidUpdateLocalizationNotification
        object:nil
    ];
}
- (void)updateUserInterface {
    // Update your interface
}

override func viewDidLoad() {
    super.viewDidLoad()
    NotificationCenter.default.addObserver(
        self,
        selector: #selector(updateUserInterface),
        name: NSNotification.Name.LokaliseDidUpdateLocalization,
        object: nil
    )
}

func updateUserInterface() {
    // Update your interface in Swift
}
Referring keys
There is no need to update your code with swizzling enabled, refer to the keys as usual:
NSLocalizedString(@"key", @"comment");
NSLocalizedStringFromTable(@"key", @"tableName", @"comment");

NSLocalizedString("key", comment: "comment")
NSLocalizedString("key", tableName: "tableName", comment: "comment")
If you have not enabled bundle swizzling, you can refer to the keys using the Lokalise SDK directly:
\[[Lokalise sharedObject] localizedStringForKey:@"key" value:@"default value" table:@"table name"];

Lokalise.shared.localizedString(forKey: "key", value: "default value", table: "tableName")
The table name is actually your .strings (or .stringsdict) filename without the extension. Localizable is used by default.
SwiftUI
SwiftUI is not automatically localized after Lokalise.shared.swizzleMainBundle() is called. Translated value should be passed to SwiftUI views to make it work with our SDK.
Text("key") -> Text(NSLocalizedString("key", comment: ""))String class extension or a custom postfix operator can make it more compact.
extension String {
    var localized: String {
        NSLocalizedString(self, comment: "")
    }
}

Text("test_key".localized)

postfix operator ~
postfix func ~(string: String) -> String {
    return NSLocalizedString(string, comment: "")
}

Text("test_key"~)
Managing bundles
Publishing changes
Lokalise supports production and prerelease versions of the bundle and lets you keep different versions of each bundle.
When the bundle is generated, it will take you to the project settings / Lokalise iOS SDK section. Turn on the relevant switch before the bundle to publish it to production or prerelease (see Testing your localizations section below for description).
Hit Save changes to apply.
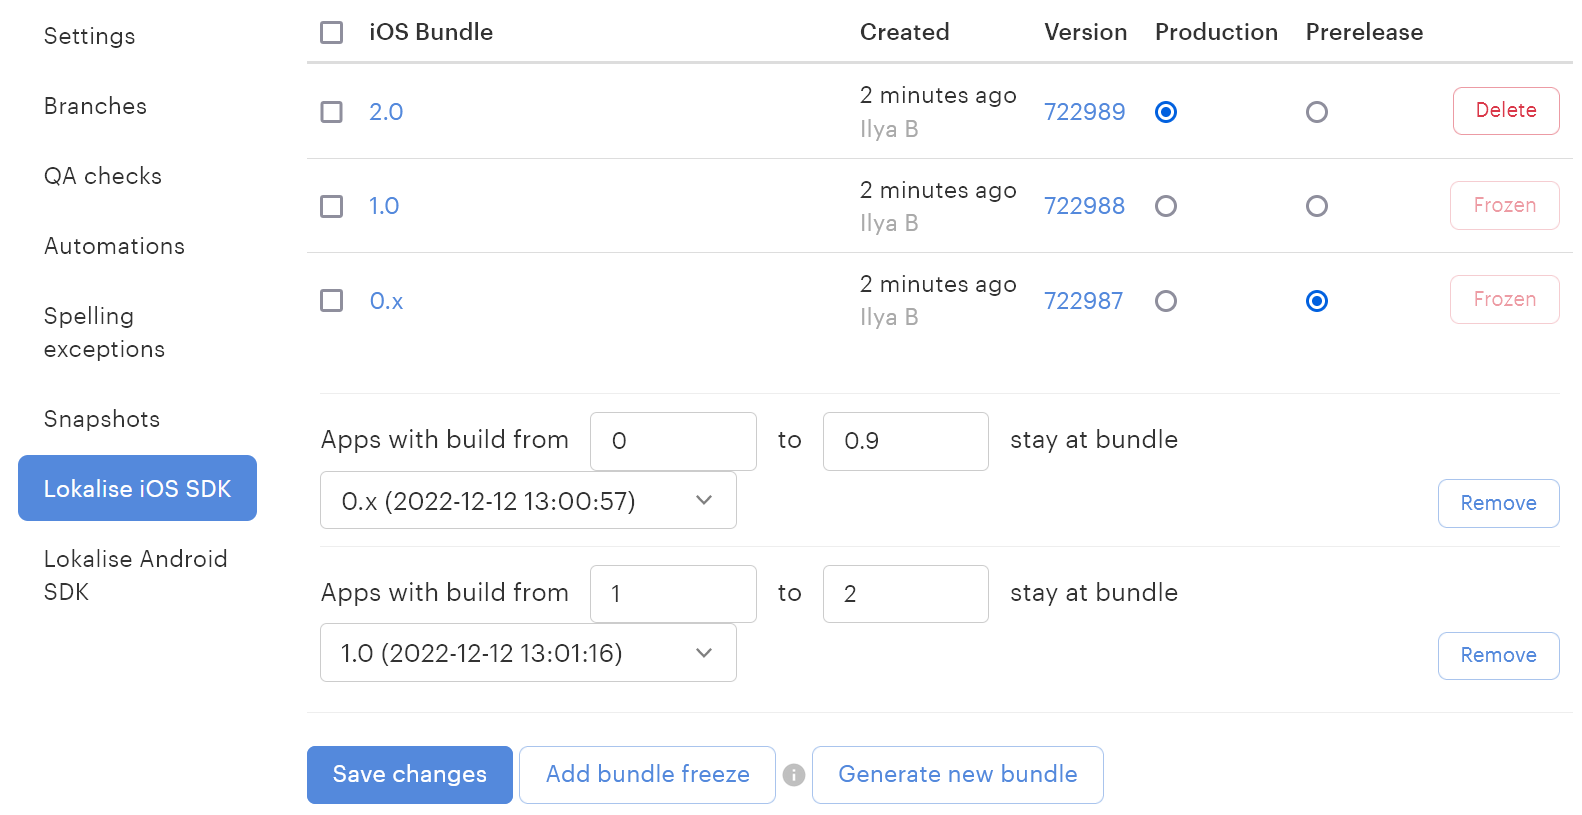
Bundle freeze
Lokalise offers you the option to freeze a particular bundle on a particular app version. As you can see in the screenshot below, the "Test_01" bundle is assigned to the apps with a build from 0 to 6 and the newest bundle is assigned to the apps with a build from 7 to 12. This feature is supported in the Lokalise iOS SDK 0.8.0 and up.
Testing your localizations
If you are building for TestFlight or Crashlytics and don't want to mess up the production app strings and want to see local translation or no translation at all, the localizationType option. If it's LokaliseLocalizationPrerelease, the SDK will download a fresh Prerelease bundle (according to the table in the image above).
// Loads production localization (Default type).
[Lokalise sharedObject].localizationType = LokaliseLocalizationRelease;
Lokalise.shared.localizationType = .release
// Loads prerelease localization.
[Lokalise sharedObject].localizationType = LokaliseLocalizationPrerelease;
Lokalise.shared.localizationType = .prerelease
// Uses localization included in local app bundle.
[Lokalise sharedObject].localizationType = LokaliseLocalizationLocal;
Lokalise.shared.localizationType = .local
// Returns keys instead of localized string.
[Lokalise sharedObject].localizationType = LokaliseLocalizationDebug;
Lokalise.shared.localizationType = .debug
Adding languages
You need to add languages in your Xcode project, only then do they become available in the app. Lokalise SDK does not dynamically add languages to the app if you add them in Lokalise.
Available methods in Swift
You can view all available methods by importing the framework (import Lokalise) and jumping to its definition (Cmd+Ctrl on import Lokalise).
You will be provided with SDK headers compiled for Swift with comments describing those methods.
Compliance with AppStore review guidelines
Lokalise iOS SDK is compliant with the Software Requirements defined in the App Store Review Guidelines. Lokalise doesn't load executable code as prohibited by rule 2.5.2.
Mobile SDK insights
We provide comprehensive usage stats on the project's Statistics page. The reports include:
- Daily unique users (range)
- Daily requests (range)
- Monthly active users
User privacy
We do not track personal data of users of your application. SDK gathers a limited amount of information about your users to provide Mobile SDK Insights. This includes Device language and Application Language.
Troubleshooting
If you encounter crash that recursively calls these methods
[NSBundle(Lokalise) lokalise_localizedStringsForKey:value:table:]
[Lokalise localizedStringForKey:value:table:]
Ensure that your Localizable.strings and other .strings files are localized as default language of your project and not Base language.
If this doesn't help or you are experiencing other issues contacts us in live support chat.
Updated 8 months ago