PHP and Symfony
This tutorial will show you how to use the Lokalise preprocessing and postprocessing feature to manage uploaded and downloaded translations in your Symfony app.
In this tutorial you'll learn how to...Implement custom processors for Lokalise using Ruby on Rails.
Prerequisites
This guide assumes that you have a Lokalise project (if not, learn how to create your Lokalise project here). In this tutorial, we are going to upload English translations. Therefore, make sure that your project has the English language added with the “en” ISO code.
If you want to follow this guide locally on your computer, you need to have the following software installed:
- PHP 8.0.2 or above
- Symfony CLI tool
- Code editor
What we are going to build
We are going to create a simple application that will process translations that you'll import and export on Lokalise. The app will then process translations and remove any banned words.
Preparing a new Symfony app
Create a new Symfony app by running the following command:
symfony new lokalise-processor --webappThis will create the skeleton app for you.
Now go into the project folder and create a new controller:
symfony console make:controller ProcessorControllerPerforming preprocessing
So, now let's see how to perform translations preprocessing. For example, suppose we want to iterate over the uploaded translations and remove a "BANNED" word from them.
To achieve that, simply add a new preprocess action to your ProcessorController:
class ProcessorController extends AbstractController
{
    #[Route('/preprocess', name: 'app_preprocess')]
    public function preprocess(Request $request, LoggerInterface $logger): Response
    {
        $payload = $request->getContent();

        if (empty($payload)) {
            return new Response(json_encode(['error' => 'Missing body!'], JSON_THROW_ON_ERROR));
        }

        $data = json_decode($payload, true, 512, JSON_THROW_ON_ERROR);
        $data = $this->filterBannedWords($data, ['banned', 'offensive']);

        return new Response(json_encode($data, JSON_THROW_ON_ERROR));
    }
}
Next, let's add a method to remove banned words:
    private function filterBannedWords(array $translationPayload, array $bannedWords): array
    {
        foreach ($translationPayload['collection']['keys'] ?? [] as $keyId => $keyValue) {
            foreach ($keyValue['translations'] ?? [] as $language => $translationData) {
                $translationPayload['collection']['keys'][$keyId]['translations'][$language]['translation'] = str_ireplace($bannedWords, '', $translationData['translation']);
            }
        }

        return $translationPayload;
    }
Enabling preprocessor
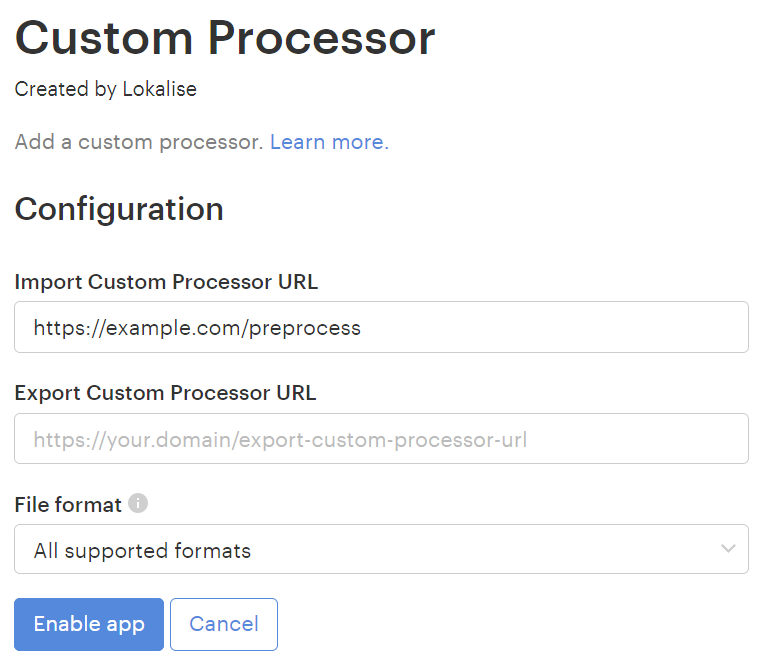
Now that the preprocessor is ready, we have to enable it on Lokalise. To achieve that, open your Lokalise project, proceed to Apps, find Custom processor in the list and click on it. Then click Install and configure this app by entering a preprocess URL:

By default preprocessor will be run for every uploaded translation file but you can narrow the scope by choosing one of the file formats from the corresponding dropdown.
Once you are ready, click Enable app. Great job!
Postprocessing translations
Now let's perform a very similar thing and remove "BANNED" words from the downloaded translations.
To achieve that, add a postprocess action to your controller:
    #[Route('/postprocess', name: 'app_postprocess')]
    public function postprocess(Request $request): Response
    {
        $payload = $request->getContent();

        if (empty($payload)) {
            return new Response(json_encode(['error' => 'Missing body!'], JSON_THROW_ON_ERROR));
        }

        $data = json_decode($payload, true, 512, JSON_THROW_ON_ERROR);
        $data = $this->filterBannedWords($data, ['banned', 'offensive'], $logger);

        return new Response(json_encode($data, JSON_THROW_ON_ERROR));
    }
This is it!
Enabling postprocessing
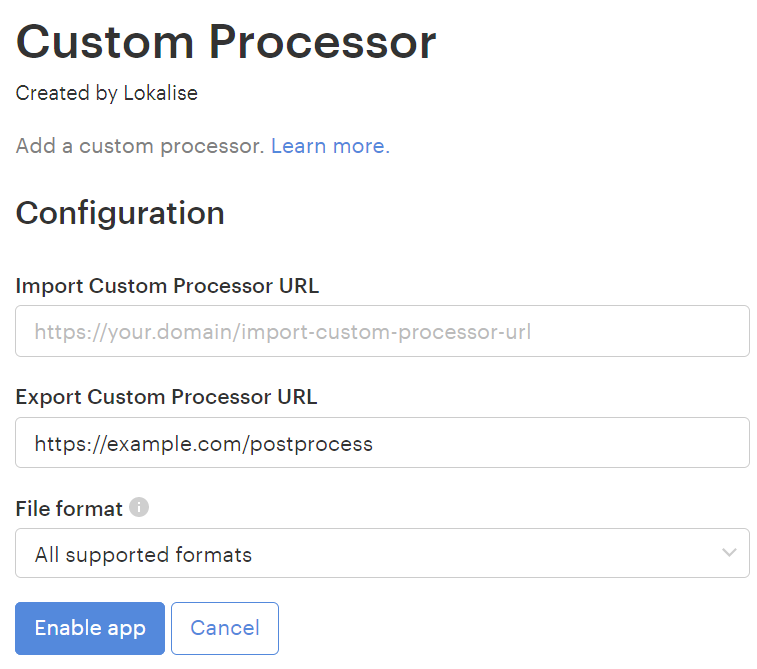
Now that the app is finalized, we have to enable postprocessing on Lokalise. To achieve that, open your Lokalise project, proceed to Apps, find Custom processor in the list and click on it. Then click Install and configure this app by entering a postprocess URL:

By default postprocessor will be run for every uploaded translation file but you can narrow the scope by choosing one of the file formats from the corresponding dropdown.
Once you are ready, click Enable app. Great job!
Updated 6 months ago