
Software localization workflow
Learn best practices and recommendations on localization workflow.
Lokalise branching explained
Branching allows you to create separate versions of your translation project. Once enabled, you can create and manage multiple independent versions of your project. You can switch between these versions, delete them, and merge changes from one to another. For more information, check out the post on Lokalise branching.
It's crucial to understand that branching in Lokalise operates differently from commonly used version control tools such as Git. The key differences to keep in mind are:
- There is no possibility to revert a branch merge.
- There is no possibility to branch from a non-master branch.
- Conflict resolution logic may differ; refer to the documentation for more information.
- Branches in Lokalise are not automatically linked to or created in Git repositories and vice versa.
There are certain limitations for branched projects:- Some actions and features may only be specific to a branch; refer to the documentation for more information.
- Some actions and features are only available for the master branch, such as automations, custom processors, and snapshots; refer to the documentation for more information.
- It's not possible to restrict user access to a specific branch. Team members will have access to all Lokalise branches.
Lokalise branching vs. Git branchingIt's important to recognize that there may be differences in features and conflict resolution between Lokalise and Git branching. Lokalise branching was specifically designed for localization purposes.
Uses of Lokalise branching
Lokalise branching can be useful in the following scenarios:
- When you want to initiate localization at an early stage of the development process.
- When you want to preserve your production translations while still making new translation changes.
- When you want to compare and test two translation versions.
Before exploring these scenarios further, let's take a closer look at a typical development and localization workflow without using Lokalise branches.
Last-Step localization workflow (without Lokalise branching)
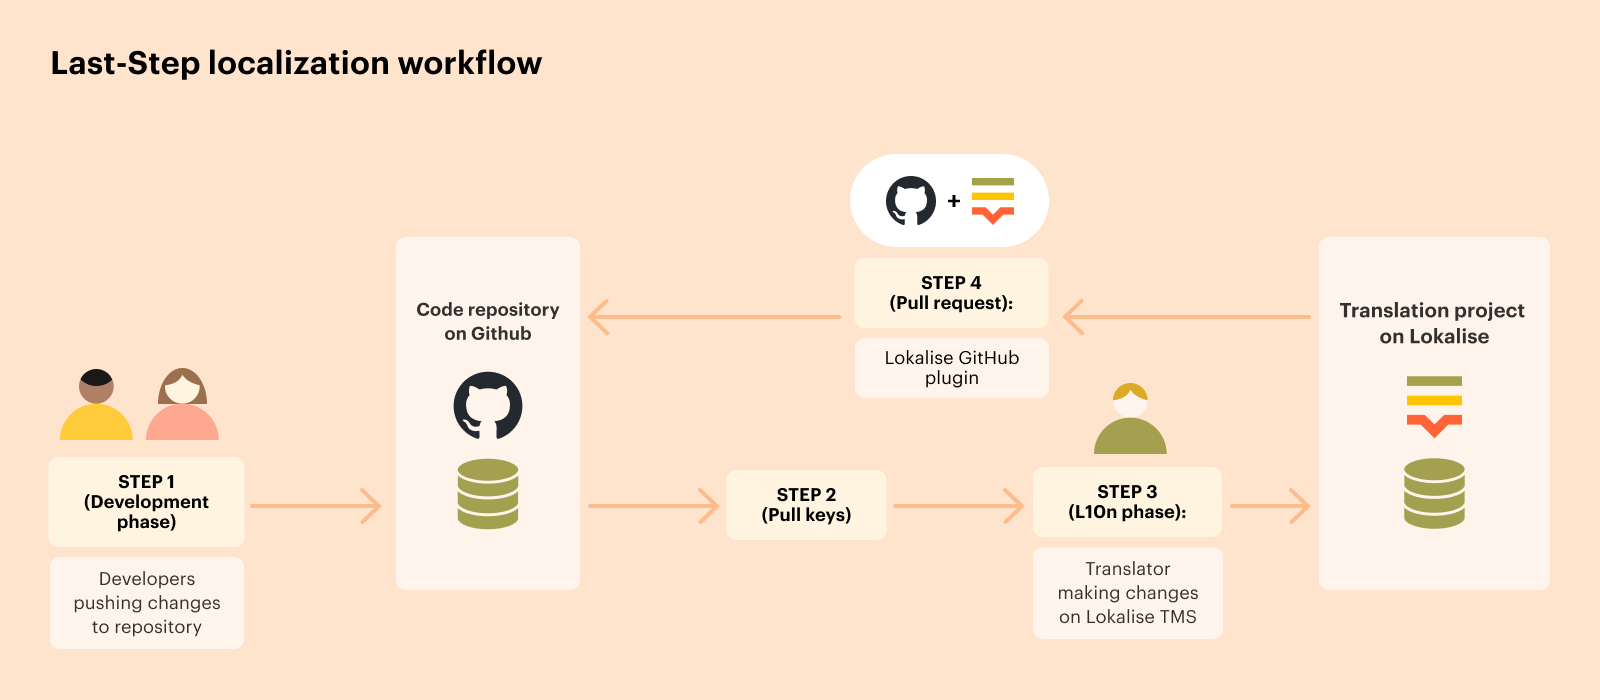
For developers working in a Git feature branch, the following flow is recommended when the localization team wants to start localization once the features are close to production. This is an example of a workflow in which there is no need to use the Lokalise branching feature.
- Once a feature's strings are ready for translation, they are committed to the Git branch connected to Lokalise through GitHub-like integrations, and Lokalise can retrieve the relevant resource files for translation.
- Lokalise will only have one version (master), as branching is not enabled.
- Localization managers can retrieve the latest changes from the translations-ready/staging branch in Git and let translators work continuously on translation updates.
- When the translations are finished, a pull request (PR) is made from Lokalise to the translations-ready branch in Git. The PR is reviewed, committed, and the entire branch is merged into the master branch in Git, creating a new release of the localized feature.
- Developers can use the Lokalise API or CLI to automate getting the latest translations for deployment or testing, eliminating the need to manually retrieve changes from Lokalise and create a PR in GitHub.
- For continuous development and localization, it is possible to create a PR with only translated, reviewed, or approved translations.
Development-stage localization
Consider a scenario where developers work on separate feature branches in GitHub and merge them directly into the main branch without first having a separate translations-ready branch to accumulate all changes. If a team wants to start localization while developers continue working on separate branches, before the feature is fully developed, alternative approaches can be taken, with or without the use of Lokalise's branching feature.
With Lokalise branching
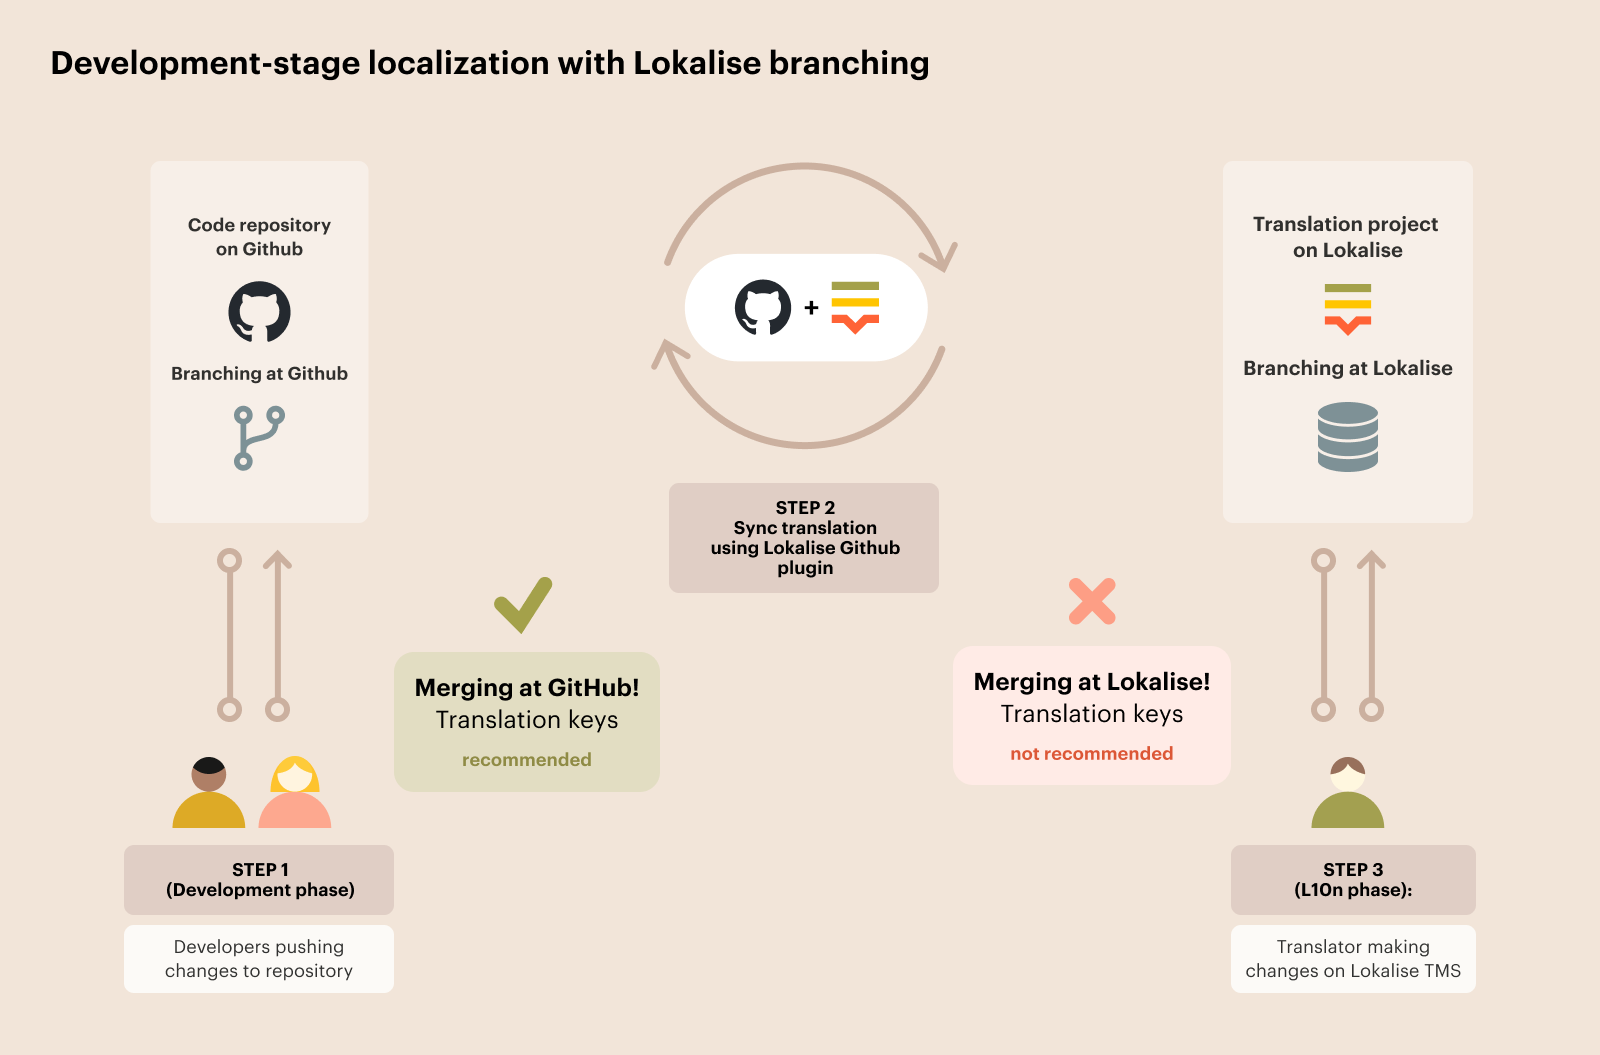
Multiple branches in GitHub repositories can be connected with multiple branches in Lokalise, one branch per branch (e.g., main in GitHub connected to master branch in Lokalise).
It's important to remember that Lokalise branching is only for localization and not as advanced as branching in GitHub. The features and conflict resolution between the two will not be equal. It's crucial to establish the source of truth for branch merging, which is recommended to be GitHub.
There are two approaches to using Lokalise branching:
-
Merging content in Lokalise (not recommended)
This is not recommended as the GitHub flow of merging feature-specific branches cannot be replicated in Lokalise (unless you create a custom flow with Lokalise similar to what Lemonade outlines in their case study). -
Merging in GitHub
Merging branches in GitHub gives better control over merge scenarios and expected behavior. It's also possible to reverse the branch merge in GitHub, while this is irreversible in Lokalise.
To avoid discrepancies between Lokalise and GitHub, it's best to rely on GitHub for conflict resolution during branch merging and to not merge in Lokalise. Here is possible workflow:
- Enable branching in the Lokalise project
- Create a branch in Lokalise for each GitHub feature branch with localizable content
- Keep the master branch in Lokalise clean
- For any content changes, create new branches in Lokalise and use them for translation tasks
- Export content from Lokalise branches to GitHub branches
- Merge branches into main in GitHub (rely on GitHub for conflict resolution)
- Remove the feature branch in Lokalise after merging in GitHub is complete
- Pull the new GitHub main to the Lokalise master, which may override changes in Lokalise
Note: The recommended approach is to keep the Lokalise master branch clean and make all changes in new branches to avoid losing any work in progress on the Lokalise master branch not present in GitHub.
Without Lokalise branching
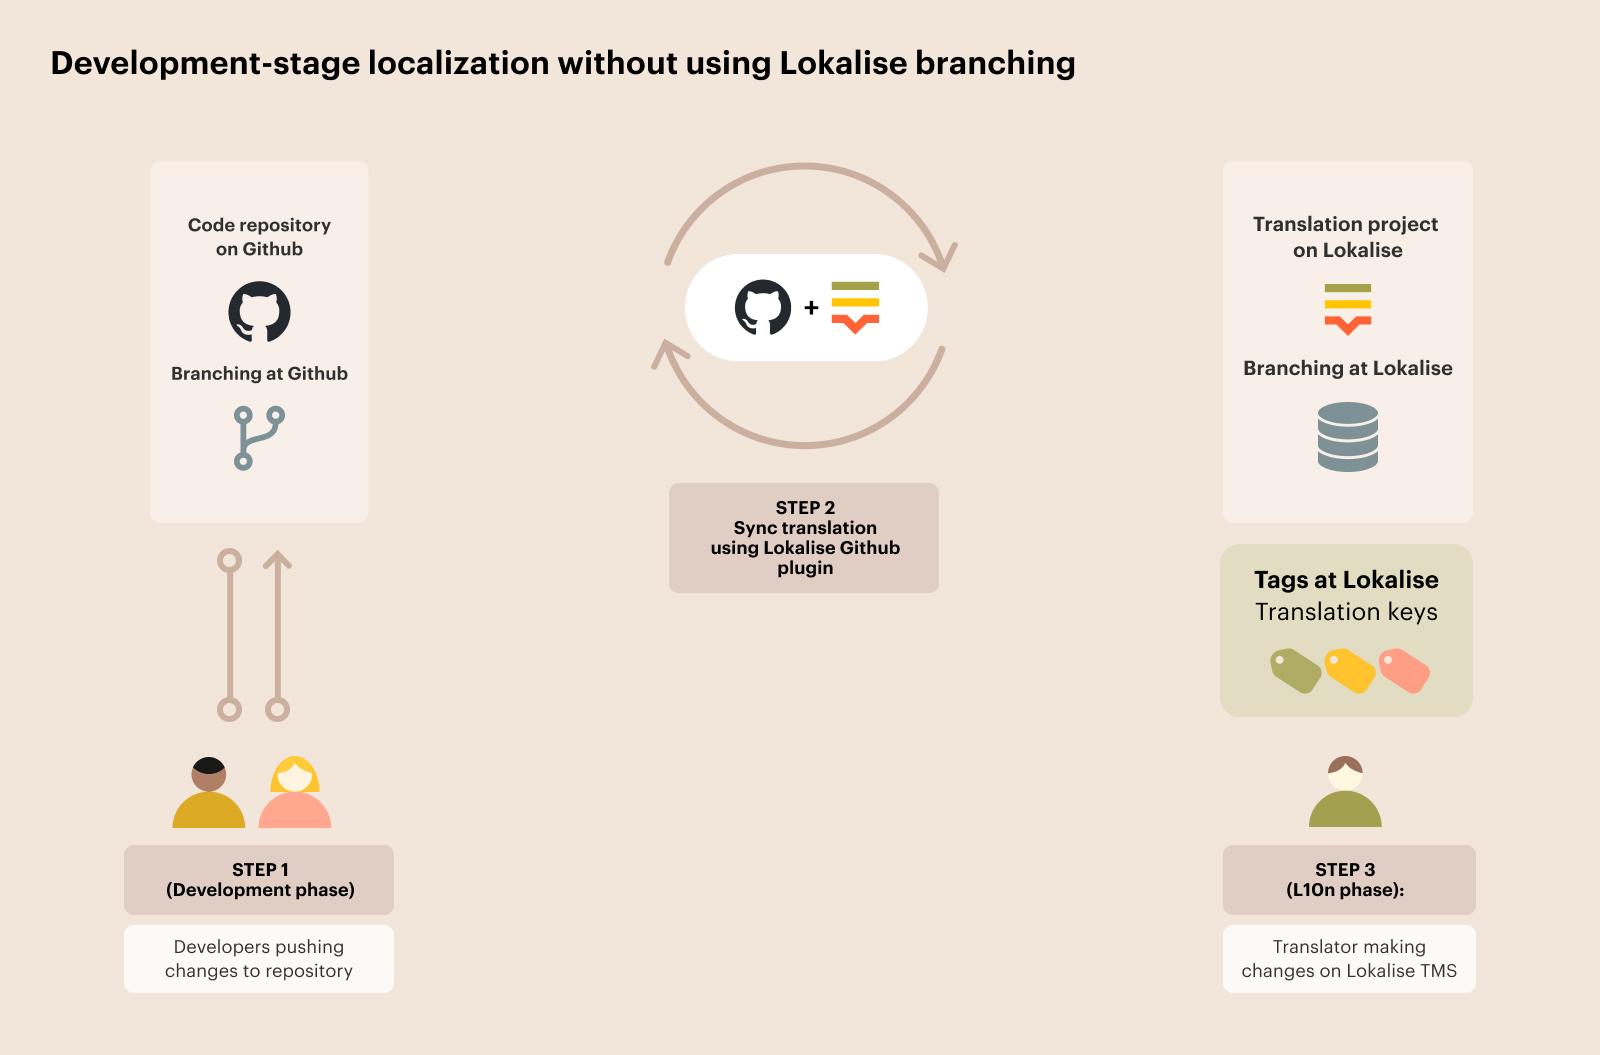
You can achieve the same results by usingtags to differentiate branch-specific content.
For instance, you can add a tag to a translation key to indicate the branch where it was first introduced. Additionally, you can add tags to indicate the status of the translation key, such as "work in progress," "released," or "obsolete."
For example, you can use tags to mark translation keys with their Git branch of origin and their progress through development processes. You can use tags like "feature-1," "work in progress," "production," and "obsolete."
When downloading content, such as creating PRs in GitHub, you have the option to include tags in or exclude tags from the download bundle. This gives you flexibility to filter for keys that match your desired scope. For instance, you can export all keys with a specific feature branch tag and a "reviewed" status. Or, you can export all keys (or keys with the tag "work in progress") for the download bundle that contains all the content needed for staging. This can be done through Lokalise's UI, API, or CLI.
Branching by using tagsFor more information, read the "Branching by using tags and separate projects" that covers the topic.
Testing-stage localization
Another reason to use branches in Lokalise is to maintain two distinct versions of content that are separate from each other: one version is clean and has all the translations deployed to production, while the other version has changes that are being tested.
Managing different content versions (production and staging) can be achieved in various ways.
With Lokalise branching
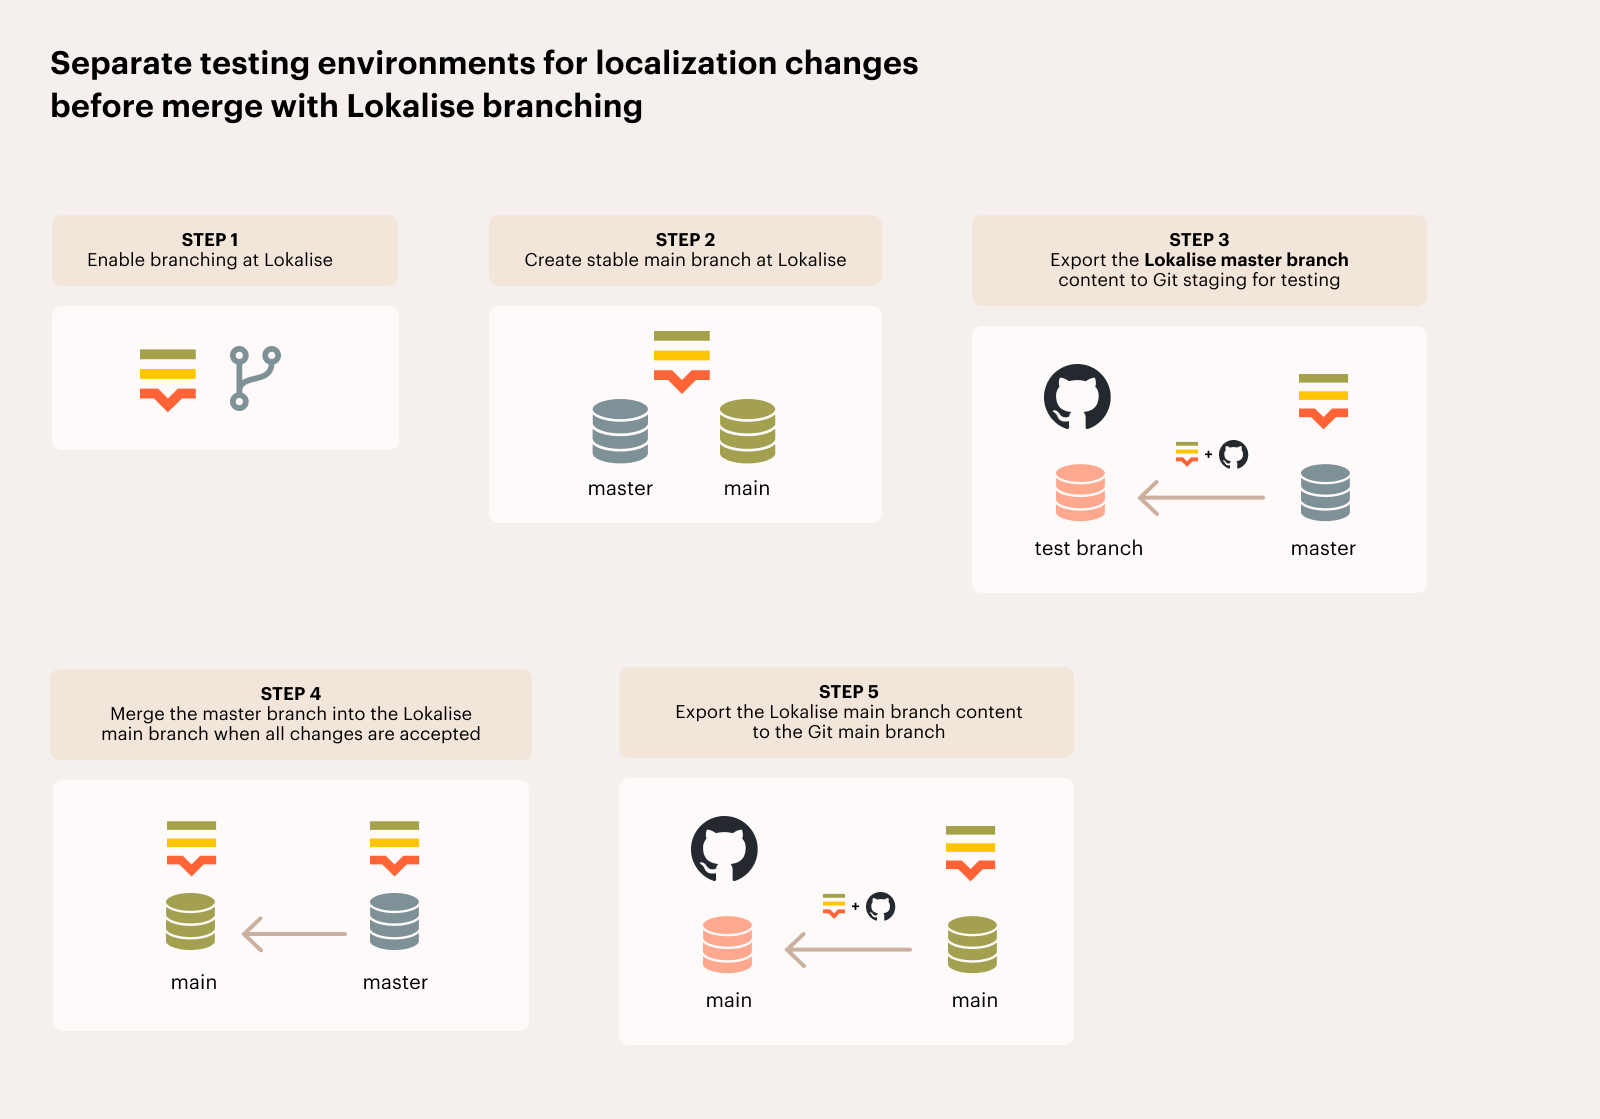
The Lokalise branching feature has a suggested flow to keep the Lokalise master branch clean and synchronized with the released content in the Git main branch. The changes should be made in a "testing" branch in Lokalise, which can be synchronized with the customer's staging environment. Once the changes are approved, the "testing" branch is merged into the Lokalise master branch, replacing it with all changes.
Here is a possible workflow:
- Enable branching in Lokalise
- Keep the Lokalise master branch clean
- Create a testing or staging branch in Lokalise
- Translate amended content on the testing branch
- Export the testing branch content from Lokalise to Git staging for testing
- Merge the testing branch into the Lokalise master branch when all changes are accepted
- Export the Lokalise master branch content to the Git main branch
This workflow minimizes conflicts from branch merges and creates a more predictable process by only making changes on the testing branch. However, note that a branch merge cannot be reverted in Lokalise. To revert a merge in Git, the same changes need to be manually made in the Lokalise master branch by uploading files to Lokalise and by manually overriding changes.
Swapping Lokalise branches:
Use Lokalise's master branch as a staging branch in GitHub for full utilization of Lokalise's features, such as automations, snapshots, and custom processors, which are only supported for the master branch. Create a separate non-master branch in Lokalise as a production branch in GitHub. The flow would be as follows:
- Enable branching in Lokalise
- Create a new branch named main
- Use Lokalise's default branch (master) as a staging branch and synchronize it with the Git staging branch
- Synchronize Lokalise's main branch (non-master) with the Git main branch
- Make all changes on the Lokalise master branch (such as adding raw content and pre-translating with Automations), then export the same content for testing
- After testing, merge the Lokalise master branch into the Lokalise main branch, and push the content from the Lokalise main branch to the Git main branch.
Without Lokalise branching
You can also achieve a similar workflow without using branches in Lokalise for cases where you only want to test changes in a staging environment before releasing them to production.
Tag-based approach + translation filters:
As previously mentioned, tags can be used to differentiate translation keys in different branches, as seen in this article.
It is possible to include or exclude translation keys in a GitHub PR, but it's also necessary to filter which translations should be included in the PR.
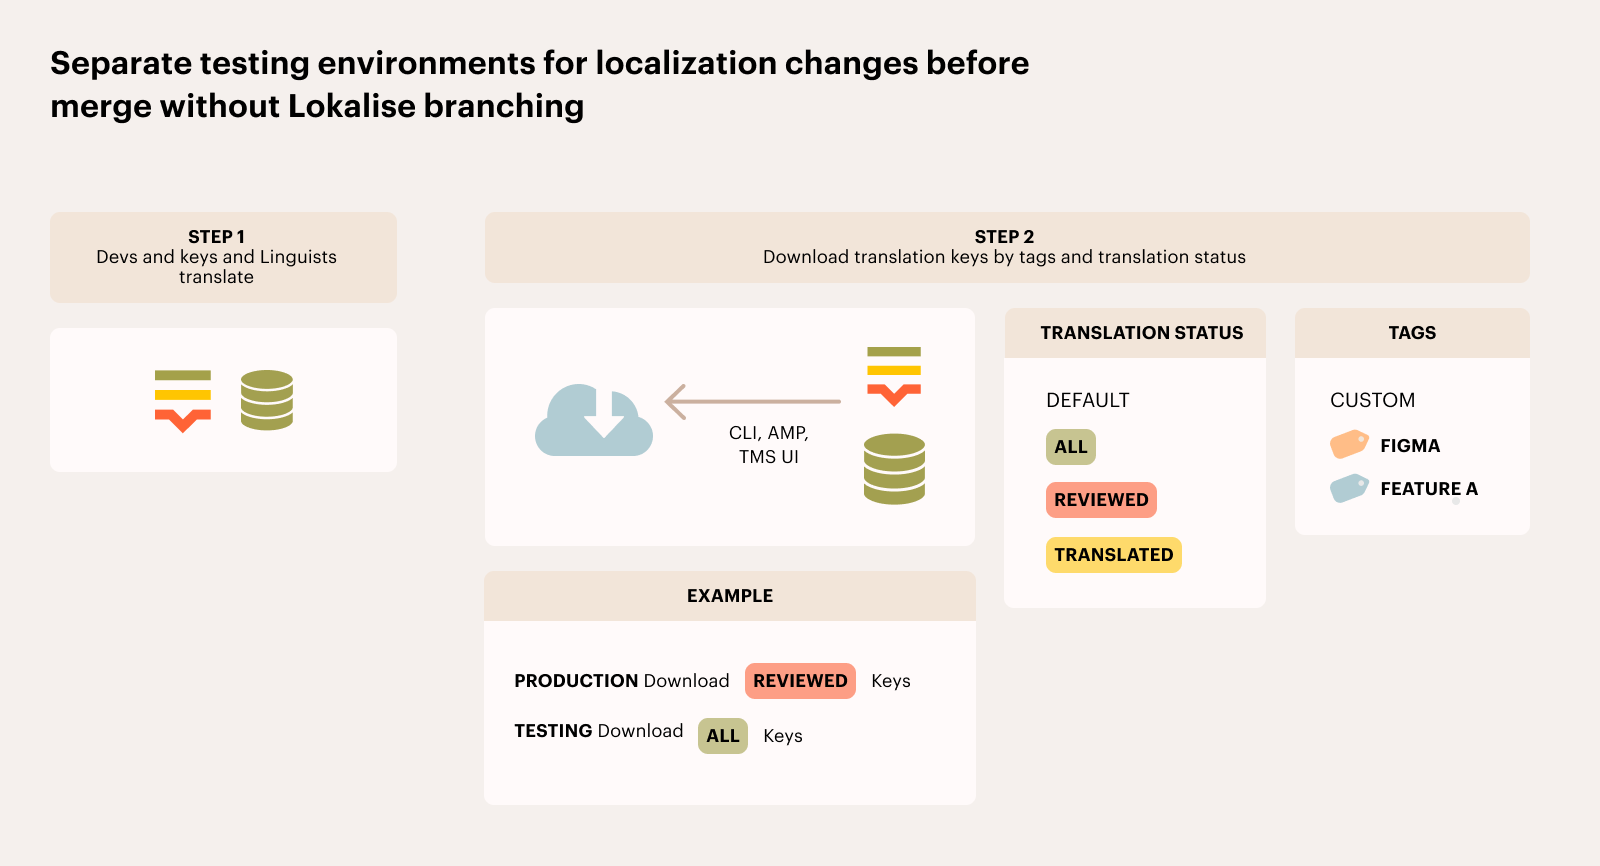
The example below illustrates how to filter and export translations using Lokalise:
A developer added a key with an English source copy "Hello world." Linguists translated it into Spanish as "Hola Mundo" and the stakeholders (e.g., copywriters, QA, legal) reviewed it and marked the translation as "reviewed."
Using Lokalise's UI, CLI, or API, you can filter the bundle during the download process using tags and translation statuses. If you export the content with filters such as "all" translations, "reviewed-only" translations, or "last reviewed" translations, the key and its Spanish translation "Hola Mundo" will be included in the pull request (PR).
If the source copy is changed to "Hello, my world" and the translation is changed to "Hola, mi mundo," this becomes the latest and current version, but the approvers have not marked it as "reviewed" yet.
To export the approved content (e.g., content for production), you can use the "last reviewed" filter on export. In this case, the "Hola Mundo" translation will be returned in the resource file because "Hola, mi mundo" has not been reviewed yet.
For testing, you can download a file from Lokalise with "all" translations, and Lokalise will take the most up-to-date translation version, which is "Hola, mi mundo". This resource file can be sent for testing on a staging environment.
You can also use Lokalise CLI and API endpoints to create pipelines that rely on different translation filters, e.g., "all" translations are downloaded and sent to "staging," and "last reviewed" translations are sent to the production environment.
Once "Hola, mi mundo" is marked as reviewed, it will be picked up by the "last reviewed" filter in future downloaded files.
Using a combination of tags, translation statuses, and export options, you can (for example):
- Export keys tagged as "production" with "last-reviewed" strings to get the version closest to the master in GitHub
- Export all keys and all translations to get the version closest to the staging in GitHub (with all recent changes)
Translating dynamic content
Translating dynamic components, such as user-generated content or product information that is typically stored in a database, can pose significant challenges.
Considerations before getting started
First and foremost, it’s important to understand and consider the architecture of the database, and any system(s) it is connected to—that's because a database is never an isolated entity. The system needs to be aware of the database's architecture and accommodate any changes made within it, both in setting up a multilingual database and managing the languages it contains. This could be a considerable challenge indeed.
Secondly, unlike standard translation, database translation isn't merely about taking the content and translating it. Instead, it requires construction of an entire workflow, with careful consideration given to where the data for the synchronization logic will be stored. This data could reside within its own independent microservice, be stored in the database itself, or even exist within a key in Lokalise.
Thirdly, it's crucial to decide which system will be the single source of truth for your content. For your source content, you might opt for the database or a user-friendly UI layer atop your database, or you might even prefer Lokalise. For your translated content, while Lokalise is typically the go-to choice, your database could also serve as the home base. This is a fundamental decision that could shape your entire localization journey.
Lastly, we must consider the synchronization style. We can use a full sync, replicating all the content of the database (a more suitable choice for small-scale projects), or a delta sync, processing only the new and updated keys.
What are the best practices?
When it comes to project organization, maintaining translations of dynamic content in a distinct Lokalise project is recommended. This project should run parallel to the one you're already using to handle static translations. If the volume of dynamic content is substantial, consider categorizing it into separate projects based on type.
While managing dynamic content in Lokalise, it's essential to understand the key and value structure. Set aside time to formulate a logical key structure for your dynamic entries, aiming to use a unique database identifier within the key name, such as:
form.1.title
form.1.details
form.1.overview
form.2.title
form.2.details
form.2.overview… and so on.
The key naming pattern must be unique within its given context in the Lokalise project. Its prominence in Lokalise can also provide context to the translator. Key tagging can also be utilized, thus affording you the ability to more effectively manage and structure keys during the localization process.
To keep your dynamic content translations current, establish a routine sync process, wherein the potential options are manual, scripted, or a fully automated service. The solution can even evolve over time from manual to automated as long as the logic remains the same, meaning that a database restructure wouldn’t be required.
When it comes to uploading content, start by grouping your keys and original content. You can either gather them into standard file types (here is a list of our supported file types) or organize them as individual keys. Then you can directly upload this collected data to Lokalise, using our API if you prefer. If you want to provide further context for translators, such as screenshots or descriptions, you can directly create new key entries in Lokalise and append these additional details to them.
The rule of thumb for managing content translation is to revise only Lokalise's translated versions of the source content. Any changes to the source content should be conducted directly within the database. This practice helps prevent any potential versioning conflicts.
Retrieving translated entries is also manageable. Straightforward use cases can utilize the export function or download endpoint. Choose a format you are comfortable with, ideally easy-to-parse formats, or even export at the key level directly using the translations endpoint. Once you have secured your translations for each location, simply store the content associated with each key and locale in the database.
What about database structure when handling multilingual data?
If the database only contains one language, we need to consider where the translated content will be situated in the database. In the world of database design for multilingual data, there are three main approaches: localized columns within the model, separate translation tables, or a completely separate database. The choice between a straightforward or more sophisticated method directly aligns with your app's specific needs.
The column method: Localized model columns, such as title_en and title_fr, allow normal queries and subsequent fine-tuning in the application layer. This approach is ideal for smaller apps with fixed locales.
The separate tables method: If the number of locales is likely to grow, using separate tables per model for translations proves more accommodating. Although this entails complex querying, it provides excellent adaptability—locales can be added indefinitely without disturbing your models.
The separate database method: This approach involves housing all the translations in an entirely different database. While this means managing an additional element, it can offer greater separation and flexibility, especially for larger projects with numerous languages and locales.
Universal considerations: The method chosen should always be considered in relation to the applications connected to the database—e.g., backend services—since these apps will "consume" the multilingual process and should be able to work with the multilingual structure of the DB.
Also, irrespective of the chosen approach, remember to define your tables and text fields with utf8mb4_unicode_ci for full, case-insensitive Unicode support. Additionally, opting for the UTC format for dates and times, coupled with a time zone offset application at retrieval, ensures user relevance. Optionally, a secondary time zone offset column can be included for the logged time zone.
Successful project management practices
Before diving headfirst into your localization process, focus on project management best practices. Begin by gathering your specific requirements, which will lay the foundation for outlining your localization process. This process should be approved by Lokalise's Sales Engineering team, which can provide valuable insights and confirm if you're on the right path.
Next, it’s time to prepare the success criteria for your proof of concept (POC). These criteria will guide your POC project and serve as a benchmark for the project's success. Once the POC project is executed, evaluate the outcome against the preset success criteria, and use your findings to adjust your localization process for optimal efficiency.
Lastly, prepare your implementation project, which should incorporate the insights and refinements from the POC stage. Remember, a robust plan and iterative refinement are keys to success in the localization process, especially when dealing with dynamic content translation.
Final word
Navigating the world of dynamic content translation can be challenging, but Lokalise brings simplicity and efficiency to the task. Successful localization is about effectively managing both the content and its underlying processes. If your project is small or expansive, Lokalise stands as a reliable partner, supporting you in managing all your content translation efficiently and intuitively.