
Technical requirements: Native app
What is a Native Content Integration?
Our customers have the best experience when we enable them to manage the translation workflow from the same system that holds the content being translated. For example, when they are translating a WordPress website, we provide an interface in WordPress. When they are translating their website designs, we provide an interface within Figma, Sketch, etc.
A native content integration is an app that is built and installed on a third-party system and acts as a bridge between that system and Lokalise. It enables our customers to pick the content they want to translate, send the content to Lokalise, see the translation status, and receive the translated content back.
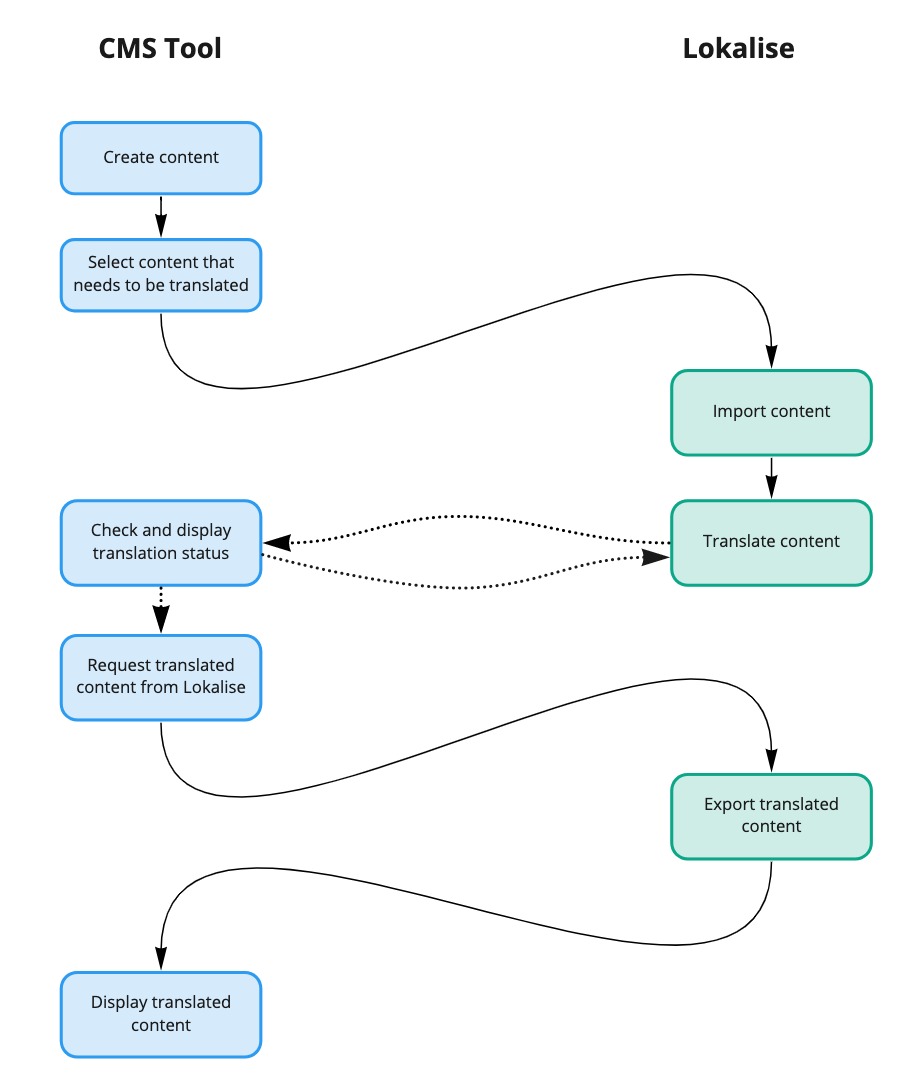
What is the desired user flow?
We aim to provide our customers with a familiar experience that follows the same flow across multiple systems, which consists of the following phases:
- Setup: Installation, authorization, and configuration.
- Content management: Translation status & management interface
The user flow should be as follows:
Phases
Phase 1. Setup: Installation, authorization, and configuration
The app is installed by the user, and guides them through authentication with Lokalise and configuration of the integration.
Step 1: User installs the app in your system
Authentication with Lokalise can be performed by generating an API token or with an OAuth 2 access token. Please find the details below. While all the endpoints support both methods, it's recommended that you use OAuth 2 flow. API tokens are good for rapid prototyping or integrations designed for single-account use, but integrations designed for multi-customer use or listing on the marketplace should be built with OAuth 2.
Step 2: User configures the app
The configuration page should include the below parameters:

- Lokalise project – The user should be able to select an existing project or create a new one. Please note that the app should only show projects where the user has admin access rights, and the base language from the service is included (as the base or the target language). So, to get the available projects you should fetch all projects and follow these steps:
- check if this team has access to the Lokalise API
- check that project type is LocalizationFiles (
"project_type": "localization_files") - check if the user is a contributor with admin access rights for this project (use Get contributors endpoint)
- check if segmentation is disabled for this project (
"segmentation": false) - check if the base language in the CMS is included in the project (
"languages").
The first option in the projects dropdown should be Create new project. Then all the existing projects should be displayed.
If the user selects an existing project, inputs with the base and target languages should be displayed. Use the Get project languages API endpoint to get target languages, and the Retrieve project endpoint to get the base language (base_language_id and base_language_iso parameters). The base language input should be disabled and the user should not be able to change this language. The target languages input should be enabled so that the user can add new target languages to the project.
If the user selects Create new project, new inputs should be displayed:
- Project name (text input)
- Select a team (dropdown with all the user's teams) — if the user has more than 1 team (use Get teams endpoint)
- Base language is the main initial language in the Lokalise project and might be used for inline machine translations and automations (you can use the Get languages endpoint)
- Target languages
Please note that the base project language in the CMS must be included in the project as the base or target language. If the user does not select a language used in the CMS and clicks Done, an error should be displayed and project will not be created.
Here's a sample dialog that may be displayed after the user selects the Create new project option:

The user should be able to return to this configuration page and change all these settings. If the user changes the project, then all keys should be unlinked (removed from the cache table).
Authentication
Authentication can be performed in one of the following ways:
- By generating an API token
- With an OAuth 2 access token — this is the preferred option for an application that will be utilized by multiple users.
Personal access token
An API token can be generated on Lokalise under the Personal profile - API Tokens tab. This token should be sent to the Lokalise API as a request header X-Api-Token. The user must have a team owner role to create new projects with the supplied token.
You can find more details in the API docs.
OAuth 2
To get started, you should register a new OAuth 2 app with Lokalise and set the redirect URI.
The OAuth 2 process can be separated into three stages:
- Request an access code.
- Make a request with the access code and receive an access token (the user can receive data from Lokalise with this access token).
- After the access token expires make a request to refresh the token.
You can find more details in the API docs.
Phase 2. Translation status & management interface
Translation status
In order to stay in sync with Lokalise, which helps to optimize communication and the UX, the app must implement an internal cache that will keep, for every content item, information related to the Lokalise integration. This includes the translation status, the last updated date, and other required metadata.
Depending on the flexibility and capabilities of the system that is being integrated, this can be achieved in one of two ways:
- Implementing a relational database, where all information will be kept, as part of the app and within the system (i.e., not on an external server).
- Extending the content item object, and keeping the information as part of the object itself.
If none of these options is possible, and an external server and database are required, these must be built and managed by Lokalise.
For available translation statuses, see the Tabs block below.
Management interface
The user is presented with a translation management interface from where they are able to manage the translation workflow for content items. The interface allows them to see the status of all content items, as well as to search for specific items and push them to Lokalise for translation.
All translatable items, that are accessible via the API, should be displayed on this page. We recommend displaying content as top-level items – for example, if your structure is space > folder > article > title/description/body/etc., you should display the list of articles. When you export an article to Lokalise, a new key for each field will be created (e.g., you export 1 article and 3 keys are created in Lokalise – title, body, and description).
Each language should be displayed as a separate element (row). One article with 3 target languages will be displayed as 4 rows in the items table (one for the base language, and one for each target language).
General description
The management interface:

Tabs
Translation statuses should be displayed as different tabs.
Please note that the translation status is different for each language, and one element (on different languages) might be displayed under different tabs (for example, Latvian translations are added, Spanish is published, and Italian is in progress).
Available translation statuses:
| Title | Description |
|---|---|
| Not translated | This item wasn’t exported to Lokalise (translation status for all elements here is "Missing") |
| Translation in progress | This item was exported to Lokalise. Translation statuses are "In progress" and "Done" for reviewed translations. All exported elements should be displayed here. They can be translated or in progress, but none of them is imported back. Actual translation status: done or in progress should be displayed in the Status column. To define the actual status, you should check all items included in the considered article or element. For instance, if an article has 4 elements and 3 of them are translated and 1 of them is not, this article should be displayed in this tab. After the user adds translations for all 4 items, the status of this article should be Done. |
| Translation is done | Item is imported back |
Table
The following parameters should be displayed on this page:
- Element title (N first characters of the title and “…”). If the element doesn’t have a title, then you should use one of these options:
- "Content type" for "title of parent element". This is the element type (for example, title, content, description, post, rich text, link, label, or other).
- The first N characters of the next text component
- Mark items as "Untitled"
- Tags that are saved in the Lokalise project while exporting to Lokalise. If the element has more than one tag (e.g., the article title has a “title” tag and article description has a “description” tag, but we have only one row for one article), we should display all possible tags.
- Last updated date is the date on which the translated item was imported or changed in the service.
- Language – Languages should be displayed as a filter and new column. In the filter, the user can select more than one language. If a language is selected, only elements on this language are displayed.
- For Translation in progress tab: translation status from Lokalise. The available options are:
- "In progress" for exported items without saved translations
- "Done" for exported items marked as reviewed (
is_reviewedfield in the List keys API call)
- For Translation is done tab: element status (in your service). Usually statuses have the following possible values:
- draft – element is not published
- changed – element was changed after it was exported to Lokalise (element can be draft or published in this case)
- published – element is published
Translation in progress tab:

Translation is done tab:

The available expected element statuses in the CMS system are the following:
| Title | Description |
|---|---|
| Draft | Item is not published |
| Published | Item is published |
| Changed | Item was changed after last import to/export from Lokalise |
Filters
Filters should be applied to elements displayed on the currently selected tab. The two most important filters should be displayed at the top of the table, and others may be hidden under the More filters button.
We recommend putting in different important filters for different tabs:
- Not translated tab: the most used filters are language and tag or title
- Translation in progress tab: language and status
- Translation is done tab: language and title or tag

The available options for filters should be:
- Translation or element status (translation status for the Not translated and Translation in progress tabs, and element status for Translation is done tab)
- Tags (or other equivalent options for content filtering, according to how the system is built)
- Dates ("Created before/after", "Updated before/after")
- Text search for the title or other text fields included in the element
- Parent elements/folders/spaces/environment
- Content type
Sorting
The user should be able to sort elements by all the displayed fields: title, content type, last updated date.
Pagination
There are two possible options:
- Display N elements and upload the next N elements automatically after the user scrolls the page to the end of displayed elements (this is the preferred option)
- Display page and number of displayed elements, and button for loading more items:

Actions
Action that applies to all elements: Refresh.

After the user clicks the Refresh button, the actual translation statuses from Lokalise should be requested. Elements might be moved across tabs and their statuses should be updated.
Also, the interface should include additional actions specific to different translation statuses:
- The Not translated tab should have the Export to Lokalise action. The user selects an article (or clicks the Select all checkbox) and clicks the Export to Lokalise button. Then the Export settings should be displayed (please find details below).
- The Translation in progress tab should have the Import button. After the user clicks the button, all selected items on selected languages should be imported from Lokalise (please find details below).
Export content
After the user clicks Export to Lokalise, a popup with Export settings should be displayed:

Export settings:
- Select target languages. Display only the languages that the user has added to the service.
- Assign tags (default, custom, and initial). Default tags are < your system >, < space/environment/other top-level hierarchical element in your system >, and < article - parent element title >. For example, if you’re adding an integration between Shopify and Lokalise, then < your system > tag will be Shopify. The next tags depend on the data structure in your system. You should take the title (name) of the top-level element (usually it’s space/environment/site name/folder) and the title of the parent element (for instance, an article has title, body, and description fields and all these elements should have an article title tag).
- They are displayed by default, but each element can be removed.
- Also, the user should be able to add any custom tag manually on export.
- Save character limit (in case any of the content item fields/elements have length restrictions – character limits, this data should also be passed to and saved in Lokalise)
- Source of truth – Available options are "Lokalise" and "Your system". If the user selects Lokalise as a source of truth, translations will be updated in Lokalise. But if you selects "Your system", translations won't be updated in Lokalise even if they were updated manually in your service.
- For example, you have exported, translated, and imported back an article, and you need to make some changes there. In this case, the manager updates the initial text and may also update translations. If they can fix translations directly on your service, then you should select your service as a source of truth and update translations in Lokalise. If only translators can fix and update text, then the manager should only update the initial text and set Lokalise as a source of truth.
- By default, the source of truth should be the third-party system.
Export process for already exported elements (linked to Lokalise keys):
- Check if the translations were included in an ongoing task (optional step). This can be checked in the following way:
- Retrieve a key to get a task ID.
- Check the status of the related task. Task status shouldn't be "In progress".
- If the user has selected Lokalise as a source of truth in Push settings, the translations for all selected languages should be updated. You can use the Get keys and Update translations endpoints for this.
- If the user has selected your service as a source of truth in Push settings, then only the base language value can be updated. You can use the Get keys and Update translations endpoints for this.
Export process for new elements
- Add a new key for each text element. Please note that usually one article (one row in the table) includes several fields and each of these fields will be a separate key. This means one article could be linked to multiple keys in Lokalise.
- Display the export process result:
- Success: you can display how many items were exported
- Fail: detailed error message or at least the statement where an exception was raised. Provide a way for a user to run the export operation again.
Import content
After the user clicks Import from Lokalise, a popup with Import settings should be displayed.

Import settings:
- Status of created content – The available options should reflect the workflow in your system. Usually the workflow is the following: draft > published. We recommend having Draft, Published, and Same as base item. The default option should be Same as base item.
Import process:
- Get all translations for all fields of the selected articles (Get keys → Get translations endpoints). Only the selected languages should be imported.
- Update items:
- translations created already should be overwritten with the new values from Lokalise
- new translations should be added to Lokalise – create new translations for articles without
- Possible errors:
- Item was deleted before the import — create a new item.
- Language was deleted — the item should be skipped.
- Display the result of the import operation:
- If the process was successful, the number of imported, updated, and skipped items should be displayed. For skipped items, detailed errors might be displayed.
- If the process failed, an error should be displayed.
Remove an app
The user should be able to remove the app.
After the user removes the app, all data from the cache table (where links between text items in the CMS and keys in Lokalise, and additional info, are stored) should be deleted. If the user then reinstalls the app, elements won’t be connected to Lokalise keys, and upon the next export new Lokalise keys will be created (even if user selects the initial project).
Development Milestones
| Step | Title | Result |
|---|---|---|
| Phase 1. Step 1 | Initial App Setup | A native application is available for users to install/reinstall. This might not be possible during the development process until an app is submitted to the respective "app store", but this is the wireframe for the entire app |
| Phase 1. Step 2 | Authentication Implementation | When users install the app, they authenticate with Lokalise using OAuth 2 or API keys. The scope and credentials are saved in the app for all future communication with Lokalise. |
| Phase 1. Step 3 | App Configuration | After authenticating, the user is able to select the Lokalise project (or create a new project) and languages that will be used for this integration. *Please see Phase 1. Setup: Installation, authorization, and configuration — User configures an app* |
| Phase 2. Step 1 | Lokalise API Implementation | An SDK or custom wrapper is created to implement the Lokalise API so that it’s available to the app. |
| Phase 2. Step 2 | Lokalise Content Metadata Implementation | The content object can be stored in your DB. Please see "Technical requirements" – Content object |
| Phase 2. Step 3 | Translation Management Interface (TMI) | Users are presented with an interface listing all content that is available for translation, being translated, and has been translated. Please see "Phase 2", point 3 – General description |
| Phase 2. Step 4 | TMI - Sorting & Filtering | Users are able to filter and sort the content to narrow down the list according to status, tags, dates, etc. |
| Phase 2. Step 5 | TMI – Bulk Actions | Users are able to select one or multiple items of content, and initiate actions on them. |
| Phase 2. Step 6 | Action – Export To Lokalise | Selected content is exported to Lokalise |
| Phase 2. Step 7 | Action – Import From Lokalise | Translated content is imported from Lokalise |
Statuses
In order to easily manage the translation workflow, each content item in the system has a status that relates to its translation within Lokalise. This status needs to be saved in the third-party system, by extending the content item object or by creating a "mapping table" database (according to the possibilities available in the third-party system).
Each content item in the system will have one of the following statuses:
| Title | Description | Next/Previous |
|---|---|---|
| Missing | This content item hasn’t yet been sent to Lokalise | Next – In progress |
| In Progress | This content item is currently being translated in Lokalise | Previous – Missing Next – Done |
| Done | Translation is reviewed in Lokalise, but not imported back to the CMS (to get reviewed translations check the is_reviewed parameter in Get translations endpoint) | Previous – In progress Next – Imported |
| Imported | Translated content is imported back to CMS | Previous – Done Next – Changed |
| Changed | This content has been translated, but the text has since been updated in the CMS | Previous – Imported Next – In progress |
Definitions
Content type – when the system that is being integrated supports multiple types of content (for instance, "newsletters", "blogs posts", and "articles"), each with its own set of fields and/or unique structure, each of these types is called a "content type".
Content object – when an item is exported to Lokalise, additional parameters about this item should be stored as content object, such as translation status, Lokalise project, key ID, last updated date, etc.
Translation status – is the current state of translation. Available options are: missing (item wasn’t exported to Lokalise), in progress (item was exported to Lokalise), done (translation was marked as reviewed in Lokalise), changed (translation was updated after it was imported).
Refreshing the content is the action taken when the CMS compares and sets new translation statuses and last updated dates for all selected items.
Management interface is the view of all elements and their translations with detailed information and available actions (import or export), so that the user will be able to manage the content item translation workflow.
Technical Guidelines
Code quality
-
The deliverable code must follow the coding standards of the respective language(s) and framework(s).
-
The deliverable must include extensive documentation, that describes the functionality and logic of the code, either as a separate document or as inline comments embedded in the code.
Content object
The content object should include the following properties:
unique_idis the unique ID of this itemitem_idis the ID of this item in your systemkey_idis the ID of the Lokalise key connected to this itemproject_idis the ID of the connected Lokalise projectrefreshed_at– date and time of the last refreshupdated_atis the date and time when item was updated in Lokalisecontent_typeis the type of content (for example, title, description, page, article, etc.)field_typeis the field type of this object (for example, text, rich text, markdown, date, etc.)languageis the language of this item
API limitations
Access to all endpoints is limited to 6 requests per second. See details here.
Requirements for MVP
MVP must include the following steps:
- Installation of the app:
- User is able to install and remove app/plugin in the CMS.
- After the user removes the app, all data about content objects should be deleted.
- Authentication:
- When users install the app, they authenticate with Lokalise using OAuth 2 or API keys. The scope and credentials are saved in the app for all future communication with Lokalise.
- Configuration (connection to the Lokalise project):
- User is able to connect to existing Lokalise project.
- Item selection:
- User should be presented with an interface listing all content that is available for translation, being translated, and has been translated.
- The interface should include the main information about translatable elements (field type, title, etc.) and the possibility to select any items for translation.
- Export items:
- User can export all translatable content in Lokalise. After the user clicks Export, new keys will be created in the selected Lokalise project.
- Import translated items:
- User can import translated content from Lokalise back to CMS.
Suggested Roadmap
The expected approximate roadmap is as shown here:
 (1).jpg")
Updated 11 months ago