OAuth 2 flow
Learn about Lokalise OAuth 2 flow.
Developers can build their own applications to manage user data in Lokalise using the OAuth 2 authentication flow.
With the OAuth 2 authentication, an application can make requests to Lokalise APIv2 on behalf of a user.
OAuth 2 is an authorization protocol that allows a user to grant third-party applications access to their information on another site.
Authorization flow
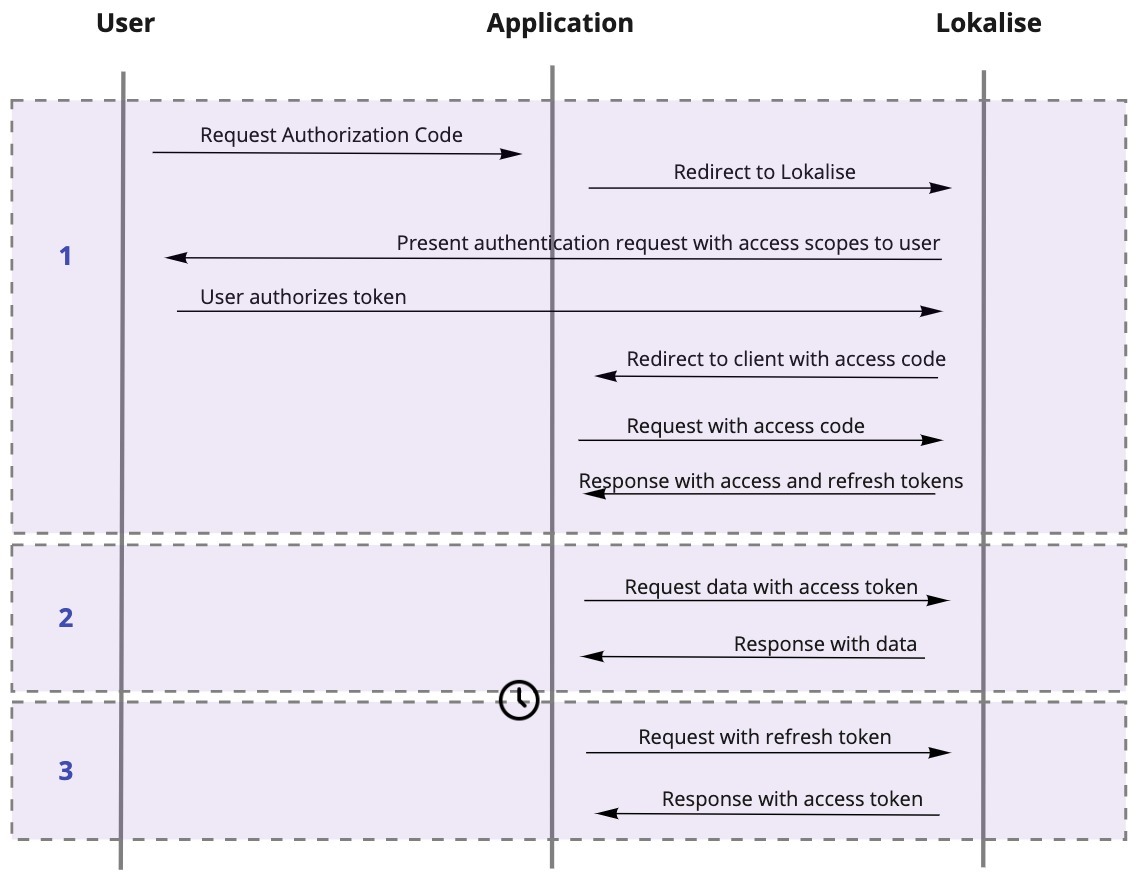
This process can be separated into three stages:
- The user requests an access code.
- The user makes a request with the access code and receives an access token. The user can receive data from Lokalise with this access token.
- After the access token expires the user makes a request to refresh the token.
The authorization flow is shown in more detail in the following diagram:

Register a new application
To register your app with Lokalise, you should contact our support team and provide the following information:
- Title of your application
- Logo of your application
- Supported size is 150x150px.
- Supported formats are PNG and JPG.
- Description of your application (this field is optional).
- Link to app website/documentation (this field is optional).
- Required scopes. Find the list required scopes for the corresponding API endpoints in the Lokalise API description.
OAuth 2 authorization overview
Lokalise is using OAuth 2.0 authorization protocol implementation of authorization code flow.
- Auth URL:
https://app.lokalise.com/oauth2/auth - Access token URL:
https://app.lokalise.com/oauth2/token - The supported grant type is authorization code.
- More information on the protocol can be found here:
Prerequisites
- The app should be registered with Lokalise.
- OAuth 2 client ID ("Client ID") and OAuth 2 client secret ("Client Secret") should be obtained.
- You should have a publicly available URL where the user will be redirected after the authentication ("Redirect URI").
Step 1. Obtain Authorization Code
The app should redirect users to the auth URL. After a successful authorization users are forwarded to the redirect URL with the authorization code as a parameter.
The request should be sent to the following URL: https://app.lokalise.com/oauth2/auth
URL parameters for the GET request:
| Parameter | Explanation |
|---|---|
client_id | The App Client ID received after registration |
redirect_uri | The URL in your application where users will be sent after authorization. |
scope | One or more scopes the app requires. Multiple scopes should be separated with spaces. |
state | A random string used for protection against CSRF attacks. (Optional if you are not using redirect_uri) |
Here's an example request:
https://app.lokalise.com/oauth2/auth?client_id=SomeClientID&redirect_uri=https://example.com/auth/success&scope=write_projects+read_keys&state=someRandomStateString
After successfully logging in, users will be redirected to the following URL:
https://example.com/auth/success?code=123abc
Step 2. Obtain access token
The app can use the authorization code received in the previous step to obtain the access token. To achieve that, the app should send a POST request to the access token URL.
URL parameters for the POST request:
| Parameter | Explanation |
|---|---|
grant_type | Specifies action to be taken (should be authorization_code) |
client_id | The app client ID received after registration |
client_secret | The app client secret received after registration |
code | The code received after successful user authentication and redirect |
Here's an example request with cURL:
curl -X POST \
  https://app.lokalise.com/oauth2/token \
  -H "content-type: application/json" \
  -d "{
        \"grant_type\":\"authorization_code\",
        \"client_id\":\"SomeClientID\",
        \"client_secret\":\"SomeClientSecret\",
        \"code\":\"yourCode\"
  }"
A successful response should contain the following data:
| Parameter | Explanation |
|---|---|
access_token | Access token to use for request authentication |
refresh_token | Refresh token to use to obtain new access token after the current expires. |
expires_in | Amount of seconds until the access token expires (Usually, 1 hour) |
token_type | The authorization token type used. Will be required for authenticated requests. (Usually, "Bearer"). |
Here's an example:
{
  "access_token":"someAccessToken",
  "refresh_token":"someRefreshToken",
  "expires_in": 3600,
  "token_type": "Bearer"
}
Step 3. Make requests to the API
The app now can make requests to Lokalise API on behalf of the authorized user. In order to authorize a request, the Authorization request header must contain the token type and the actual access token.
Here's a sample request with cURL:
curl -H "Authorization: Bearer someAccessToken" https://api.lokalise.com/api2/projectsStep 4. Use refresh token
For security reasons, the access token has a relatively short expiration time (usually, 1 hour). In order to prevent your users from the need to reauthorize the app after the token expiration, the app can obtain new access token using refresh token.
The app should send a POST request to the access token URL with the following parameters:
| Parameter | Explanation |
|---|---|
grant_type | Specifies action to be taken. (Should be refresh_token). |
client_id | The App Client ID received after registration. |
client_secret | The App Client Secret received after registration. |
refresh_token | The refresh token obtained with "authorization_code" request |
Here's a sample request with cURL:
curl -X POST \
  https://app.lokalise.com/oauth2/token \
  -H "content-type: application/json" \
  -d "{
        \"grant_type\":\"refresh_token\",
        \"client_id\":\"SomeClientID\",
        \"client_secret\":\"SomeClientSecret\",
        \"refresh_token\":\"someRefreshToken\"
  }"
A successful response should contain the following data:
| Parameter | Explanation |
|---|---|
access_token | Access token to use for request authentication |
scope | One or more scopes the token has access to |
expires_in | Amount of seconds until the access token expires (usually, 1 hour) |
token_type | The authorisation token type used. Will be required for authenticated requests. (usually, "Bearer"). |
Here's an example response:
{
  "access_token":"someAccessToken",
  "scope":"write_projects",
  "expires_in": 3600,
  "token_type": "Bearer"
}
OAuth 2 request errors
If an OAuth 2 request results in an error, the response will an HTTP status code 400 and the body will contain a JSON object with the following fields:
| Field | Explanation |
|---|---|
error | Error name |
error_description | Error description |
state | (Optional) The state string added on the Authorization code request |
Here's an example:
{
  "error":"invalid_request",
  "error_description":"Invalid post body",
  "state":"someRandomStateString"
}
Examples
You can find sample apps utilizing OAuth 2 flow in the corresponding section.
Updated 6 months ago