
GitHub Actions for content exchange
We provide a collection of ready-to-use GitHub actions that help you exchange translation files between Lokalise "Web and mobile" projects and GitHub repositories. These actions include:
- Push: Upload new or updated translation files (for the base language) from GitHub to Lokalise.
- Pull: Download translation files from Lokalise to GitHub as a pull request.
These actions are lightweight and do not require installing the GitHub app for Lokalise.
Typical use cases
Check out our in-depth tutorialIf you're looking for an in-depth tutorial covering push/pull scenarios, check out our blog post!
Push action
-
Base‑language updates
Automatically upload your source (base) language files to Lokalise whenever you merge or push changes. Keeps your TMS in sync with the latest strings without manual API calls. -
Incremental uploads
With tag‑tracking or diff detection, only new or modified keys get pushed. Great for large repos where you don’t want to resend every file on each CI run. -
One‑off full imports
Enablerambo_modeto force a complete re‑upload of all base‑language files (e.g. initial setup or major refactor). -
Custom file structures
Works with flat JSON/YAML files or nested folder layouts, and supports custom naming patterns vianame_pattern. -
Resilient CI pipelines
Built‑in retry logic for rate limits, configurable timeouts, and parallel uploads help ensure reliable delivery of your translation assets. -
Git‑based sync markers
Use built‑in Git tags to record “last synced” commits per branch, so you never accidentally re‑upload the same content.
When this action isn’t a good fit
-
Non‑base‑language pushes
This action only uploads the base language. If you need to bulk‑import translations for target languages, use a dedicated download/pull flow instead. -
Live or in‑app translation delivery
If you need translations applied immediately in your running service or preview environment, a CI‑triggered push is too slow and indirect. -
Complex transformation workflows
If you require pre‑upload processing, multi‑step orchestration, or external data enrichment before sending to Lokalise, you’ll be better served by a custom script or pipeline. -
Non‑GitHub environments
This action is GitHub‑Actions–specific. It won’t run on other CI platforms like GitLab CI or Bitbucket Pipelines without modification. -
High‑frequency real‑time sync
For sub‑minute or on‑every-user‑request syncs, a discrete GitHub Action run is not practical and you’ll need a direct API integration or webhook solution.
Pull action
-
Automated translation sync
Keep your repo’s localization files up to date without manual downloads. Trigger this action on a schedule or manually. -
Multi‑language projects
You have dozens of language files (JSON, YAML, XML, etc.) and want a single PR that updates all of them in one go. -
Custom file layouts
Whether you use flat files (locales/en.json) or nested directories (locales/en/strings.json), the action can pull into your preferred structure. -
Team‑driven reviews
Automatically assign reviewers or teams, add labels, and set a clear title/body so your translators or dev leads know exactly what’s changed. -
Light post‑processing
Use thepost_process_commandhook to run quick fixes (e.g.sedreplacements, JSON formatting scripts) before the PR is created.
When this action isn't a good fit
-
Real‑time or in‑app translation previews
If you need live updates in your running application (e.g. on every user request), a CI‑based pull request flow is too slow. -
Complex translation pipelines
When you require multi‑step transformations, branching logic, or external data enrichment, a simple pull‑based action may be too limited. -
Non‑GitHub environments
If your code or CI lives outside GitHub (e.g. Bitbucket Pipelines, GitLab CI without GitHub), this action won’t run natively. -
Heavy custom logic
If you’re writing large scripts, custom binaries, or orchestration spanning multiple services, it’s better to build a dedicated workflow or use a full‑fledged CD tool.
Scenario overview: Push and pull with tags
This is the simplest and recommended approach for managing translation files. It relies on using key tags in Lokalise to map translations to the corresponding branch in GitHub.
- Using the hub branch: In GitHub, designate a specific branch to manage your translations. We'll refer to this branch as the "hub." This branch serves as the central point for translation updates and synchronization between Lokalise and GitHub.
- Pushing translation files to Lokalise: To send updated translation files from GitHub to Lokalise, manually trigger the "Push to Lokalise" workflow from the hub branch. When you do this, any new or updated keys in Lokalise are tagged with the name of the hub branch that initiated the workflow.
- For advanced technical details and the default API parameters used by this action, read the technical details in the push action README.
- Pulling translation files from Lokalise: To bring translation files from Lokalise back into GitHub, manually trigger the "Pull from Lokalise" workflow from the hub branch. This workflow filters the translation keys by the tag matching the hub branch’s name. Once filtered, a pull request with the updated translation files is created for the hub branch. After merging this pull request, your hub branch will be up-to-date with the latest translation files.
- For advanced technical details and the default API parameters used by this action, read the technical details in the pull action README.
This approach allows you to manage your translation process in a dedicated branch, giving you the flexibility to merge updates into your main branch whenever needed.
Getting started with GitHub Actions for Lokalise
General setup overview
Every action from this collection requires some general setup. In this section, we'll summarize general configuration options. Later, we'll show where and how these values should be provided.
Lokalise API token
To start, generate a read/write Lokalise API token and securely pass it to the action. Do not paste your token directly into the workflow configurations. Instead, store it as a repository secret:
- Open your repository's Settings.
- Navigate to Secrets and variables > Actions.
- Under Repository secrets, click New repository secret.
- Enter
LOKALISE_API_TOKENin the Name field. - Paste your API token into the Secret field.
- That's it! Your token is securely stored in GitHub and won't be exposed during workflow runs. We'll reference this token when configuring the push and pull workflows.
Mandatory workflow parameters
Every workflow requires the following parameters. These can be set as environment variables, repository secrets, or passed directly in the workflow YAML file.
api_token— Lokalise API token. See the section above for setup instructions.project_id— Your Lokalise project ID. If you don’t have a project yet, create a "Web and mobile" project on Lokalise and note its ID.translations_path— One or more paths to your translation files. For example, if your translations are stored in thelocalesfolder at the project root, uselocales(omit leading and trailing slashes).file_format(required for the Pull action only, deprecated for Push) — Defines the format of your translation files, such asjsonfor JSON files. Defaults tojson. This format determines how translation files are processed and also influences the file extension used when searching for them. However, some specific formats, such asjson_structured, may still be downloaded with a generic.jsonextension. If you're using such a format, make sure to set thefile_extparameter explicitly to match the correct extension for your files.file_ext(required only for Push) — One or multiple file extensions (without leading dots) to use while collecting translation files.base_lang— The base language of your Lokalise project (e.g.,enfor English). Be mindful of regional codes! For example:- If your base language is French Canada (
fr_CA), provide the exact value (fr_CA) forbase_lang. - Ensure the folder structure under
translations_pathmatches the regional code (e.g.,locales/fr_CA).
- If your base language is French Canada (
Providing workflow parameters
- Always provide the Lokalise API token as a GitHub repository secret for security.
- Other parameters (e.g.,
project_id,base_lang) can be set:
- Directly in the YAML file, e.g.,
base_lang: en.- Via repository variables or secrets, e.g.,
project_id: ${{ vars.PROJECT_ID }}.- If using repository variables, ensure they are named clearly and referenced correctly.
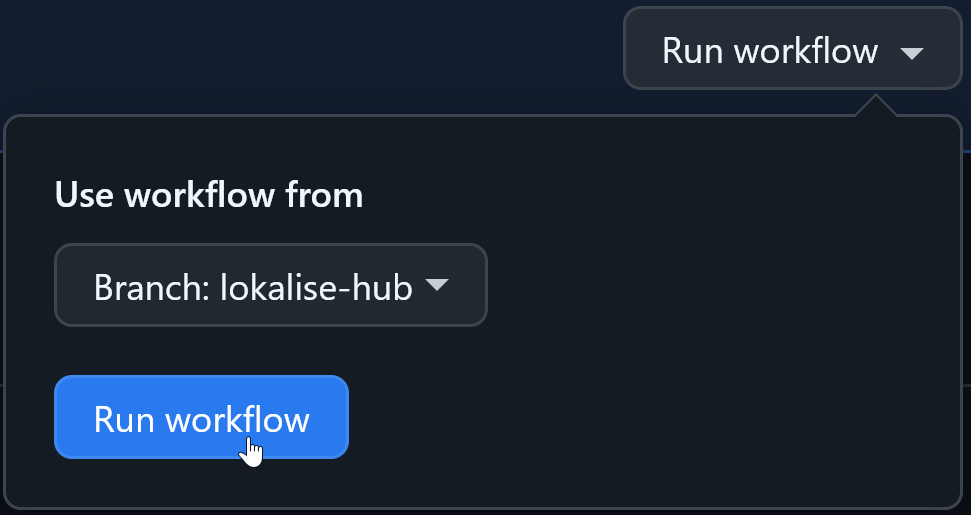
Running the workflows
To run a workflow:
- Open your GitHub repository and go to Actions.
- Select a workflow from the left pane.
- Find the Run workflow dropdown on the right side.
- Choose a hub branch to trigger the workflow for.
- Click Run workflow.
Push and pull with key tags
Creating the hub branch and setting up Push action
Suppose your project uses the main branch, but you want to manage translations in a dedicated branch. To achieve this, you’ll create a new branch, which we’ll refer to as the "lokalise-hub" branch. However, before that, you’ll need to set up a workflow in the main branch of your repository.
- Create the Push action:
Switch to the main branch of your repository and create a new file at .github/workflows/push.yml.
name: Push to Lokalise
on:
  workflow_dispatch:

jobs:
  build:
    runs-on: ubuntu-latest
    steps:
      - name: Checkout Repo
        uses: actions/checkout@v5
        with:
          fetch-depth: 0

      - name: Push files to Lokalise
        uses: lokalise/[email protected]
        with:
          api_token: ${{ secrets.LOKALISE_API_TOKEN }}
          project_id: LOKALISE_PROJECT_ID
          # Your extension(s) without leading dots
          file_ext: FILE_EXTENSION
          translations_path: |
            TRANSLATIONS_PATH1
            TRANSLATIONS_PATH2
          base_lang: BASE_LANG_ISO
The following parameters are used in this example (note that we’re not covering all supported parameters here):
api_token: A secret variable containing your read/write Lokalise API token. Refer to the Lokalise API token section for setup instructions.project_id: Your Lokalise project ID.file_ext— Defines the format(s) of your translation files, such asjsonfor JSON files. Defaults tojson. This format determines how translation files are processed and also influences the file extension used when searching for them. Alternatively, configure thename_patternparameter.translations_path: One or more directories in the project root containing your translation files without leading or trailing slashes (e.g.,locales).- The full path to the translation files is built as
TRANSLATIONS_PATH/LOCALE/**/**.FILE_FORMAT. Refer to the Translation files section for more details on file organization. - If your files are not nested under additional folders but instead stored directly in the
translations_path(e.g.,locales/en.jsonori18n/fr.json), set theflat_namingparameter totrue.
- The full path to the translation files is built as
base_lang: The base language of your Lokalise project (e.g.,en). Be mindful of regional codes! For example, if your base language isfr_CA, provide exactly that value.- Ensure that the
translations_pathincludes a folder named after the base language. For instance, if yourtranslations_pathis set tolocalesandbase_langisen, the workflow expects to find translation files under the/locales/en/folder. If this folder or the necessary files don’t exist yet, you’ll add them in step 3.
- Ensure that the
How changes are detected
- The Push action detects changes in translation files by comparing the latest commit with the one directly before it. This approach ensures the action processes only the most recent updates, rather than scanning the entire repository.
- If there are no changes between these two commits, the action will not upload any files to Lokalise. To ensure your updates are processed, make sure the most recent commit includes all intended changes to your translation files.
- To change this behavior, set the
use_tag_trackingtotrue(experimental feature). It enables branch-specific sync tracking using Git tags. The action creates a unique tag for each branch to remember the last successfully synced commit. On subsequent runs, it compares the current commit against the tagged commit to detect all changes since the last successful sync — regardless of how many commits occurred in between.
- Create and switch to the lokalise-hub branch:
git checkout -b lokalise-hub- Set up the translation folder and files:
In this branch, create a folder for your translations if you haven't already done so. The folder name should match thetranslations_pathyou configured in step 1.- For example, if your base language on Lokalise is English (
en), create a folder calledlocalesand inside it, anendirectory. Place your base language translation files in this directory. For this demo, we’ll use the JSON format.
Your folder structure should look like this:
- For example, if your base language on Lokalise is English (
locales/
├── en/
│   ├── main.json
│ └── en.json- Push the new branch to your GitHub repository:
git add .
git commit -m "Added translation files for English (base)"
git push origin lokalise-hub
Additional parameters for the Push action
This is not an exhaustive listFind full list of all available parameters on GitHub.
The Push action supports several optional parameters for further customization. These parameters provide flexibility when handling specific workflows or addressing edge cases.
-
additional_params: Extra parameters to pass to the Lokalise API when pushing files. Must be passed as a valid JSON. For example, you can use{"convert_placeholders": true}to handle placeholders. Multiple API params can be included as needed. Defaults to an empty string. -
flat_naming: Use flat naming convention. Set this totrueif your translation files follow a flat naming pattern, such aslocales/en.json, instead of being organized in nested folders likelocales/en/file.json. Defaults tofalse. -
name_pattern— Custom pattern for naming translation files. Overrides default language-based naming. Must include both filename and extension if applicable (e.g.,"custom_name.json"or"**/*.yaml"). Default behavior is used if not set.- When the
name_patternis set, the action will respect yourtranslations_pathbut won't append any language names as folders. Therefore, if you want to upload all JSON files with custom naming for the English locale, you'll need to providename_pattern: "en/**/custom_*.json". To upload all JSON files stored directly undertranslations_path, you'll setname_pattern: "custom_*.json". The latter approach is similar toflat_namingbut enables you to define custom patterns.
- When the
-
skip_tagging— Do not assign tags to the uploaded translation keys on Lokalise. Set this totrueto skip adding tags like inserted, skipped, or updated keys. Defaults tofalse. -
rambo_mode— Always upload all translation files for the base language regardless of changes. Set this totrueto bypass change detection and force a full upload of all base language translation files. Defaults tofalse.
Pushing translations to Lokalise
Now that everything is set up, you're ready to push translations from GitHub to Lokalise.
- Go to the Actions tab in your GitHub repository.
- Open the Push to Lokalise workflow. From the branch dropdown, select the
lokalise-hubbranch.

- Click Run workflow.
- The workflow will take a few moments to complete. Once finished, you’ll see the confirmation that the workflow has been successfully completed.

What if I already had translation files in my main branch?
If you already have translation files in your main branch before switching to the lokalise-hub branch, there’s no need to worry. The Push action only processes translation files that have been created or changed since the most recent commit. Files already in your version control history will not be treated as “new,” so they won’t be uploaded again unless modified.
When no changes are detected between the last two commits, the action checks if it is running for the first time on the current branch by searching for a lokalise-upload-complete tag:
- If the tag exists, it means the initial upload has already occurred, and the action will exit without uploading anything.
- If the tag is missing, the action will upload all translation files for the base language to Lokalise. After completing the upload, it creates the
lokalise-upload-completetag to indicate that the initial setup is finished.
Recommendation: After the initial run, pull the tag into your local repository using
git pullto ensure your local copy reflects this setup.
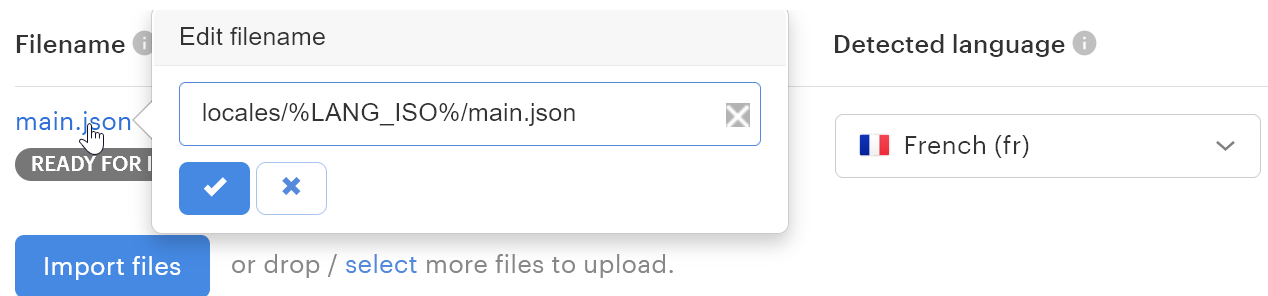
If you have additional translation files for other (non-base) languages that you want to upload, you’ll need to do this manually in Lokalise. When uploading these files, ensure the filenames match the structure expected by Lokalise. For example, if your base language files are stored in locales/%LANG_ISO%/main.json, ensure that files for other languages follow the same structure (e.g., locales/fr/main.json for French or locales/de/main.json for German).
Editing translations on Lokalise
Once you're set up, you can head over to your Lokalise project and start managing translations. You'll notice that your translation keys are tagged with the lokalise-hub tag (or another tag named after the hub branch).
It's important to keep this tag intact to maintain the connection with your GitHub branch. If you need to add other tags, feel free to do so, but be careful not to remove the lokalise-hub tag. If it's accidentally removed, you can easily add it back using the Lokalise UI.
In Lokalise, you can add one or more target languages to your project and manage translations as usual.
Pulling translations from Lokalise
After editing your translations or creating new keys in Lokalise, you can sync these changes back to your hub branch.
- Create the Pull action
Start by switching to the main branch of your repository. Then, create a.github/workflows/pull.ymlfile and add the pull action configuration to it.
name: Pull from Lokalise

on:
  workflow_dispatch:

jobs:
  build:
    runs-on: ubuntu-latest

    steps:
      - name: Checkout Repo
        uses: actions/checkout@v5
        with:
          fetch-depth: 0

      - name: Pull from Lokalise
        uses: lokalise/[email protected]
        with:
          api_token: ${{ secrets.LOKALISE_API_TOKEN }}
          project_id: LOKALISE_PROJECT_ID
          translations_path: |
            TRANSLATIONS_PATH1
            TRANSLATIONS_PATH2
          base_lang: BASE_LANG_ISO
          file_format: FILE_FORMAT
Filtering data based on translation status
- By default, this action pulls all keys with the assigned tag, regardless of translation status.
- To control this, use the
additional_paramsoption with the"filter_data"parameter.
- This parameter accepts the following values:
translated,untranslated,reviewed,reviewed_only,last_reviewed_only,verified, andnonhidden.
The following parameters are used in this example (note that we’re not covering all supported parameters here):
api_token: Secret variable containing your read/write API token. Refer to the Lokalise API token section for setup instructions.project_id: Your Lokalise project ID.translations_path: One or more directories in the project root containing your translation files without leading or trailing slashes (e.g.,locales).- The full path to the translation files is constructed as
TRANSLATIONS_PATH/LOCALE/**/**.FILE_FORMAT. Check the Translation files section for more details on file organization. - If your files are not nested under additional folders and instead stored directly in the
translations_path(e.g.,locales/en.jsonori18n/fr.json), set theflat_namingparameter totrue.
- The full path to the translation files is constructed as
base_lang: The base language of your Lokalise project (e.g.,en). Be mindful of regional codes! For example:- If your base language is
fr_CA, provide exactly that value. - Ensure the
translations_pathincludes a folder named after the base language. For instance, if yourtranslations_pathis set tolocalesandbase_langisen, the workflow expects translation files under the/locales/en/folder.
- If your base language is
file_format: Specifies the format of your translation files, such asjson. Do not include a leading dot.
- Push your newly created action to the main branch on GitHub.
- Grant proper permissions to the actions. To achieve that:
- Go to your GitHub repository's Settings.
- Navigate to Actions > General.
- Under Workflow permissions, set the permissions to Read and write permissions.
- Enable Allow GitHub Actions to create and approve pull requests on the same page (under "Choose whether GitHub Actions can create pull requests or submit approving pull request reviews").
Assigning Lokalise filenames and tagsBefore running this action, ensure that your translation keys on Lokalise are correctly assigned with appropriate filenames and tags.
By default, the action filters downloaded keys based on a tag that matches the Git branch name used to trigger the workflow. This is done automatically via the
--include-tags=BRANCH_NAMEcommand-line argument. For example, if the action is triggered from the hub branch on GitHub, it will download only the keys tagged with hub:--include-tags=hub. If no keys with the specified tag are found, the action will terminate.To disable this automatic filtering or use custom tags, set the
skip_include_tagsparameter totrue. You can also provide your own tags via theadditional_paramsfield.If you specify
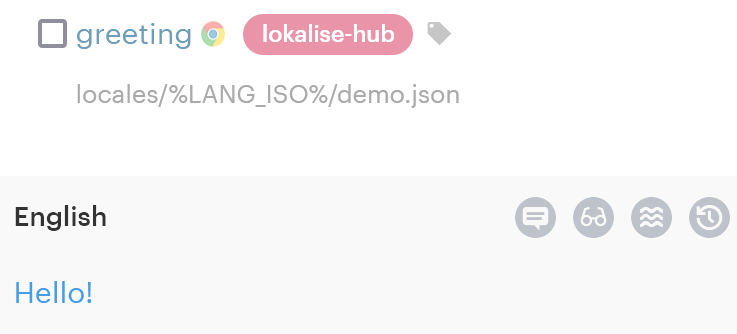
localesas thetranslations_path, your keys must include filenames on Lokalise that align with this structure, such as:
locales/%LANG_ISO%.jsonlocales/%LANG_ISO%/main.xmlIf the filenames do not include the correct directory prefix (like
locales/), the action will fail to compare the downloaded files with the existing files in yourtranslations_path. In this case, the workflow logs will show the message: "No changes detected in translation files.". To avoid this, double-check that your Lokalise filenames match the expected directory structure.Note that by default the action adds the
"original_filenames": trueand"directory_prefix": "/"command line arguments. To disable this behavior, set theskip_original_filenamesto true.
- Head back to your GitHub repository and navigate to the Actions tab.
- Select the Pull from Lokalise action.
- Make sure you choose the hub branch as the trigger for this workflow.
- Once the workflow completes, switch to the Pull requests tab. You should see a new pull request created.

- In the pull request, you'll notice it's created for the
lokalise-hubbranch, originating from a temporary branch. The name of this branch starts with the prefixlok, followed by the hub branch name. - Review the changed files to see the updates. You may notice that your translations have been reordered and the indentation level updated. This behavior can be adjusted by setting additional parameters.
- When you're satisfied with the changes, go ahead and merge the pull request. After merging, you can safely delete the temporary branch.
This process can be repeated as often as needed. If no changes are detected in the translations (meaning the translations in Lokalise match those in the hub branch), a pull request won’t be created.
Tracking changes to the base languageBy default, the Pull action does not track changes to the base language files. To include these files, set the
always_pull_baseoption totruewhen configuring the action.
Additional parameters for the Pull action
This is not an exhaustive listFind full list of all available parameters on GitHub.
The Pull action supports several optional parameters for further customization. These parameters allow you to tailor the workflow to your specific needs.
-
file_ext— Custom file extension to use when searching for translation files (without leading dot). By default, the extension is inferred from the file_format value. However, for certain formats (e.g.,json_structured), the downloaded files may still have a generic extension (e.g.,.json). In such cases, this parameter allows specifying the correct extension manually to ensure proper file matching. -
additional_params: Extra parameters to pass to the Lokalise API when pulling files. Must be valid JSON. For example, you can use"indentation": "2sp"to manage indentation. Defaults to an empty string. -
temp_branch_prefix: A prefix for the temporary branch used to create the pull request. For example, usinglokwill result in a branch name starting withlok. Defaults tolok. -
always_pull_base: By default, changes in the base language translation files (as defined by thebase_langoption) are ignored when checking for updates. Set this option totrueto include changes in the base language translations in the pull request. Defaults tofalse. -
flat_naming: Use flat naming convention. Set this totrueif your translation files follow a flat naming pattern likelocales/en.jsoninstead of being organized in nested folders likelocales/en/file.json. Defaults tofalse. -
skip_include_tags— Skip setting the--include-tagsargument during download. This will download all translation keys for the specified format, regardless of tags. You can also provide custom filtering options viaadditional_params, for example--include-tags staging,dev. -
pr_labels— Comma-separated list of labels to apply to the created pull request.
Assumptions and defaults
Translation files
This workflow assumes that the translations_path option can include one or more directories where your translation files are stored. By default, each folder specified in translations_path should contain subfolders named after your project locales. For example, if your base language is en, there should be a folder named en inside each specified path. Here's an example directory structure:
locales/
├── en/
│   ├── main.json
│   └── admin.json
└── fr/
    ├── main.json
    └── admin.json
When managing translation keys on Lokalise, ensure the filenames match your repository structure. If you store translations under translations_path/%LANG_ISO%/, the filenames assigned to the keys must follow this pattern: translations_path/%LANG_ISO%/TRANSLATION_FILE_NAME.
Nested files
Nested folders are fully supported. For example, you can organize files like this: locales/en/nested_folder/main.json.
Flat naming convention
If your translation files are stored directly in the translations_path without locale-specific subfolders (e.g., locales/en.json or locales/fr.json), set the flat_naming parameter to true. Here's an example of a flat naming structure:
locales/
├── en.json
├── fr.json
└── de.json
Tags
Every translation key uploaded to Lokalise via the Push action is automatically tagged with the name of the branch that triggered the workflow. For example, if the workflow is triggered by the lokalise-hub branch, all affected keys will receive a lokalise-hub tag.
When running the Pull action, the workflow filters keys by the tag matching the branch name. For instance, if you run the Pull action from the lokalise-hub branch, only keys tagged with lokalise-hub will be downloaded, while other keys will be ignored.
To ensure all relevant keys are included in the workflow, it’s essential to retain these tags. If a tag is removed by mistake, you can reassign it manually via the Lokalise UI.
Ignoring tags on pull
If you need to pull all keys regardless of the assigned tags, set the skip_include_tags option to true. You can also provide custom filtering options via additional_params, for example --include-tags=staging,dev.
Advanced scenarios
Support for Gettext PO files
If you are using Gettext (PO files) and the "pull" action opens pull requests when no translations have been changed and the only difference is the "revision date", refer to the following comment for clarifications.
Support for iOS Strings files
iOS projects typically use a very specific translation file structure. For example, if you plan to add support for English, French, and Spanish, you'll have:
MyApp/
├── en.lproj/
│   └── Localizable.strings
├── fr.lproj/
│   └── Localizable.strings
└── es.lproj/
    └── Localizable.strings
In other to support this structure, you'll need to properly configure Push and Pull actions.
Configuring Push action for Strings files
Here's an example:
- name: Push to Lokalise
  uses: lokalise/lokalise-push-action@main
  with:
    api_token: ${{ secrets.LOKALISE_API_TOKEN }}
    project_id: YOUR_PROJECT
    base_lang: en
    translations_path: |
      en.lproj
    file_format: strings
    name_pattern: "*.strings"
Key things to note:
- Typically we recommend to upload only the base language to Lokalise (English in this case). However, you can further customize this approach.
- You must provide translation path as
en.lprojto upload the base language. - Make sure to specify proper file format (
strings). - Finally, it's cruical to provide the name pattern for the translation files. In the example below translations are stored in
stringsfiles directly under thelprojfolder. If yourlprojfolder contain nested directories with translation files, you could say**/*.strings.
Configuring Pull action for Strings files
Here's an example:
- name: Pull from Lokalise
  uses: lokalise/lokalise-pull-action@main
  with:
    api_token: ${{ secrets.LOKALISE_API_TOKEN }}
    project_id: YOUR_PROJECT
    translations_path: |
      fr.lproj
      es.lproj
    flat_naming: true
    file_format: strings
Key things to note:
- You'll have to provide translation paths for all the target languages.
- If the
lrpojfolder contain translation files directly (without any further nesting), enable theflat_namingoption.
Pull everything regardless of the assigned filenames and platforms
To pull all keys regardless of the assigned filenames and platforms, you'll need to disable original filenames, provide a custom bundle structure, and enable all_platforms param. Here's an example for the Strings format:
- name: Pull from Lokalise
  uses: lokalise/lokalise-pull-action@main
  with:
    api_token: ${{ secrets.LOKALISE_API_TOKEN }}
    project_id: YOUR_PROJECT
    translations_path: |
      resources/strings/en.lproj
      resources/strings/es.lproj

    file_format: strings

    # Enable if you're planning to store translation files directly under resources/strings/LANG_ISO.lproj
    flat_naming: true

    # Enable to pull everything regardless of the assigned tags:
    skip_include_tags: true

    # Ignore any original filenames
    # (don't forget to provide bundle_structure in the additional_params!)
    skip_original_filenames: true

    # Enable if you need to pull translations for the base language
    always_pull_base: true

    # Important params here:
    # - bundle_structure --> provide path and filename, placeholders like %LANG_ISO% and %FORMAT% can be used
    # - all_platforms
    # Other params like language_mapping can be enabled as needed
    additional_params: >
      {
        "bundle_structure": "resources/strings/%LANG_ISO%.lproj/Localizable.%FORMAT%",
        "all_platforms": true,
        "language_mapping": [
          {"original_language_iso":"en_US","custom_language_iso":"en"},
          {"original_language_iso":"en_GB","custom_language_iso":"en-GB"}
        ]
      }
Cron jobs
You can easily schedule your workflows using cron (POSIX syntax). To do that, add a new schedule event.
on:
  schedule:
    - cron: "0 0 * * *"
In this example, the workflow will run every day at midnight. If you need help creating the right schedule, check out this cron expression generator.
A few things to keep in mind:
- Scheduled workflows always run on the latest commit from the default or base branch.
- The minimum interval for running scheduled workflows is every 5 minutes.
- You can use
ifconditions to skip specific times:if: github.event.schedule != '30 5 * * 1,3'. - Watch out for GitHub Actions quotas. On the Free plan, you get 2000 minutes per month.
Automerge
You can configure automerge when using the pull action. For example, suppose you have this step:
- name: Pull from Lokalise
  id: lokalise-pull
  uses: lokalise/[email protected]
  with:
  api_token: ${{ secrets.LOKALISE_API_TOKEN }}
  project_id: my_project_id
  translations_path: |
    locales
    i18n
  base_lang: en
  file_format: json
  pr_labels: 'automerge'
Note the pr_labels parameter that assign a label to the created PR.
Now, the next step would be:
- name: Trigger Automerge Workflow
  if: steps.lokalise-pull.outputs.created_branch != '' && steps.lokalise-pull.outputs.pr_created == 'true'
  uses: actions/github-script@v7
  with:
    github-token: ${{ secrets.PAT_TOKEN }}
    script: |
      await github.rest.actions.createWorkflowDispatch({
        owner: context.repo.owner,
        repo: context.repo.repo,
        workflow_id: "automerge.yml",
        ref: "${{ steps.lokalise-pull.outputs.created_branch }}",
      });
This way you're running a separate workflow to the automerge and set a proper ref.
Here's the automerge.yml:
name: Automerge PRs

on:
  workflow_dispatch:

permissions:
  contents: write
  pull-requests: write

jobs:
  automerge:
    runs-on: ubuntu-latest

    steps:
      - name: Checkout Repository
        uses: actions/checkout@v4

      - name: Automerge PRs
        uses: pascalgn/[email protected]
        env:
          GITHUB_TOKEN: ${{ secrets.GITHUB_TOKEN }}
          MERGE_LABELS: "automerge"
          MERGE_METHOD: "squash"
          MERGE_RETRIES: 6
          MERGE_RETRY_SLEEP: 10000
          MERGE_DELETE_BRANCH: "true"
Make sure to use the same label name for the MERGE_LABELS parameter.
Updated about 1 month ago