Node and Fastify
This tutorial will show you how to use the Lokalise preprocessing and postprocessing feature to manage uploaded and downloaded translations in a Node app.
In this tutorial you'll learn how to...Implement custom processors for Lokalise using Node and Fastify.
You can find source code on GitHub.. Also you can find a very similar example that utilizes Next.js functions and can be hosted on Vercel.
Prerequisites
This guide assumes that you have a Lokalise project (if not, learn how to create your Lokalise project here).
If you want to follow this guide locally on your computer, you need to have the following software installed:
What we are going to build
We are going to create a simple application that will process translations that you'll import and export on Lokalise. The app will then process translations and remove any banned words.
Preparing the project
First of all, let's create a package.json file with all the necessary scripts and dependencies:
{
  "name": "custom-processors",
  "main": "server.js",
  "scripts": {
    "start": "node server.js",
    "dev": "fastify start -w -l info -P app.js",
    "lint": "eslint .",
    "prettier": "prettier --write ."
  },
  "dependencies": {
    "config": "^3.3.7",
    "fastify": "^3.29.0",
    "fastify-autoload": "^3.13.0",
    "fastify-cli": "^3.1.0",
    "fastify-plugin": "^3.0.1"
  },
  "devDependencies": {
    "eslint": "^8.16.0",
    "eslint-config-prettier": "^8.5.0",
    "eslint-plugin-import": "^2.26.0",
    "eslint-plugin-jest": "^26.4.6",
    "eslint-plugin-prettier": "^4.0.0",
    "jest": "^28.1.0",
    "nodemon": "^2.0.16",
    "prettier": "^2.6.2"
  }
}
Next, create a server.js file which will boot up Fastify server:
'use strict'

// Read the .env file.
require('dotenv').config()

// Require the framework
const Fastify = require('fastify')

// Instantiate Fastify with some config
const app = Fastify({
  logger: true,
  pluginTimeout: 30000,
})

// Register your application as a normal plugin.
app.register(require('./app.js'))

// Start listening.
app.listen(process.env.PORT || 3000, '0.0.0.0', (err) => {
  if (err) {
    app.log.error(err)
    process.exit(1)
  }
})
Also, let's create an app.js file with some boilerplate code:
'use strict'

const path = require('path')

const AutoLoad = require('fastify-autoload')

module.exports = async function (fastify, opts) {
  // Place here your custom code!

  // Do not touch the following lines

  // This loads all plugins defined in plugins
  // those should be support plugins that are reused
  // through your application
  fastify.register(AutoLoad, {
    dir: path.join(__dirname, 'plugins'),
    options: Object.assign({}, opts),
  })

  // This loads all plugins defined in routes
  // define your routes in one of these
  fastify.register(AutoLoad, {
    dir: path.join(__dirname, 'routes'),
    options: Object.assign({}, opts),
  })
}
Add a Procfile:
web: npm startFinally, you can create a root route under routes/root.js:
'use strict'

module.exports = async function (fastify) {
  fastify.get('/', async function (request, reply) {
    await reply.send({ hello: 'world' })
  })
}
Preprocessing translations
Now that the ground work is done, let's see how to implement translations preprocessing with Fastify. Preprocessing will happen whenever you upload translations to a Lokalise project.
Create a new file called routes/preprocess.js:
'use strict'

module.exports = async function (fastify) {
  fastify.post('/preprocess', async function (request, reply) {
    if (!request.body) {
      return { error: 'Invalid request: Missing body' }
    }

    // Get the payload from the request:
    const payload = request.body
  })
}
So, we are getting the request body and raise an error if it is not present.
Now let's suppose we would like to iterate all the uploaded translations and remove a banned word. To achieve that, first you'll have to iterate over translation keys in the following way:
for (const [keyId, keyValue] of Object.entries(payload.collection.keys)) {
}
Now let's iterate over every translation for every key and perform the replacement:
    for (const [keyId, keyValue] of Object.entries(payload.collection.keys)) {
      for (const [lang, v] of Object.entries(keyValue.translations)) {
        payload.collection.keys[keyId].translations[lang].translation = v.translation.replace(
          'BANNED',
          '',
        )
      }
    }
In this example we are simply replacing a word "BANNED" with an empty string.
The last but not the least is responding to Lokalise with a new payload. It's very important otherwise the uploading process will fail:
await reply.send(payload)Here's a full example:
'use strict'

module.exports = async function (fastify) {
  fastify.post('/preprocess', async function (request, reply) {
    if (!request.body) {
      return { error: 'Invalid request: Missing body' }
    }

    const payload = request.body

    for (const [keyId, keyValue] of Object.entries(payload.collection.keys)) {
      for (const [lang, v] of Object.entries(keyValue.translations)) {
        payload.collection.keys[keyId].translations[lang].translation = v.translation.replace(
          'BANNED',
          '',
        )
      }
    }

    await reply.send(payload)
  })
}
Great job!
Enabling preprocessor
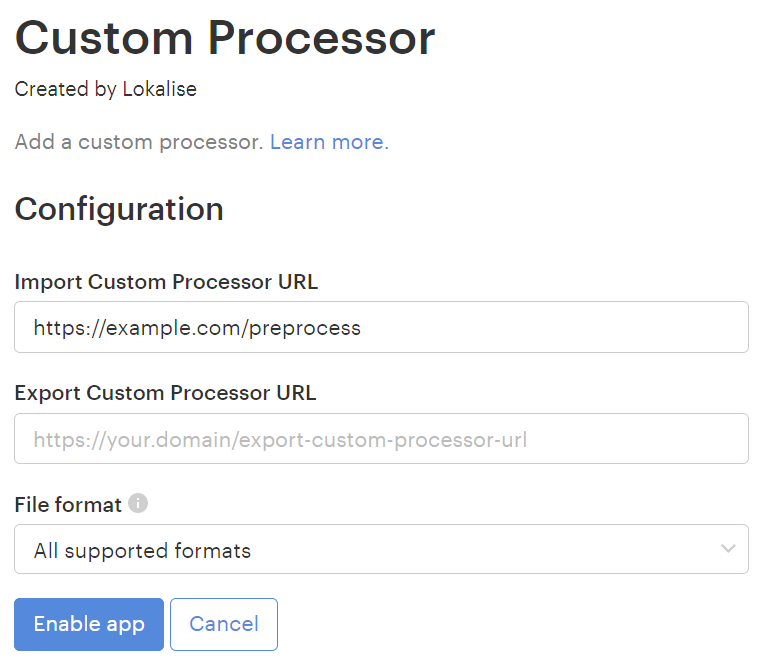
Now that the preprocessor is ready, we have to enable it on Lokalise. To achieve that, open your Lokalise project, proceed to Apps, find Custom processor in the list and click on it. Then click Install and configure this app by entering a preprocess URL:

By default preprocessor will be run for every uploaded translation file but you can narrow the scope by choosing one of the file formats from the corresponding dropdown.
Once you are ready, click Enable app. Great job!
Postprocessing translations
Postprocessing will happen whenever you download translations from Lokalise. Let's create a new routes/postprocess.js file to handle the exported data:
'use strict'

module.exports = async function (fastify) {
  fastify.post('/postprocess', async function (request, reply) {
    if (!request.body) {
      return { error: 'Invalid request: Missing body' }
    }

    const payload = request.body
  })
}
So, we are getting the request body and raise an error if it is not present.
Now suppose we would like to remove a banned word from all translations. The approach is the same as seen in the previous section: we just have to iterate over all keys and translations, and then respond with a new payload:
    for (const [keyId, keyValue] of Object.entries(payload.collection.keys)) {
      for (const [lang, v] of Object.entries(keyValue.translations)) {
        payload.collection.keys[keyId].translations[lang].translation = v.translation.replace(
          'BANNED',
          '',
        )
      }
    }

    await reply.send(payload)
Here's the full example:
'use strict'

module.exports = async function (fastify) {
  fastify.post('/postprocess', async function (request, reply) {
    if (!request.body) {
      return { error: 'Invalid request: Missing body' }
    }

    const payload = request.body

    for (const [keyId, keyValue] of Object.entries(payload.collection.keys)) {
      for (const [lang, v] of Object.entries(keyValue.translations)) {
        payload.collection.keys[keyId].translations[lang].translation = v.translation.replace(
          'BANNED',
          '',
        )
      }
    }

    await reply.send(payload)
  })
}
Enabling postprocessing
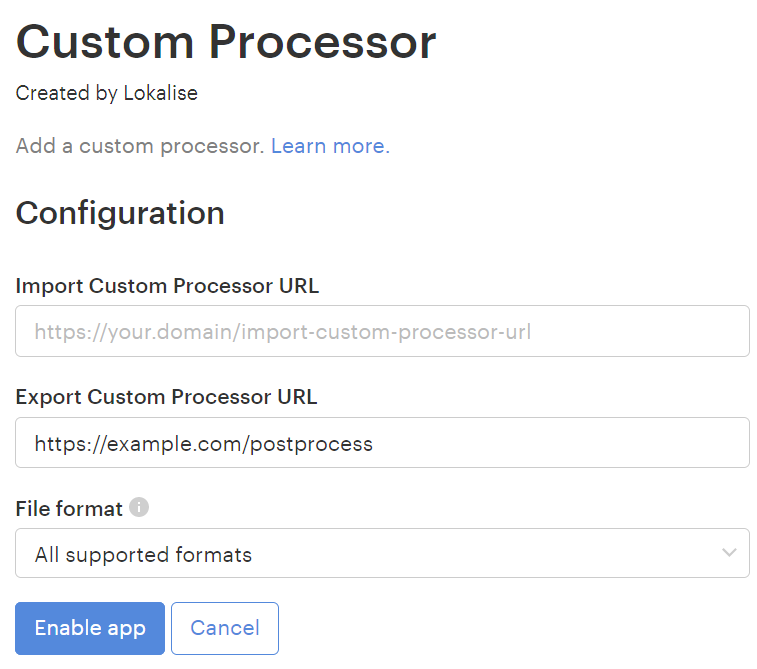
Now that the app is finalized, we have to enable postprocessing on Lokalise. To achieve that, open your Lokalise project, proceed to Apps, find Custom processor in the list and click on it. Then click Install and configure this app by entering a postprocess URL:

By default postprocessor will be run for every uploaded translation file but you can narrow the scope by choosing one of the file formats from the corresponding dropdown.
Once you are ready, click Enable app. Great job!
Updated 6 months ago