
We provide pre-built SDKs for iOS, Android, and Flutter applications, for a quick and simple implementation of the OTA (Over-the-air) service in mobile applications, but sometimes that's not enough. For those cases, we provide a Public API that enables building bundles, managing releases, and making requests from your application to get the most recent translation bundle.
In this article you will learn how to work with the OTA API endpoints. We will use Postman to send the HTTP requests and explore the responses but of course you can use our API playground or any other tool.
Overview
Integrating your application with the Lokalise OTA service includes three steps:
- Codebase integration — not part of OTA itself, but the foundation of a workflow for continuous development and localization. For more information, check out this video about GitHub integration, or use any of our other code repository integrations.
- Bundle management — the OTA service serves zipped files that contain the keys and translations for every language and every version of your application. Those files are called "bundles", and they can be created, managed, and configured using the UI and API.
- Fetching translations — after everything else is set up, all that remains is to implement a GET request to fetch the most up-to-date translation bundle for a specific user.
Obtaining an API token
First things first: you'll need to obtain a token to perform API requests as explained in the following document. Please make sure to create a read/write token. Also please remember that your token must not be publicly shared otherwise malicious users can perform arbitrary API requests on your behalf.
Obtaining a JWT
Please note that JWT is required for most actions.You won't be able to create, list or freeze bundles, as well as request translation bundles with a regular API token. Also please make sure to keep your JWT safe. Generated JWT expires in 30 minutes.
Next, you'll need to obtain a JWT: we are going to use this token for operations for security purposes. To achieve that, you'll need to make an HTTP POST request to the https://api.lokalise.com/api2/projects/{project_id}/tokens endpoint. Let's use our API playground (Create a service JWT token endpoint):
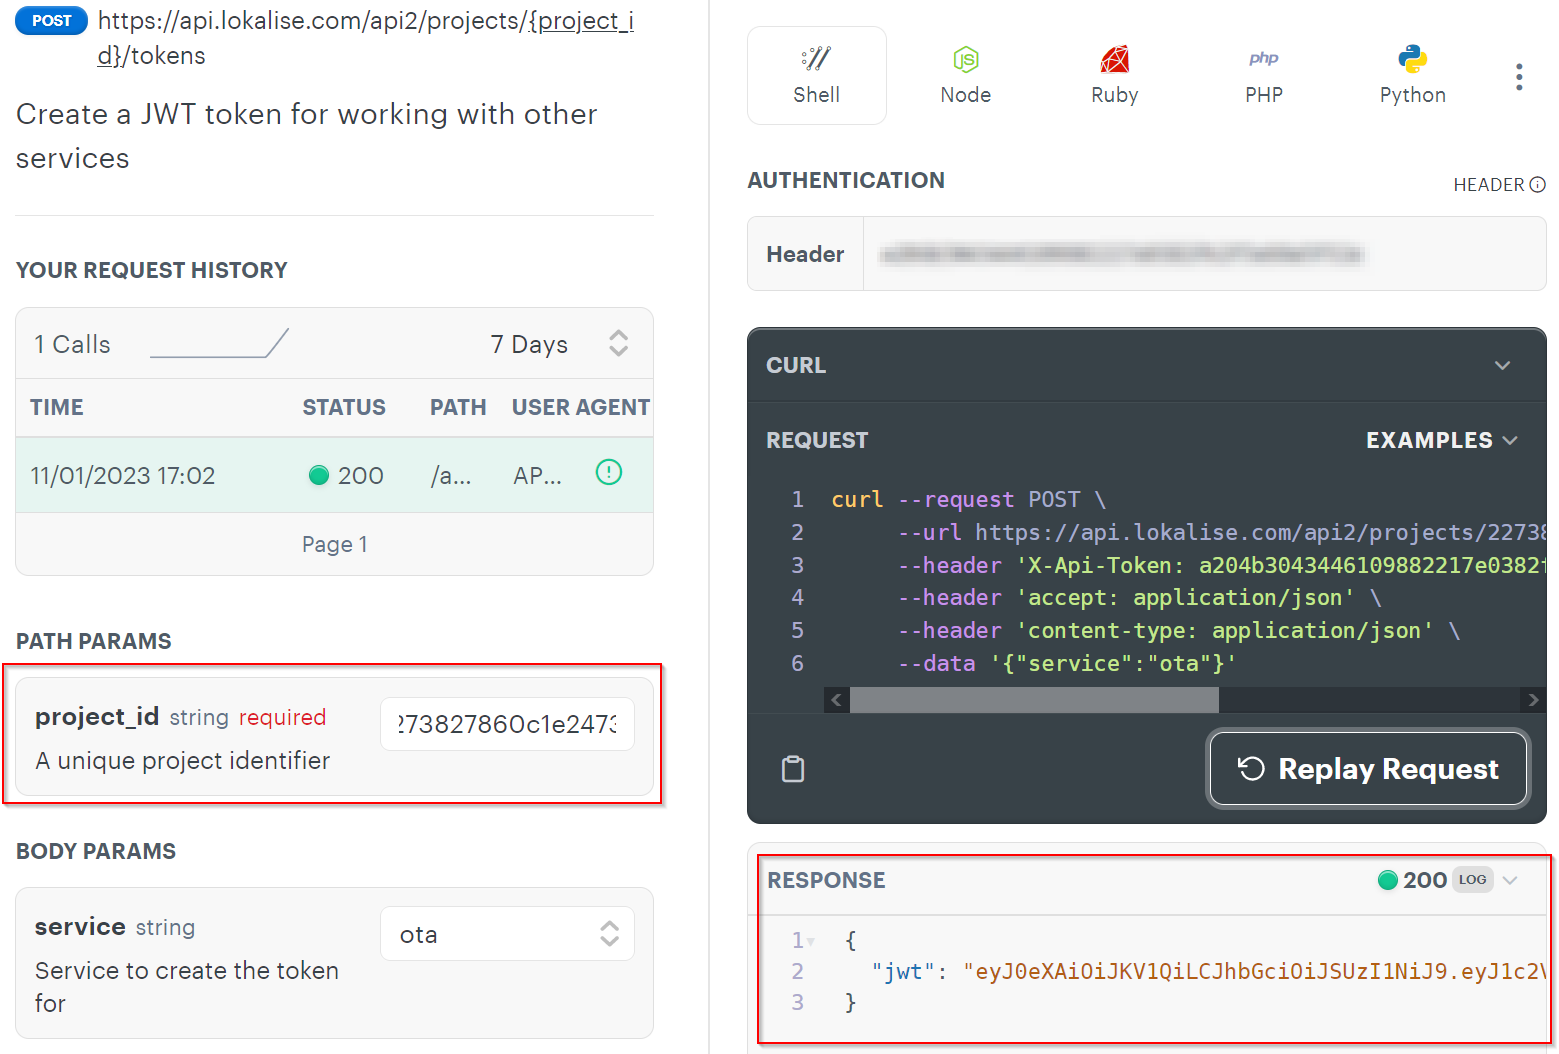
You'll have to provide the following data:
- Authentication header — the API key obtained on the previous step.
- Project ID — identifier of a Lokalise project that you want to work with. This ID can be found in the project settings.
- Service — set to
ota.
Once you are ready, click Try it. You'll get a response with the JWT as shown in the image above. Copy JWT from the Response field.
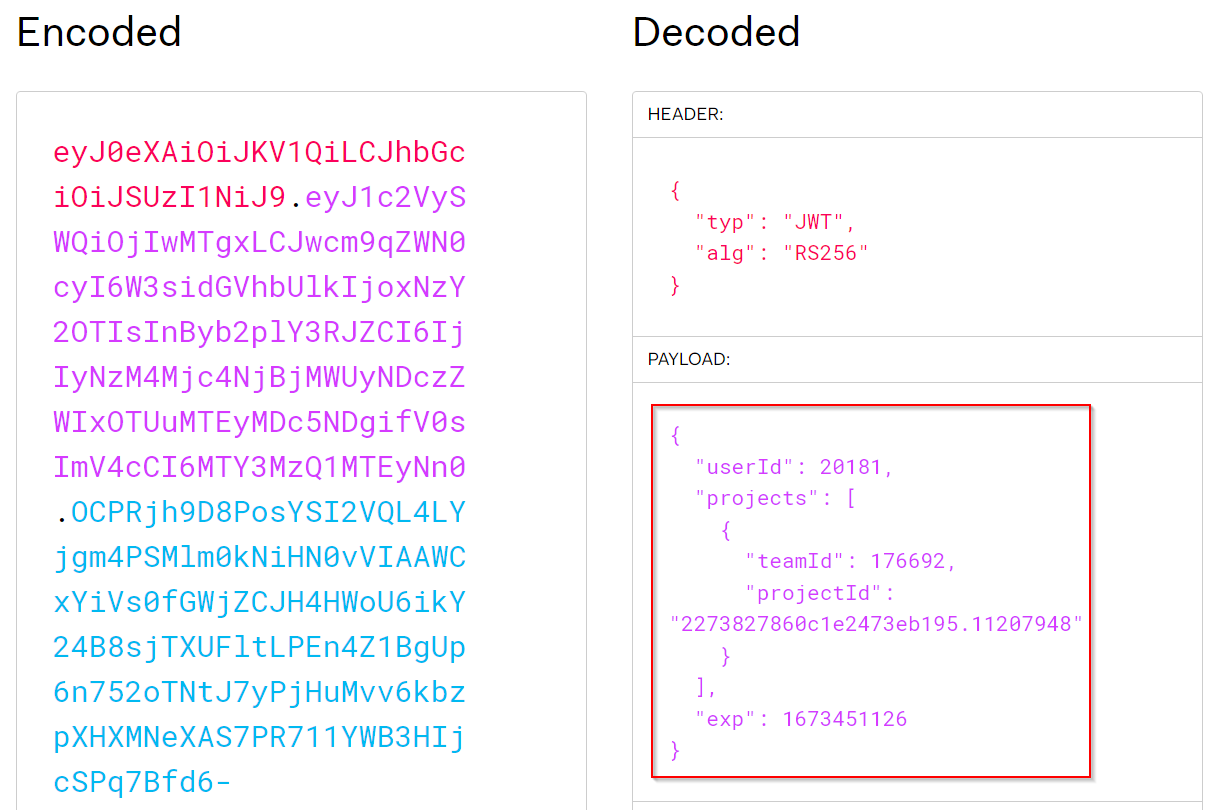
Next, proceed to jwt.io and paste your JWT into the Encoded field. To the right you will see the project you have access to and the corresponding team ID. Take a note of the team ID as we will require this information in the next sections:
Listing bundles
At least one bundle should be created at this point.To create an SDK bundle, the current way of doing this is to download a file from Lokalise via API using the
flutter_sdkfile format. Please bear in mind that your project must have at least one translation key assigned to theotherplatform before creating a bundle.
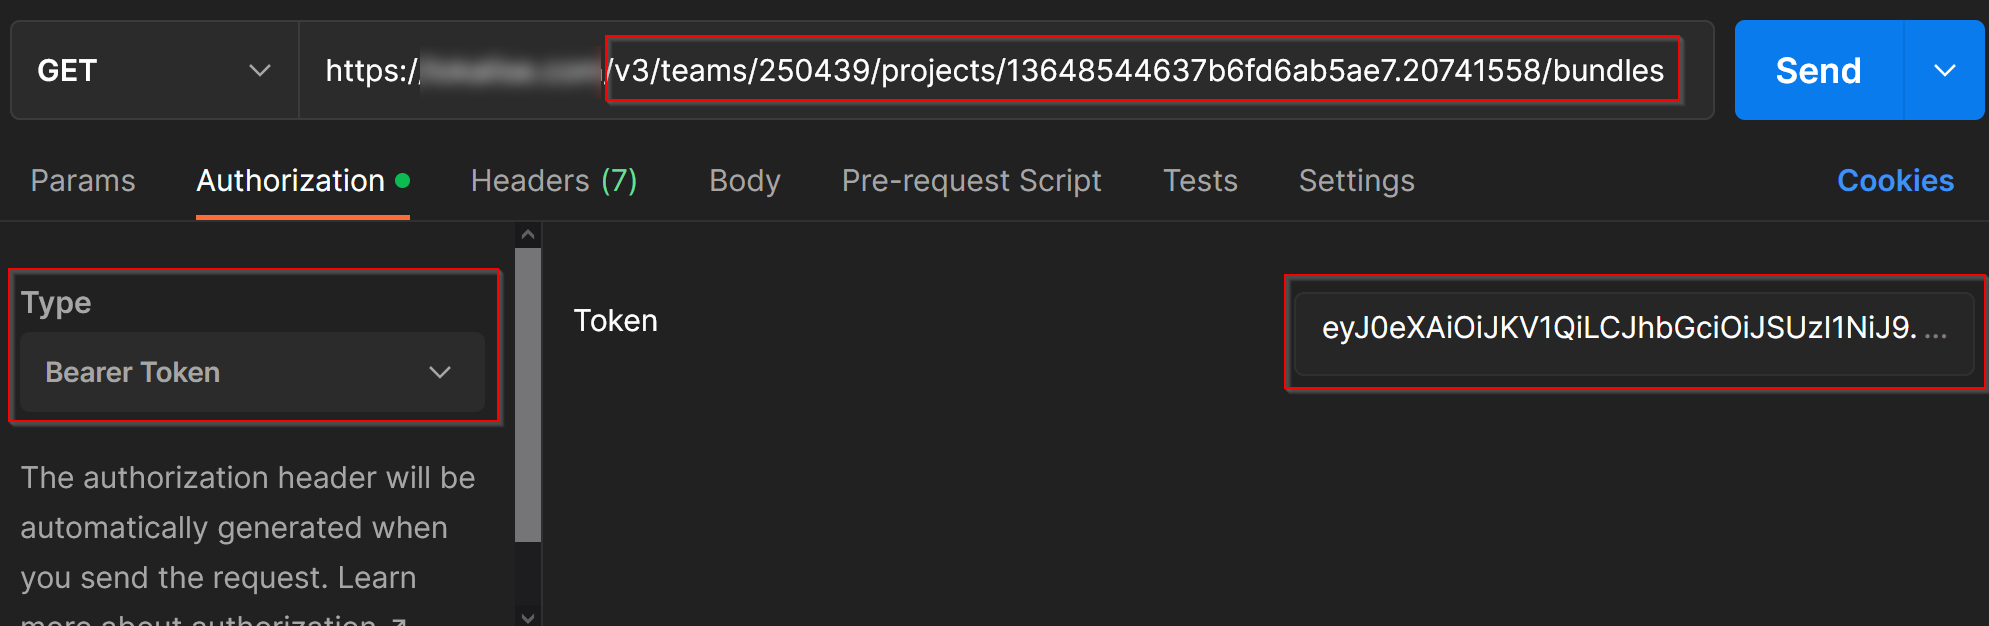
Next, you can list your OTA bundles by sending an HTTP GET request to https://ota.lokalise.com/v3/teams/{teamId}/projects/{lokaliseProjectId}/bundles. Make sure to replace the {{teamId}} and the {{projectId}} with the values obtained on the previous step.
Also you'll need to pass your JWT as the Authorization Bearer token:
After sending the request, you'll get the following response:
{
    "data": [
        {
            "id": 51,
            "projectId": "13648544637b6fd6ab5ae7.20741558",
            "isPrerelease": false,
            "isProduction": true,
            "createdAt": "2022-11-21T13:46:48.768Z",
            "createdBy": "114645",
            "framework": "ios_sdk",
            "description": null,
            "isFrozen": false,
            "lokaliseId": null,
            "fileId": "7bc6e610-ba89-4712-98d9-60fbd4539ee1",
            "modifiedAt": "2022-11-21T13:46:48.899Z"
        },
        {
            "id": 52,
            "projectId": "13648544637b6fd6ab5ae7.20741558",
            "isPrerelease": false,
            "isProduction": false,
            "createdAt": "2022-11-21T13:46:58.292Z",
            "createdBy": "114645",
            "framework": "ios_sdk",
            "description": null,
            "isFrozen": false,
            "lokaliseId": null,
            "fileId": "19663483-8095-4b0c-92d4-22628f5bcb46",
            "modifiedAt": "2022-11-21T13:54:49.675Z"
        },
    ]
}
Please note that every project can have at most 1 prerelease and 1 production bundle.
Take a look at the first bundle (with the id of 51). In this case the isPrerelease is set to false whereas isProduction is set to true which means that's a production bundle. The second bundle has both attributes set to false.
What is the difference between prerelease and production bundles?
- The production translation bundle will be served to mobile users by default: in other words, that the bundle aimed for stable app versions.
- The prerelease bundle will be served to your users only if the mobile SDK specifically requests a prerelease version. It's usually utilized for testing purposes.
Staging a bundle (optional)
Next, let's try to stage a bundle which will result in toggling the isPrerelease attribute to true. This is an optional step and you can safely skip it if you don't want to work with prerelease versions.
Currently I have the following bundle with the id of 52:
{
"id": 52,
"projectId": "13648544637b6fd6ab5ae7.20741558",
"isPrerelease": false,
"isProduction": false,
"createdAt": "2022-11-21T13:46:58.292Z",
"createdBy": "114645",
"framework": "ios_sdk",
"description": null,
"isFrozen": false,
"lokaliseId": null,
"fileId": "19663483-8095-4b0c-92d4-22628f5bcb46",
"modifiedAt": "2022-11-21T13:54:49.675Z"
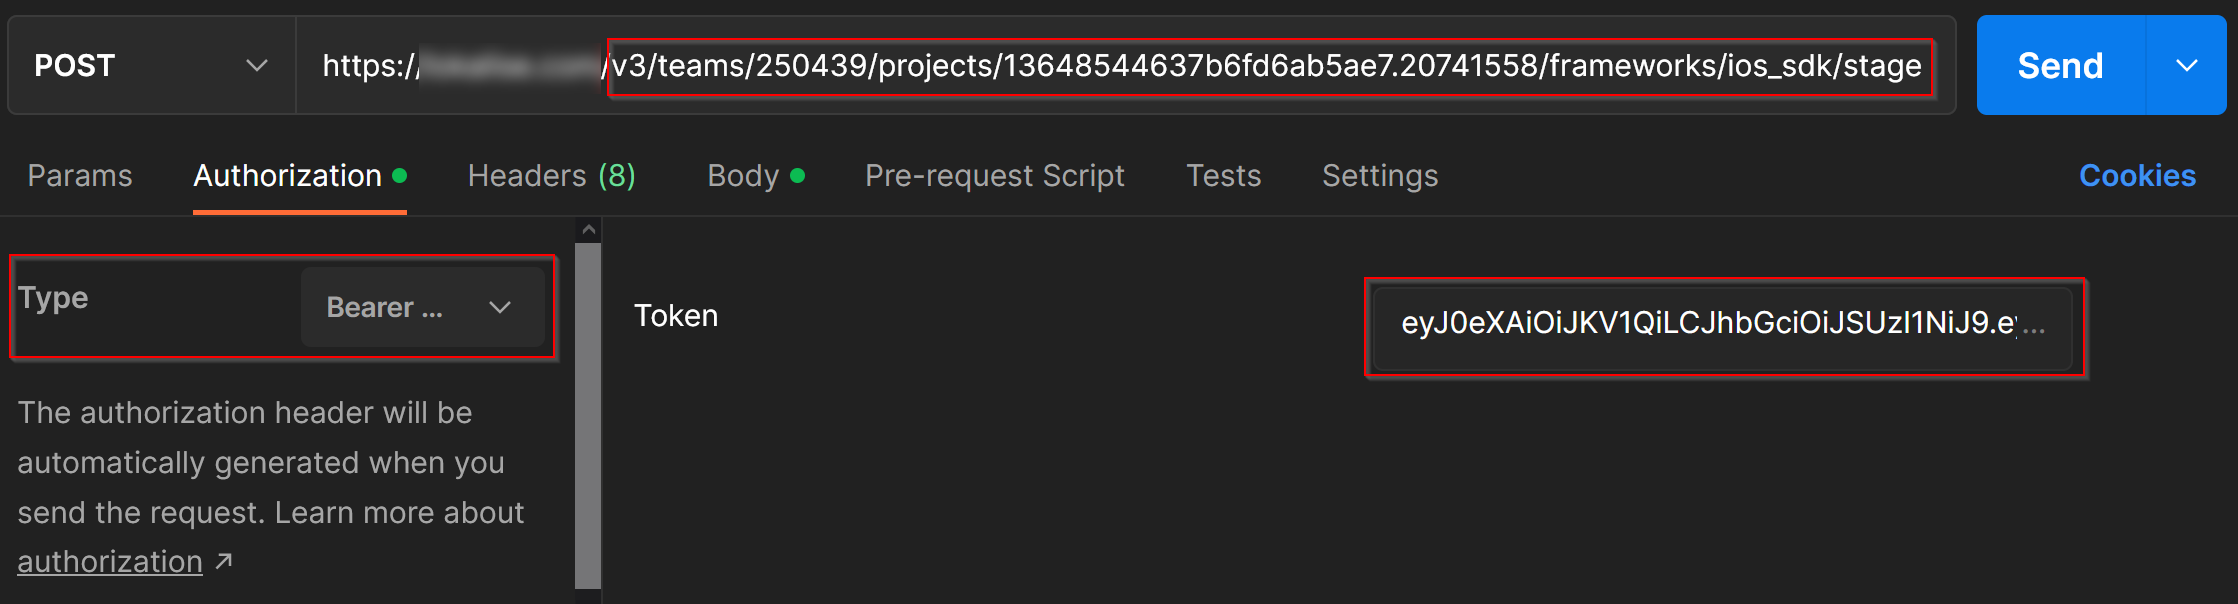
}To stage it, we'll have to send an HTTP POST request to https://ota.lokalise.com/v3/teams/{teamId}/projects/{lokaliseProjectId}/frameworks/{framework}/stage. Once again make sure to replace teamId and projectId with values obtained previously. As for the {{sdk}}, it should have the same value as the framework attribute of your bundle. In our case its value is ios_sdk.
Make sure to provide your JWT and set it as Authorization Bearer token:
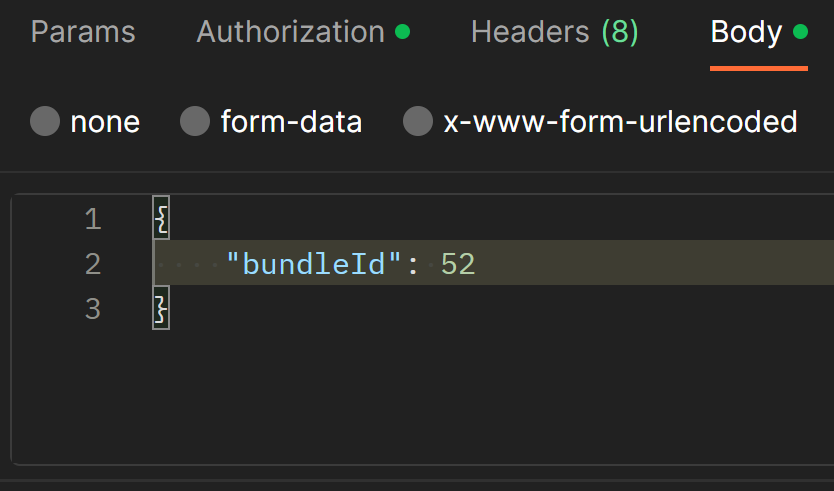
Finally, the request body should contain your bundle ID provided as bundleId:
After the request is sent, you'll get a HTTP 204 (no content) response which means that everything worked as expected.
Now you can request the bundle list again:
{
    "data": [
        {
            "id": 51,
            "projectId": "13648544637b6fd6ab5ae7.20741558",
            "isPrerelease": false,
            "isProduction": true,
            "createdAt": "2022-11-21T13:46:48.768Z",
            "createdBy": "114645",
            "framework": "ios_sdk",
            "description": null,
            "isFrozen": false,
            "lokaliseId": null,
            "fileId": "7bc6e610-ba89-4712-98d9-60fbd4539ee1",
            "modifiedAt": "2022-11-21T13:46:48.899Z"
        },
        {
            "id": 52,
            "projectId": "13648544637b6fd6ab5ae7.20741558",
            "isPrerelease": true,
            "isProduction": false,
            "createdAt": "2022-11-21T13:46:58.292Z",
            "createdBy": "114645",
            "framework": "ios_sdk",
            "description": null,
            "isFrozen": false,
            "lokaliseId": null,
            "fileId": "19663483-8095-4b0c-92d4-22628f5bcb46",
            "modifiedAt": "2022-11-21T14:03:14.714Z"
        }
    ]
}
Please note that the isPrerelease attribute is now set to true for the second bundle (with the ID 52). Great!
Publishing a bundle
Now that the bundle is staged, we can publish it and thus setting the isProduction attribute to true.
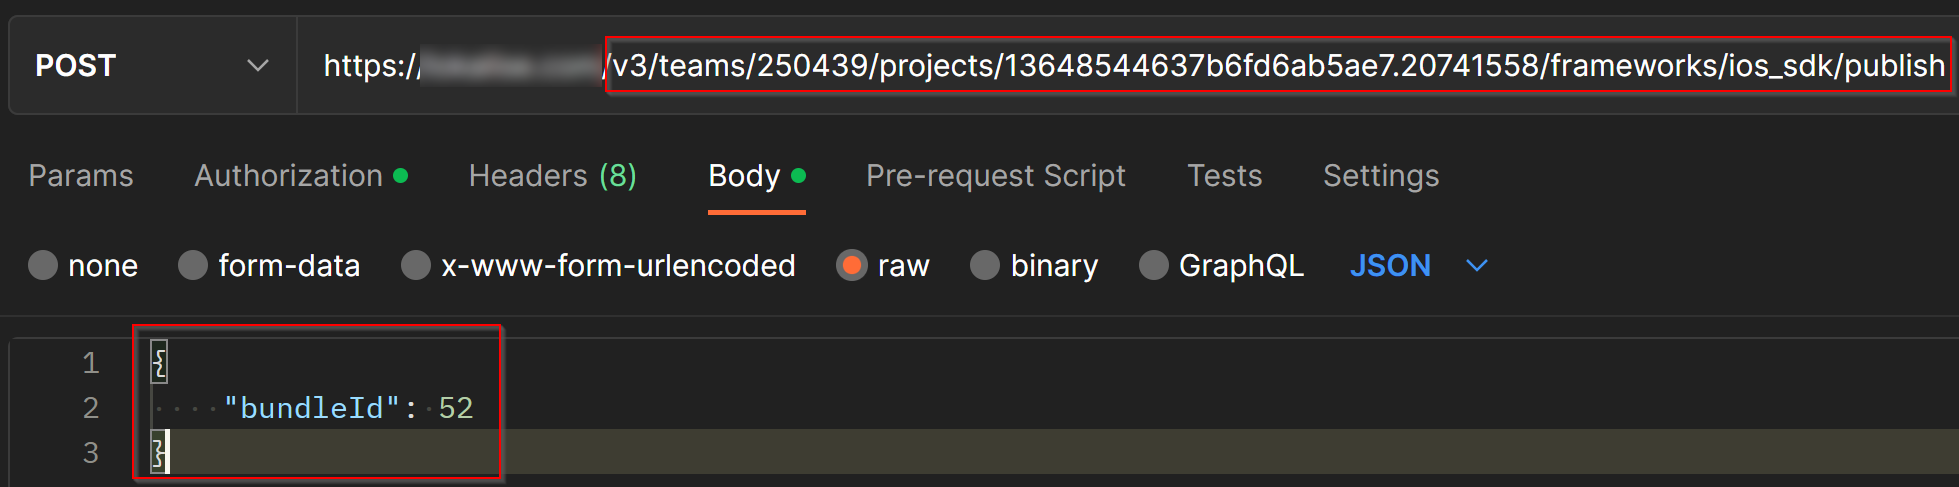
To achieve that, you'll have to set an HTTP POST request to https://ota.lokalise.com/v3/teams/{teamId}/projects/{lokaliseProjectId}/frameworks/{framework}/publish. As before, provide the following data:
{{teamId}}and{{projectId}}that were obtained previously.{{sdk}}should have the same value as theframeworkattribute of your bundle.- Provide your JWT and set it as Authorization Bearer token.
- Provide
bundleIdin the request body.
After the request is sent, you'll get a HTTP 204 (no content) response which means that everything worked as expected.
Now you can request the bundle list again:
{
    "data": [
        {
            "id": 51,
            "projectId": "13648544637b6fd6ab5ae7.20741558",
            "isPrerelease": false,
            "isProduction": false,
            "createdAt": "2022-11-21T13:46:48.768Z",
            "createdBy": "114645",
            "framework": "ios_sdk",
            "description": null,
            "isFrozen": false,
            "lokaliseId": null,
            "fileId": "7bc6e610-ba89-4712-98d9-60fbd4539ee1",
            "modifiedAt": "2022-11-21T14:12:27.105Z"
        },
        {
            "id": 52,
            "projectId": "13648544637b6fd6ab5ae7.20741558",
            "isPrerelease": true,
            "isProduction": true,
            "createdAt": "2022-11-21T13:46:58.292Z",
            "createdBy": "114645",
            "framework": "ios_sdk",
            "description": null,
            "isFrozen": false,
            "lokaliseId": null,
            "fileId": "19663483-8095-4b0c-92d4-22628f5bcb46",
            "modifiedAt": "2022-11-21T14:12:27.108Z"
        }
    ]
}
Note that second bundle (ID 52) now has the isProduction attribute set to true whereas the first one (ID 51) has the same attribute set to false. That's because we cannot have two production bundles for a single project.
Creating a bundle freeze
Now let's see how to create a bundle freeze which is basically a version range that the bundle should be provided for. For instance, you could say that the bundle ID 52 should be provided only for customers who are currently using your app versions 2.0 — 3.0. Customers who are staying on version 1.0, in turn, should obtain an older bundle ID 51.
To create a bundle freeze, you should send an HTTP POST request to https://ota.lokalise.com/v3/teams/{teamId}/projects/{lokaliseProjectId}/bundle-freezes. Provide the following data:
{{teamId}}and{{projectId}}that were obtained previously.- Provide your JWT and set it as Authorization Bearer token.
- Provide
bundleIdin the request body. - Also, the request body should contain
fromandtoattribute that specify the version range (for example,2.1.5or3.1).
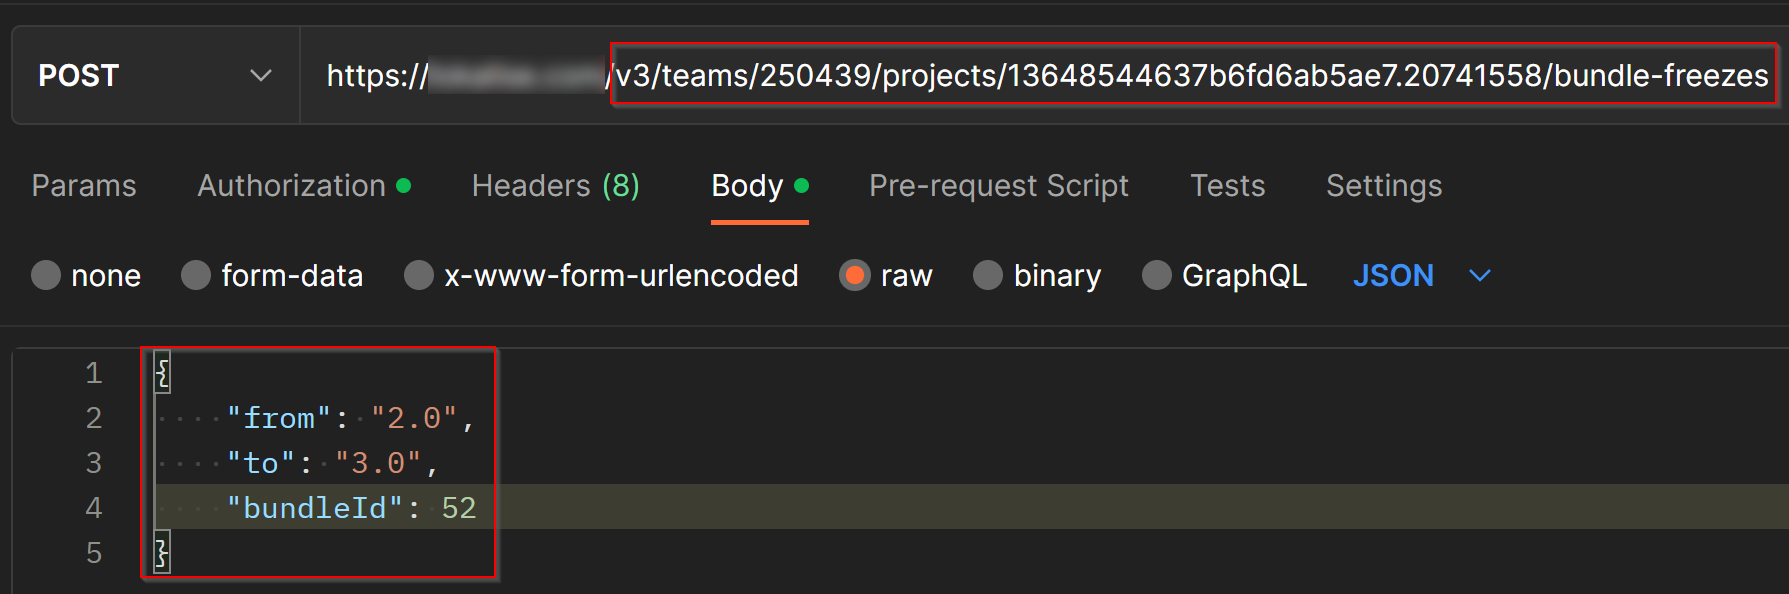
So, in this example the bundle ID 52 should be served to all customers who are using version from 2.0 to 3.0.
After the request is sent, you'll get the following response:
{
    "data": {
        "id": 21,
        "projectId": 23,
        "bundleId": 52,
        "from": "2.0",
        "to": "3.0"
    }
}
Listing bundle freezes (optional)
Now that the bundle freeze is created, you can view the list of all your freezes for the given project. This is an optional step.
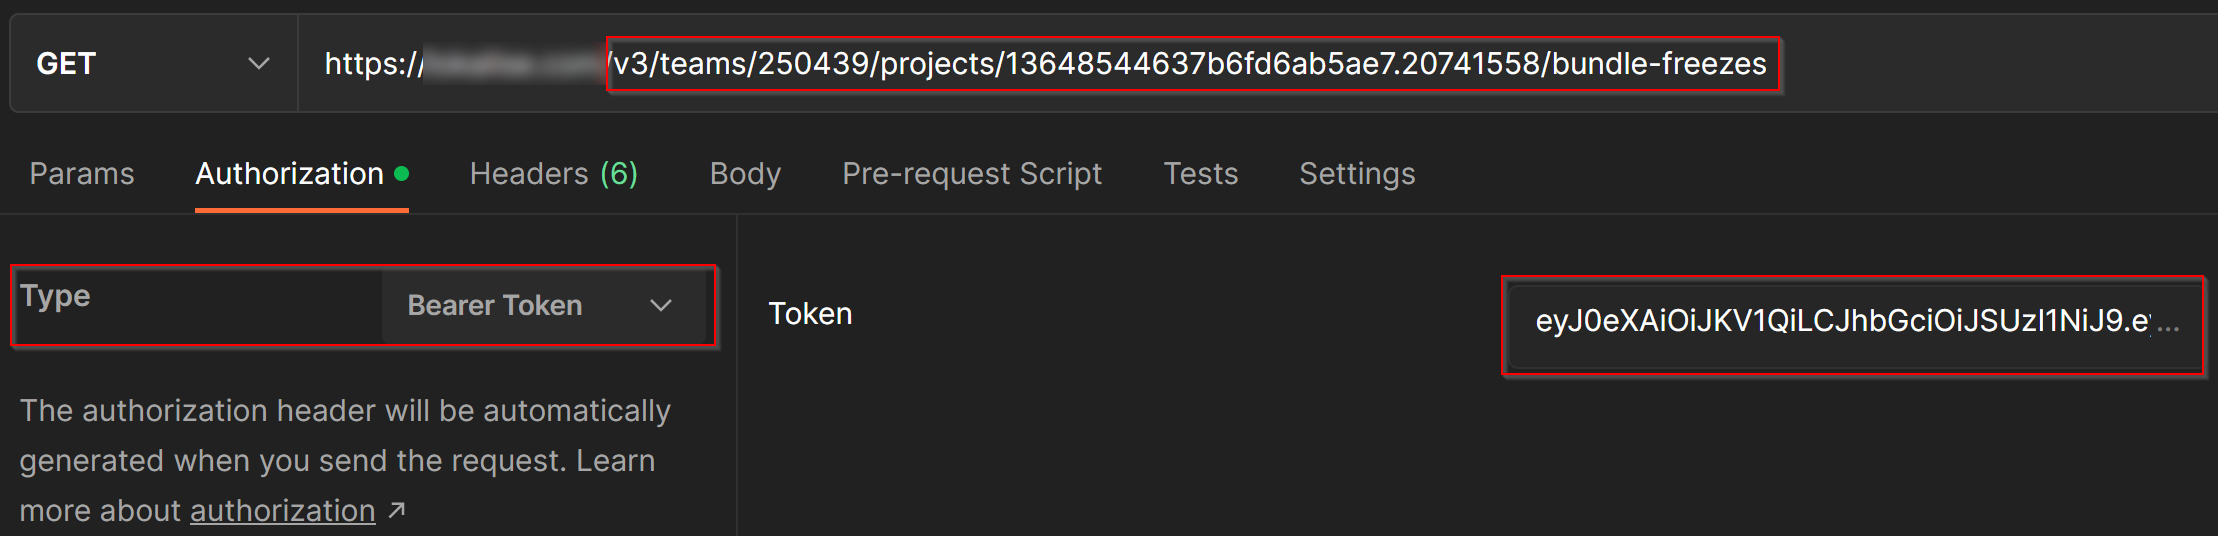
To achieve that, send a HTTP GET request to https://ota.lokalise.com/v3/teams/{teamId}/projects/{lokaliseProjectId}/bundle-freezes. Provide the following data:
{{teamId}}and{{projectId}}that were obtained previously.- Provide your JWT and set it as Authorization Bearer token.
After the request is sent, you'll be provided with the following response:
{
    "data": [
        {
            "id": 21,
            "projectId": 23,
            "bundleId": 52,
            "framework": "ios_sdk",
            "from": "2.0",
            "to": "3.0"
        }
    ]
}
Nice! The next step is fetching the bundle but before that we'll need to generate a special SDK token.
Generating an SDK token
As the name implies, the SDK token will be used by your mobile software development kit in order to request OTA bundles.
To generate a new SDK token, you'll have to send an HTTP POST request to https://ota.lokalise.com/v3/teams/{teamId}/projects/{lokaliseProjectId}/tokens. Provide the following data:
{{teamId}}and{{projectId}}that were obtained previously.- Provide your JWT and set it as Authorization Bearer token.

Once the request is sent, you'll get the following response:
{
    "data": {
        "id": 25,
        "token": "123abc456xyz",
        "projectId": 23,
        "lokaliseId": null,
        "createdAt": "2022-11-21T14:30:21.162Z"
    }
}
Take a note of that token attribute as we will need it on the next step.
Fetching an OTA bundle
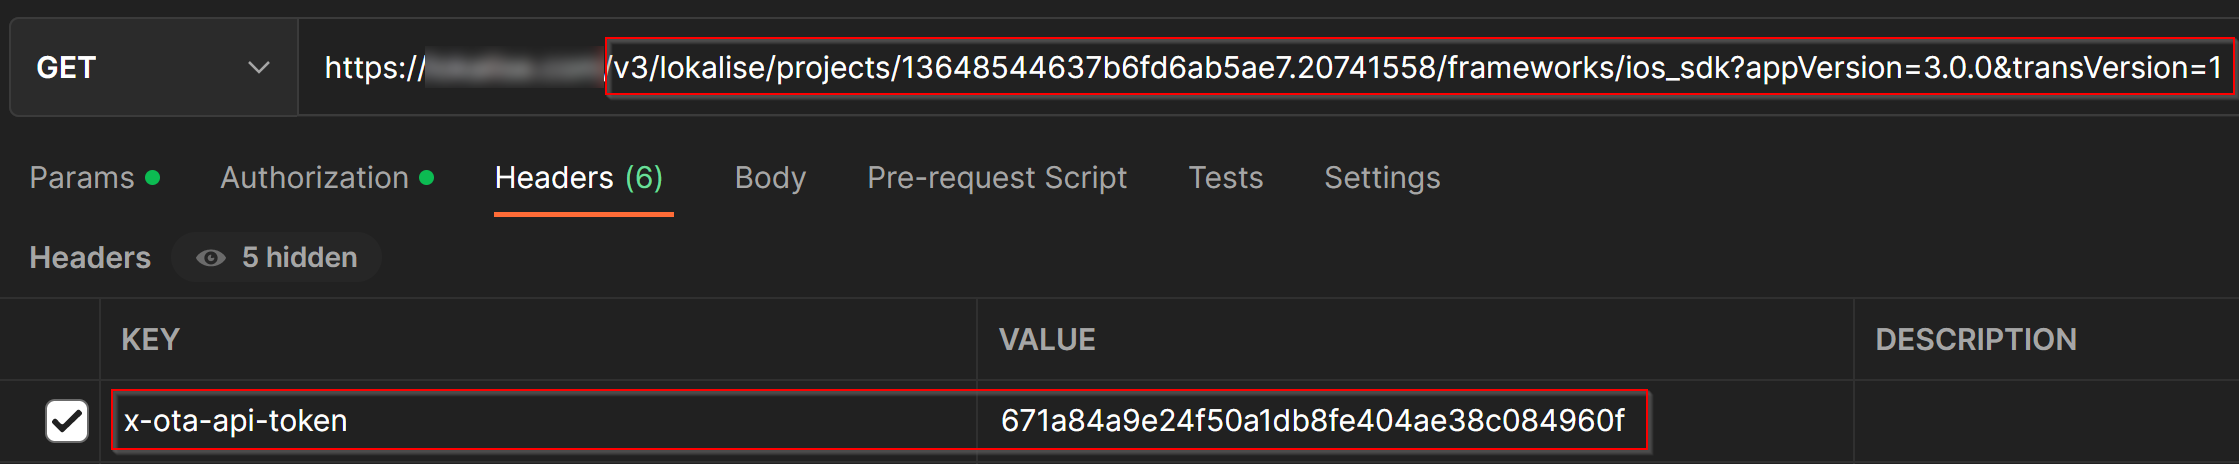
When your users load the app, refresh it from the background, or request to change the language, your application should "ask" the OTA service for the most up-to-date translation bundle. For that, you can fetch a bundle by sending an HTTP GET request to https://ota.lokalise.com/v3/lokalise/projects/{lokaliseProjectId}/frameworks/{framework}.
You will need the following data for the URL, the HTTP header and the GET parameters:
{lokaliseProjectId}: Indicates the Lokalise project that contains the translations for your application.{framework}: Indicates the format and structure of the translation files that you need for your application. It is the value of the bundle'sframeworkattribute (e.g.,ios_sdk, read more in the corresponding section about formats).x-ota-api-tokenheader: An OTA SDK token for your Lokalise project, which you can generate either through the UI or the OTA API. Every request to the OTA service must include the token in the header.appVersion: The application version that you're requesting translations for. The value must be a valid SemVer string, for example,3.0.0or2.1.5. It identifies the specific version of the application the user has installed; this is important so that different translations can be served correctly to users with different versions of your applications. It might correspond to an application version that is linked to a bundle freeze.transVersion: You can use this parameter to identify the translation version that your application is currently running (that is, the latest bundle that was fetched). You get this value when you download a translation bundle, therefore it's useful for the OTA service to check whether the user already has the most up to date translations or a newer version is required, and it can spare additional downloads of the same translations.- If your application is already providing the translation version that matches the latest translation bundle, you will get a
204 - No contentresponse instead of the bundle URL. - The
transVersionparameter is required. If it's the first time you fetch a translation bundle, or you don't know the latest value, please use0.
- If your application is already providing the translation version that matches the latest translation bundle, you will get a
prerelease(optional, default isfalse) — Set totrueif you want to request the prerelease bundle (for example, while testing).
After sending the request, you'll get a response similar to the following one:
{
    "data": {
        "url": "https://example.com/250439/13648544637b6fd6ab5ae7.20741558/bundles/ef5c0cf9-def7-44d8-af9b-644802a744d8?Expires=1669127945&Key-Pair-Id=K1817JSWQQ9F4E&Signature=eUVsRg-TsoM3ZL1Gy1F~RDrFeAHI3bU0V5uQ0SImzD9a5-Azg1chV1AmU6n5Y5gGPDlycECeLy6wmrWZiWY3Y191qtyuUz5Y1r-IX1CG7mBOZaRvLc93tZkPHPtrR-7dTEGS4tkzkuKvu9CTtiymhQcKb68f7yVDrsdhN7bZM2xv7ndeGbT2pNjPdb3sLiJLRyNN103x5Y06gdKngyOZMvPSsL99GYBS2nl1Z0NttqYVZXxBVFNbBCa6ejQ40o-36rFaOVXDv1OfnGhenhJt7PVqHXm8qh8S3fDvptpt2hndwK-b8qtTolMmNYkiMuuQTWd2ylMsGT2GQSPU161Okw__",
        "version": 52
    }
}
In this example, the returned version attribute is 52 — that's the ID of the bundle that we've previously published and created a bundle freeze for. As long as the bundle freeze contained versions from 2.0 to 3.0, and we've set the appVersion to 3.0.0, bundle ID 52 will be returned.
Format for a custom SDK
What if you would like to build a flow with custom SDK (for example, you'd like to create an SDK for React Native)? In this case you'll need to choose one of the available output formats that works for you. This format should be provided upon fetching an OTA bundle inside the sdk attribute.
ios_sdk— creates a bundle which contains.stringfiles compressed in a.zipfile.android_sdk— creates a bundle with.jsonAndroid file format.flutter_sdk— create a bundle in a.zipfile with language files in a.jsonstandard format.
So, for example, if you SDK expects JSON files, you could either use the flutter_sdk or the android_sdk format.
More Info
Visit the guides for iOS, Android, and Flutter, for specific and more detailed guides which may inspire you on your journey to building your own SDK.
The API documentation is available for every one of the endpoint, and includes a detailed description of every parameters, as well as example requests and responses.
If you still have any questions, get in touch with our support team (using the button on the bottom right corner), who'll be happy to answer and provide more guidance.