Android SDK v2
Over-the-air localization SDK for Android devices. No more unnecessary app updates.
A new way to measure and manage updates over the air (OTA)
We have improved how OTA usage is measured. We measure usage from gigabytes per month (GB/month) instead of monthly active users (MAU). In other words, based on how much data you use, not on how many active users your app has. So you’re free to add as many app users as you like. The three factors that impact data usage are users, bundle size, and number of bundle releases.
Introduction
OTA best practices
Make sure to check out our blog post covering some over-the-air best practices and recommendations to optimize and reduce the bundle size.
Android SDK 2.0 is a full re-write of the original SDK in Kotlin . The idea behind this re-write is to focus on performance, reliability and extensibility. Also, internally the SDK now uses the ViewPump library which allows you to use your own layout interceptors with our SDK. For simplicity, all examples in this documentation will be in Java . Also, if you like the new version of the SDK, any positive feedback is also welcome.
You can also check this blog post to get started with Android I18n and OTA.
Limitations and special notes
- Texts in custom views need to be updated programmatically (
LokaliseResourcesclass can be used to get the latest strings). - Jetpack Compose is not fully tested.
- KMM projects are not supported.
- Night Mode may not work properly in some cases.
- Using Unicode characters written as
\u123is not recommended as during the export the backslash symbol might be escaped (\\u). Instead, we recommend copy-pasting Unicode characters directly into the editor rather than writing them with the\uprefix. - Placeholders with HTML formatting translation values (i.e.
<b>%s</b>) are not automatically wrapped in CDATA. Please force key CDATA instead (read more) - Delivering an Android app to Google Play Store as an AAB bundle might result in removing all languages but the end user’s device language upon app’s download. As the result, most local
strings.xmllanguage files will be missing from the downloaded app (while everything will still work fine for the end user). This happens due to Play Store's app bundle splitting feature that delivers only the necessary resources on app's download. You can avoid this behavior by adding the following config to yourbuild.gradlefile:
android {
  ...
  ...
  bundle {
    language {
        enableSplit = false
    }
  }
}
Refer to the changelog for updates.
Retry mechanism
If the Android SDK was unable to download the OTA bundle, it will perform up to 4 retries with increased timeouts. Please note that this behavior might be revised in the future.
Getting started
Step 1: Set up your project in Lokalise
If you have not yet done so, add a new project in Lokalise, upload any source language files you may have (or just add keys directly in Lokalise's editor if you are building a new app). Take note of the project ID, which can be found in project settings and usually looks like this: 3281927757690217f560f6.71199070.
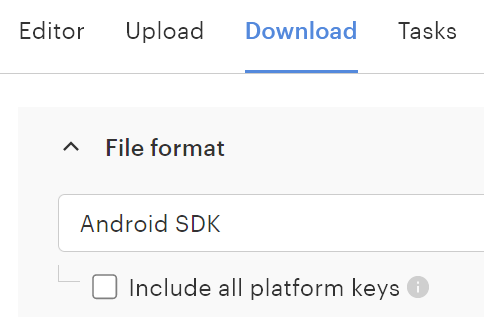
Step 2: Generate the bundle
Go to the Downloads page in Lokalise, select Lokalise Android SDK as the format and click the Build only button to generate the bundle. You will be automatically taken to the bundle versions management page in project settings. Leave the switches as they are for now. See details the in Managing bundles section.
Make sure to always include the latest strings in your project when releasing the app.
Step 3: Include Lokalise SDK in your project
First you need to add https://maven.lokalise.com to your top level .gradle file:
allprojects {
    repositories {
        ...
        maven {
            url "https://maven.lokalise.com"
        }
    }
}
After that, add the SDK to your application module level .gradle file (note that it is now sdk instead of ota-sdk)
dependencies {
    ...
    implementation('com.lokalise.android:sdk:2.1.1') {
        transitive = true
    }
}
Or if you want a lighter version of the SDK (that uses SQLite instead of Realm.io) you can use the new lite version:
implementation('com.lokalise.android:sdk:2.1.1-lite') {
    transitive = true
}
If you are using ProGuard, add the following rules (please note, that it is now com.):
-keep class com.lokalise.** { *; }
-dontwarn com.lokalise.*
-keep @interface io.realm.annotations.RealmModule { *; }
-keep class io.realm.annotations.RealmModule { *; }
Depending on your ProGuard settings you may also need to include the rules for the Gson library.
Also, if you are using DexGuard, you will need to specify these additional rules:
-keepresources string/**
-keepresources string-array/**
-keepresources plurals/**
Step 4: Initialise the SDK
For this step you will need your SDK token (generate a token in project settings > General tab) and the Project ID of the desired project (obtained in the project settings). In your main Application class include the following code:
public class MyApplication extends Application {
    ...
    @Override
    public void onCreate() {
        super.onCreate();
        // It is important init right after the "super.onCreate()"
        Lokalise.init(this, "<sdk token>", "<project id>">, translationsFallbackStrategy, postInterceptors, preInterceptors);

        // Add this only if you want to use pre-release bundles
        Lokalise.setPreRelease(true);

        // Fetch the latest translations from Lokalise (can be called anywhere)
        Lokalise.updateTranslations();
    }
    ...
}
We will need to inject the Lokalise SDK into the Activity context as well and translate the menu items using a method from LokaliseResources. To do so, we recommend you create a base Activity class and extend all your activities from it. Add the following code into your activity:
public class MainActivity extends AppCompatActivity {
    ...
    private Toolbar toolbar;

    @Override
    protected void onCreate(Bundle savedInstanceState) {
        toolbar = findViewById(R.id.toolbar);
    }

    @Override
    protected void attachBaseContext(Context newBase) {
        // Inject the Lokalise SDK into the activity context
        super.attachBaseContext(LokaliseContextWrapper.wrap(newBase));
    }

    @Override
    public boolean onCreateOptionsMenu(Menu menu) {
        getMenuInflater().inflate(R.menu.main, menu);
        ((LokaliseResources) getResources()).translateToolbarItems(toolbar);
        return true;
    }
    ...
}
That's it! You are ready to go!
Usage
Updating translations
There is no need to update your code, refer to the keys as usual:
...
<TextView
    android:id="@+id/test"
    android:text="@string/hello_world"
    ... />
...
Or from code:
TextView test = (TextView) findViewById(R.id.test);
test.setText(R.string.hello_world);
Or if you need to get latest translations from parts of the application where Context is not overridden (e.g. inside custom views), you can use the LokaliseResources class directly:
LokaliseResources lokaliseResources = new LokaliseResources(context);
String myString = lokaliseResources.getString(R.string.hello_world);
Changing application locale
If you need to change the locale of your application manually, use the Lokalise.setLocale(\<Language ISO e.g. "en">, \<Country ISO e.g. "GB"> [, variant, activityContext]) method.
There is no need for custom locale changing code or context wrappers, simply call this method and restart the Activity. It is also recommended to pass the context of the current Activity if you want locale changes to propagate.
Please note, however, that Lokalise SDK is working only with locale information present in the Context and does not persist the set locale across Application restarts. This method simply a helper method that tries to set the locale of the Context which can be overwritten by other system components during the lifecycle of the application in which case you will need to call setLocale again.
Dynamically adding keys
Sometimes you need to add new strings without recompiling the application.
After adding a new key via the Lokalise interface and creating a new Android SDK bundle, you can refer to the new key by name using the following code:
LokaliseResources resources = new LokaliseResources(context);
String newKey = resources.getString("new_key_name");
if(newKey != null) {
    // do something with the new value
}
Please note that there is no guarantee that the key will exist when you request it, since you can pass any key name to the method, so make sure to check whether the returned value is null.
PreferenceFragmentCompat
Available from v2.1.1 and v2.1.1-lite. To use it follow the next steps:
- Add all your XML preferences resources in
Applicationclass. For example,Lokalise.preferenceXmlIds = listOf(R.xml.first, R.xml.second). It is a required step because Lokalise SDK is setting translations under the hood after inflation process. It means Lokalise SDK additionally controls XML inflation process and generates a map with keys and strings for each preference XML. - From the child of
PreferenceFragmentCompatyou should calltranslatePreferenceFragment(preferenceIdRes, preferenceRecyclerView)like this:
@Override
public void onCreatePreferences(Bundle savedInstanceState, String rootKey) {
    // Load the preferences from an XML resource
    setPreferencesFromResource(R.xml.preferences, rootKey);
    ((LokaliseResources)getResources()).translatePreferenceFragment(R.xml.preferences, getListView());

}
Callbacks
If you need to know when Lokalise is done downloading a new translation bundle, there are several options.
LokaliseCallback
The simplest way is to use the LokaliseCallback interface:
LokaliseCallback myCallback = new LokaliseCallback() {
    @Override
    public void onUpdated(long oldBundleId, long newBundleId) {

    }

    @Override
    public void onUpdateFailed(LokaliseUpdateError error) {

    }

    @Override
    public void onUpdateNoNeeded() {

    }
});

Lokalise.addCallback(myCallback);
If you need to remove a callback, simply use Lokalise.removeCallback(myCallback);.
Broadcast receiver
You can also receive notifications about bundle updates via Broadcast receiver:
...
IntentFilter myIntentFilter = new IntentFilter();
myIntentFilter.addAction(LokaliseDefines.INTENT_TRANSLATIONS_UPDATED);
myIntentFilter.addAction(LokaliseDefines.INTENT_TRANSLATION_UPDATE_FAILED);
myIntentFilter.addAction(LokaliseDefines.INTENT_TRANSLATION_UPDATE_NOT_NEEDED);

BroadcastReceiver myReceiver = new BroadcastReceiver() {
    @Override
    public void onReceive(Context context, Intent intent) {
        String action = intent.getAction();
        if(action.equals(LokaliseDefines.INTENT_TRANSLATIONS_UPDATED)) {
            long oldBundleId = intent.getLongExtra(LokaliseDefines.EXTRA_BUNDLE_VERSION_OLD, 0);
            long newBundleId = intent.getLongExtra(LokaliseDefines.EXTRA_BUNDLE_VERSION_NEW, 0);

            //Do something
        } else if(action.equals(LokaliseDefines.INTENT_TRANSLATION_UPDATE_FAILED)) {
            LokaliseUpdateError error = (LokaliseUpdateError) intent.getSerializableExtra(LokaliseDefines.EXTRA_UPDATE_ERROR);

            //Do something
        } else if(action.equals(LokaliseDefines.INTENT_TRANSLATION_UPDATE_NOT_NEEDED)) {
            //Do something
        }
    }
};

@Override
protected void onResume() {
    super.onResume();
    registerReceiver(myReceiver, myIntentFilter);
}

@Override
protected void onPause() {
    super.onPause();
    unregisterReceiver(myReceiver);
}
...
Compatibility with ViewPump
If you are using ViewPump in your project, you can pass a list of interceptors to the Lokalise.init() method.
List<Interceptor> postInterceptors = new ArrayList<>();
List<Interceptor> preInterceptors = new ArrayList<>();

Lokalise.init(this, "<sdk token>", "<project id>">, postInterceptors, preInterceptors);
Please note, that you need to use the LokaliseContextWrapper instead of the ViewPumpContextWrapper in order for everything to work.
Managing bundles
Publishing changes
Lokalise supports production and prerelease versions of the bundle and lets you keep different versions of each bundle.
When the bundle is generated, it will take you to the project settings / Lokalise Android SDK section. Turn on the relevant switch before the bundle to publish it to production or prerelease.
Hit Save changes to apply.
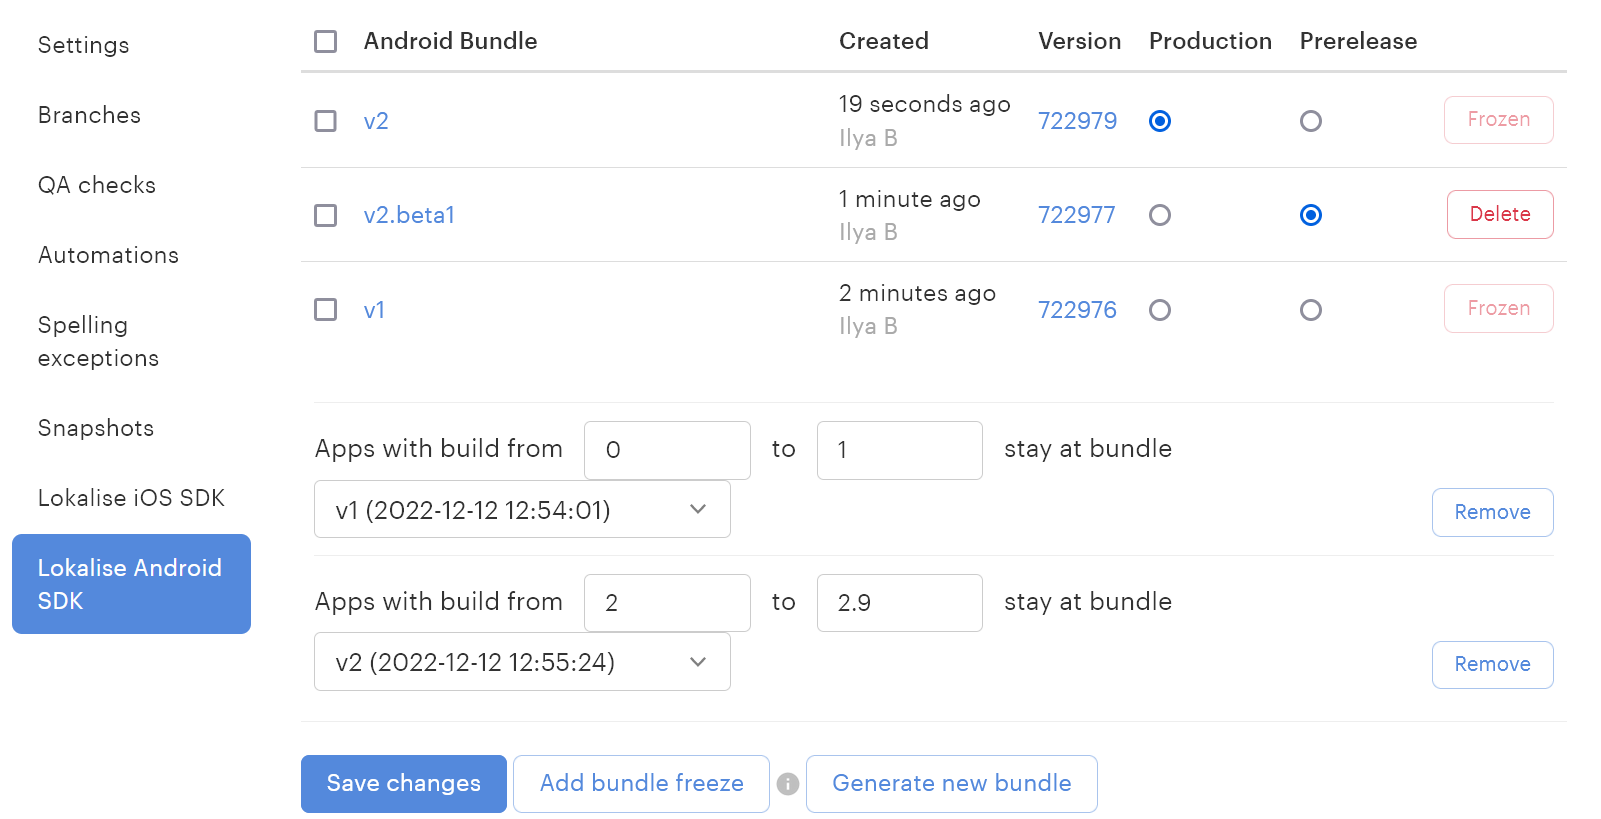
Bundle freeze
Lokalise offers the option to freeze a particular bundle on a particular app version. As you can see in the screenshot below the "Test_01" bundle is assigned to the apps with a build from 0 to 6 and the newest bundle is assigned to the apps with a build from 7 to 12. This feature is supported in the Lokalise Android SDK 1.3 and up.
Mobile SDK insights
We provide comprehensive usage stats on the project's Statistics page. The reports include:
- Daily unique users (range)
- Daily requests (range)
- Monthly active users
User privacy
We do not track personal data of users of your application. SDK gathers a limited amount of information about your users to provide Mobile SDK Insights. This includes Device language and Application Language.
Updated 7 months ago